Basic Static Analysis
Learn basic malware analysis techniques without running the malware.
Introduction
In the previous rooms of this module, we learned about the basics of computer architecture and Assembly language. While those topics are essential building blocks to learning malware analysis, we will start analyzing malware starting from this room.
Pre-requisites

Before starting this room, it is recommended that you complete the following rooms.
x86 Assembly Crash Course (coming soon!)
x86 Architecture Overview (coming soon!)
Learning Objectives
The first step in analyzing malware is generally to look at its properties without running it. This type of analysis is called static analysis because the malware is static and is not running. We will cover basic static analysis in this room. In particular, we will cover the following topics.
Lab setup for malware analysis
Searching for strings in a malware
Fingerprinting malware through hashes
Signature-based detection mechanisms
Extracting useful information from the PE header
So without further ado, let's move on to the next task to learn about setting up a malware analysis lab.
Answer the questions below
Complete the pre-requisite rooms.
Completed
Lab Setup
Start Machine
Basic precautions for malware analysis:
Before analyzing malware, one must understand that malware is often destructive. This means that when malware is being analyzed, there is a high chance of damaging the environment in which it is being analyzed. This damage can be permanent, and it might take more effort to get rid of this damage than the effort made to analyze the malware. Therefore, creating a lab setup that can withstand the destructive nature of malware is necessary.
Virtual Machines:

A lab setup for malware analysis requires the ability to save the state of a machine (snapshot) and revert to that state whenever required. The machine is thus prepared with all the required tools installed, and its state is saved. After analyzing the malware in that machine, it is restored to its clean state with all the tools installed. This activity ensures that each malware is analyzed in an otherwise clean environment, and after analysis, the machine can be reverted without any sustained damage.
Virtual Machines provide an ideal medium for malware analysis. Some famous software used for creating and using Virtual Machines includes Oracle VirtualBox and VMWare Workstation. These applications can create snapshots and revert to them whenever required, making them well-suited for our malware analysis pursuit. In short, the following steps portray the usage of Virtual Machines for malware analysis.
Created a fresh Virtual Machine with a new OS install
Set up the machine by installing all the required analysis tools in it
Take a snapshot of the machine
Copy/Download malware samples inside the VM and analyze it
Revert the machine to the snapshot after the analysis completes
Following these steps ensures that your VM is not contaminated with remnants of previous malware samples when analyzing new malware. It also ensures that you don't have to install your tools again and again for each analysis. Selecting the tools to install in your malware analysis VM can also be hectic. One can use one of the freely available malware analysis VMs with pre-installed tools to ease this task. Let's review some common malware analysis VMs most popular among security researchers.
FLARE VM:

The FLARE VM is a Windows-based VM well-suited for malware analysis created by Mandiant (Previously FireEye). It contains some of the community's favorite malware analysis tools. Furthermore, it is also customizable, i.e., you can install any of your own tools to the VM. FLARE VM is compatible with Windows 7 and Windows 10. For a list of tools already installed in the VM and installation steps, you can visit the GitHub page or the Mandiant blog for the VM. Since it is a Windows-based VM, it can perform dynamic analysis of Windows-based malware.
An instance of FLARE VM is attached to this room for performing practical tasks. Please click the Start Machine button on the top-right corner of this task to start the machine before proceeding to the next task. The attached VM has a directory named mal on the Desktop, which contains malware samples that we would be analyzing for this room.
REMnux:

REMnux stands for Reverse Engineering Malware Linux. It is a Linux-based malware analysis distribution created by Lenny Zeltser in 2010. Later on, more people joined the team to improve upon the distribution. Like the FLARE VM, it includes some of the most popular reverse engineering and malware analysis tools pre-installed. It helps the analysts save time that would otherwise be spent in identifying, searching for, and installing the required tools. Details like installation and documentation can be found on GitHub or the website for distribution. Being a Linux-based distribution, it cannot be used to perform dynamic analysis of Windows-based malware. REMnux was previously used in the Intro to Malware Analysis room and will also be used in the upcoming rooms.
Please click the Start Machine button on the top-right corner of this task to start the machine before proceeding to the next task. The machine will start in a split-screen view. If the VM is not visible, use the blue Show Split View button at the top-right of the page. The attached VM has a directory named mal on the Desktop, which contains malware samples that we would be analyzing for this room. Alternatively, you might use the following information to log into the machine:
Machine IP: MACHINE_IP
Username: Administrator
Password: letmein123!
Answer the questions below
Start the attached VM before proceeding
Completed
String search
In the Intro to Malware Analysis room, we identified that searching for strings is one of the first steps in malware analysis. A string search provides useful information to a malware analyst by identifying important pieces of strings present in a suspected malware sample. To learn a little more about strings, we can look at this room dedicated to strings.
How a string search works:
A string search looks at the binary data in a malware sample regardless of its file type and identifies sequences of ASCII or Unicode characters followed by a null character. Wherever it finds such a sequence, it reports that as a string. This might raise the question that not all sequences of binary data that looks like ASCII or Unicode characters will be actual strings, which is right. Many sequences of bytes can fulfill the criteria mentioned above but are not strings of useful value; rather, they might include memory addresses, assembly instructions, etc. Therefore, a string search leads to many False Positives (FPs). These FPs show up as garbage in the output of our string search and should be ignored. It is up to the analyst to identify the useful strings and ignore the rest.

What to look for?
Since an analyst has to identify actual strings of interest and differentiate them from the garbage, it is good to know what to look for when performing a string search. Although a lot of useful information can be unearthed in a string search, the following artifacts can be used as Indicators of Compromise (IOCs) and prove more useful.
Windows Functions and APIs, like SetWindowsHook, CreateProcess, InternetOpen, etc. They provide information about the possible functionality of the malware
IP Addresses, URLs, or Domains can provide information about possible C2 communication. The Wannacry malware's killswitch domain was found using a string search
Miscellaneous strings such as Bitcoin addresses, text used for Message Boxes, etc. This information helps set the context for further malware analysis
Basic String Search:
In the Intro to Malware Analysis room, we learned about the strings utility, which is pre-installed in Linux machines and can be used for a basic string search. Similarly, the FLARE VM comes with a Windows utility, strings.exe, that performs the same task. This Windows strings utility is part of the Sysinternals suite, a set of tools published by Microsoft to analyze different aspects of a Windows machine. Details about the strings utility can be found in Microsoft Documentation. The strings utility comes pre-installed in the FLARE VM attached to this room. The good thing about the command line strings utility is that it can dump strings to a file for further analysis. In the attached VM, executing the following command will perform a basic string search in a binary.
C:\Users\Administrator\Desktop>strings <path to binary>
Several other tools included in the FLARE VM can be used for string search. For example, CyberChef (Desktop>FLARE>Utilities>Cyberchef) has a recipe for basic string search as well. PEstudio (Desktop>FLARE>Utilities>pestudio) also provides a string search utility. PEstudio also provides some additional information about the strings, like, the encoding, size of the string, offset in the binary where the string was found, and a hint to guess what the string is related to. It also has a column for a blacklist, which matches the strings against some signatures.
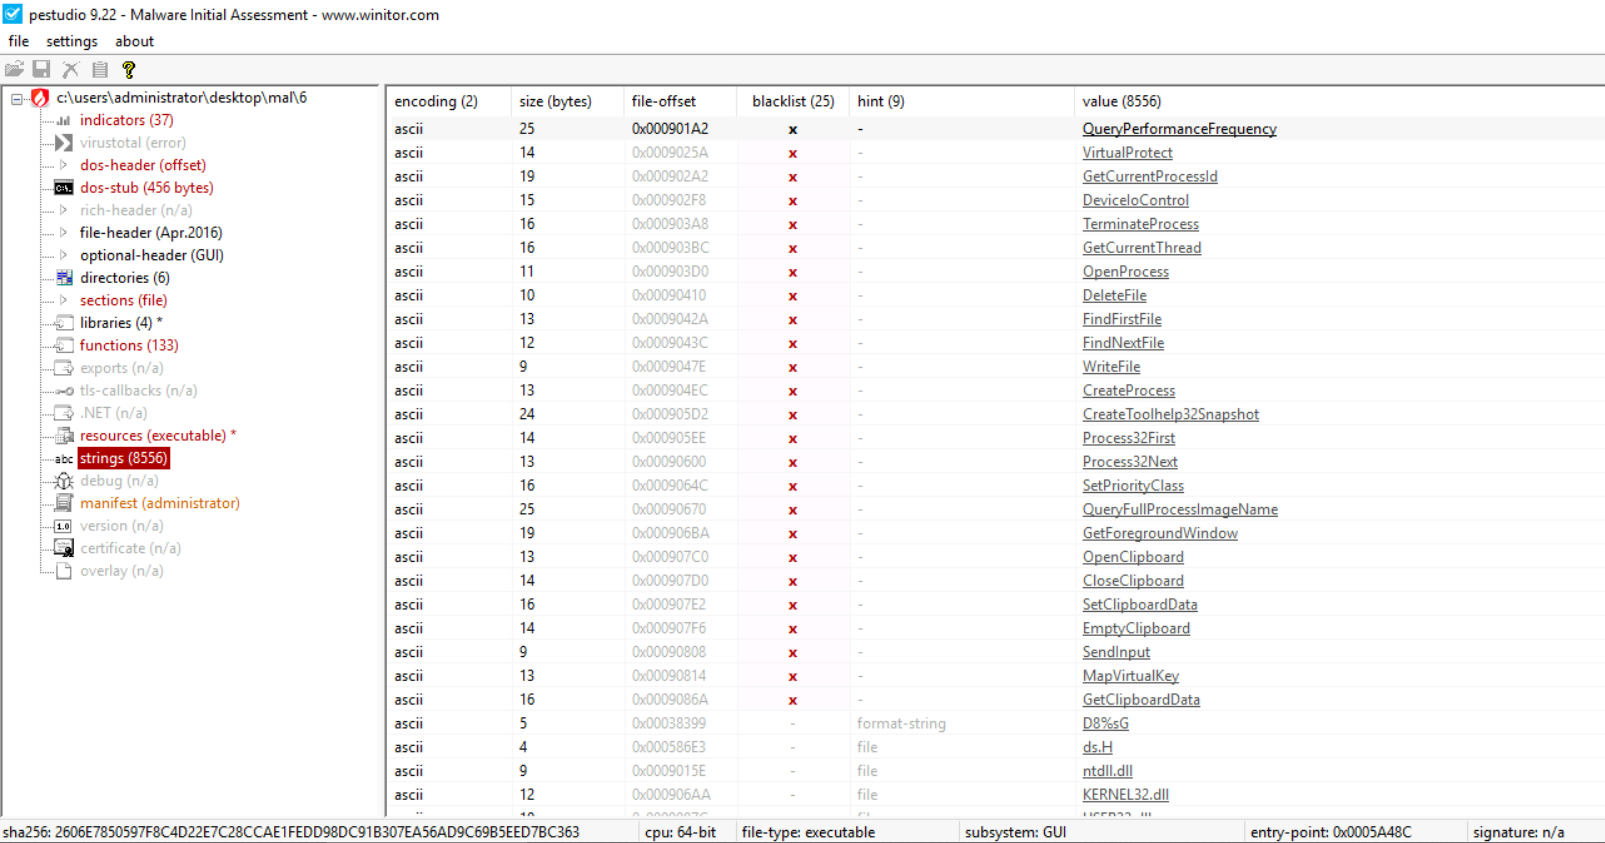
The above screenshot from PEstudio shows strings found by PEstudio in a malware sample. This can be done by selecting strings in the left pane after loading the PE file in PEstudio. The blacklist here shows a bunch of Windows API calls, which PEstudio flags as potentially used in malicious processes. You can learn about these APIs using resources like MalAPI or MSDN.
Obfuscated strings:
Searching for strings often proves one of the most effective first steps in malware analysis. As seen in the case of Wannacry, effective use of string search can often disrupt malware propagation and infection. The malware authors know this and don't want a simple string search to thwart their malicious activities. Therefore, they deploy techniques to obfuscate strings in their malware. Malware authors use several techniques to obfuscate the key parts of their code. These techniques often render a string search ineffective, i.e., we won't find much information when we search for strings.
Mandiant (then FireEye) launched FLOSS to solve this problem, short for FireEye Labs Obfuscated String Solver. FLOSS uses several techniques to deobfuscate and extract strings that would not be otherwise found using a string search. The type of strings that FLOSS can extract and how it works can be found in Mandiant's blog post.
To execute FLOSS, open a command prompt and navigate to the Desktop directory. From there, use the following command.
C:\Users\Administrator\Desktop>floss -h
This command will open the help page for FLOSS. We can use the following command to use FLOSS to search for obfuscated strings in a binary.
C:\Users\Administrator\Desktop>floss --no-static-strings <path to binary>
Please remember that the command might take some time to execute, and you might see what appear to be some error messages before the results are generated.
Answer the questions below
On the Desktop in the attached VM, there is a directory named 'mal' with malware samples 1 to 6. Use floss to identify obfuscated strings found in the samples named 2, 5, and 6. Which of these samples contains the string 'DbgView.exe'?

6
Fingerprinting malware
When analyzing malware, it is often required to identify unique malware and differentiate them from each other. File names can't be used for this purpose as they can be duplicated easily and might be confusing. Also, a file name can be changed easily as well.  Hence, a hash function is used to identify a malware sample uniquely. A hash function takes a file/data of arbitrary length as input and creates a fixed-length unique output based on file contents. This process is irreversible, as you can't recreate the file's contents using the hash. Hash functions have a very low probability (practically zero) of two files having different content but the same hash. A hash remains the same as long as the file's content remains the same. However, even a slight change in content will result in a different hash. It might be noted that the file name is not a part of the content; therefore, changing the file name does not affect the hash of a file.
Besides identifying files, hashes are also used to store passwords to authenticate users. In malware analysis, hash files can be used to identify unique malware, search for this malware in different malware repositories and databases, and as an Indicator of Compromise (IOC).
Commonly used methods of calculating File hashes:
For identification of files, a hash of the complete file is taken. There are various methods to take the hash. The most commonly used methods are:
Md5sum
Sha1sum
Sha256sum
The first two types of hashes are now considered insecure or prone to collision attacks (when two or more inputs result in the same hash). Although a collision attack for these hash functions is not very probable, it is still possible. Therefore, sha256sum is currently considered the most secure method of calculating a file hash. In the attached VM, we can see that multiple utilities calculate file hashes for us.
Finding Similar files using hashes:
Another scenario in which hash functions help a malware analyst is identifying similar files using hashes. We already established that even a slight change in the contents of a file would result in a different hash. However, some types of hashes can help identify the similarity among different files. Let's learn about some of these.
Imphash:
The imphash stands for "import hash". Imports are functions that an executable file imports from other files or Dynamically Linked Libraries (DLLs). The imphash is a hash of the function calls/libraries that a malware sample imports and the order in which these libraries are present in the sample. This helps identify samples from the same threat groups or performing similar activities. More details on the Imphash can be found on Mandiant's blog here.
We can use PEstudio to calculate the Imphash of a sample.
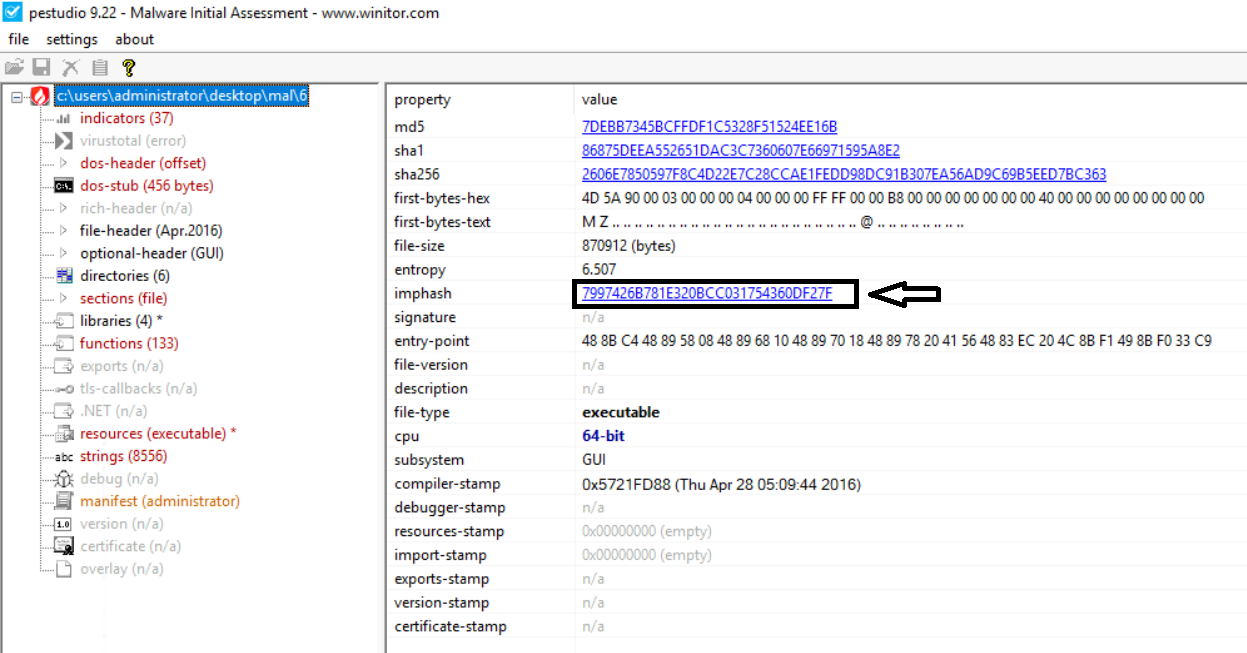
Any malware samples with the same imports in the same order will have the same imphash. This helps in identifying similar samples.
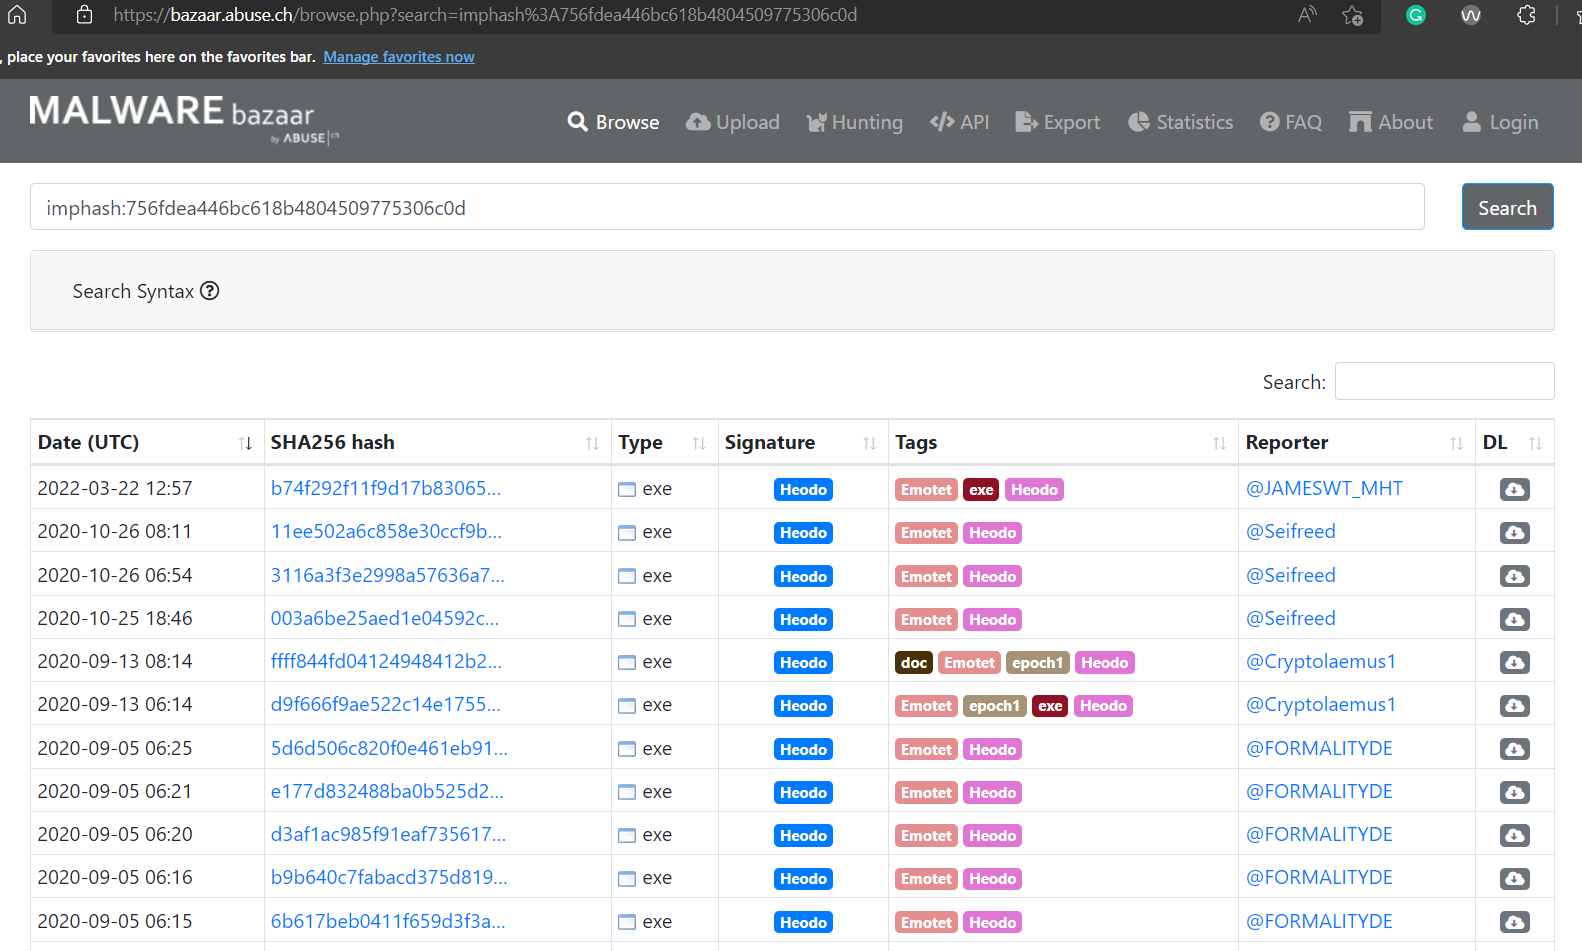
In the above screenshot from Malware Bazaar, all these samples have the same imphash. We can see that all of these samples are classified as the same malware family. We can see that their sha256 hash is vastly different and doesn't provide any information as to their similarity. However, the same imphash helps us identify that they might belong to the same family.
Fuzzy hashes/SSDEEP:
Another way to identify similar malware is through fuzzy hashes. A fuzzy hash is a Context Triggered Piecewise Hash (CTPH). This hash is calculated by dividing a file into pieces and calculating the hashes of the different pieces. This method creates multiple inputs with similar sequences of bytes, even though the whole file might be different. More information on SSDEEP can be found on this link.
Multiple utilities can be used in the attached VM to calculate ssdeep, like CyberChef. However, the ssdeep utility has been placed on the Desktop to make it easier. The following command shows the help menu of the utility.
Finding similar files using ssdeep
Let's calculate the hashes of all the samples in the mal directory in the attached VM.
Calculating ssdeep
We can try the other options shown in the help file per the requirement. When we have the ssdeep hashes, we can match these hashes together to identify similar files. This helps us identify similar files if we have a bulk of data. The documentation link provided above has very good examples of usage. The following terminal window shows one of the examples relevant to our use case to match files. For this, we can use the -d operator. The -r operator runs the ssdeep utility recursively, and the -l operator outputs relative paths of the files.
Finding matching files using ssdeep
The results show files that match each other. The number in the bracket at the end is the percentage of matches among the files.
Answer the questions below

1
Using the ssdeep utility, what is the percentage match of the above-mentioned files?
93
Signature-based detection
In the previous task, we learned how hashes could identify identical files. We also found out that hashes can be changed by changing even a single byte of data in a file and how specific hashes like imphash and ssdeep help us identify file similarities. While using imphash or ssdeep provides a way to identify if some files are similar, sometimes we just need to identify if a file contains the information of interest. Hashes are not the ideal tool to perform this task.
Signatures:

Signatures are a way to identify if a particular file has a particular type of content. We can consider a signature as a pattern that might be found inside a file. This pattern is often a sequence of bytes in a file, with or without any context regarding where it is found. Security researchers often use signatures to identify patterns in a file, identify if a file is malicious, and identify suspected behavior and malware family.
Yara rules:
Yara rules are a type of signature-based rule. It is famously called a pattern-matching swiss army knife for malware researchers. Yara can identify information based on binary and textual patterns, such as hexadecimal and strings contained within a file. TryHackMe has a dedicated room for Yara rules if it interests you.
The security community publishes a repository of open-source Yara rules that we can use as per our needs. When analyzing malware, we can use this repository to dig into the community's collective wisdom. However, while using these rules, please keep in mind that some might depend on context. Some others might just be used for the identification of patterns that can be non-malicious as well. Hence, just because a rule hits doesn't mean the file is malicious. For a better understanding, please read the documentation for the particular rule to identify the use case where it will be applicable in the best possible manner.
Proprietary Signatures - AntiVirus Scans:
Besides the open-source signatures, Antivirus companies spend lots of resources to create proprietary signatures. The advantage of these proprietary signatures is that since they have to be sold commercially, there are lesser chances of False Positives (FPs, when a signature hits a non-malicious file). However, this might lead to a few False Negatives (FNs, when a malicious file does not hit any signature).
Antivirus scanning helps identify if a file is malicious with high confidence. Antivirus software will often mention the signature that the file has hit, which might hint at the file's functionality. However, we must note that despite their best efforts, every AV product in the market has some FPs and some FNs. Therefore, when analyzing malware, it is prudent to get a verdict from multiple products. The Virustotal website makes this task easier for us, where we can find the verdict about a file from 60+ AV vendors, apart from some very useful information. We also touched upon this topic in our Intro to Malware Analysis room. Please remember, if you are analyzing a sensitive file, it is best practice to search for its hash on Virustotal or other scanning websites instead of uploading the file itself. This is done to avoid leaking sensitive information on the internet and letting a sophisticated attacker know that you are analyzing their malware.
Since we have covered Yara rules in detail in the Yara room and Virustotal scanning in the Intro to malware analysis room, we will not cover them again here. However, the FLARE VM has another very cool tool that can be used for signature scanning.
Capa:
Capa is another open-source tool created by Mandiant. This tool helps identify the capabilities found in a PE file. Capa reads the files and tries to identify the behavior of the file based on signatures such as imports, strings, mutexes, and other artifacts present in the file. For further detail into the background of Capa, we can visit its Github page or Mandiant's blog post introducing Capa.
Using Capa is simple. On the command prompt, we just point capa to the file we want to run it against.
C:\Users\Administrator\Desktop>capa mal.exe
The -h operator shows detailed options.
Capa
We can test drive capa by running it against the binaries in the Desktop\mal directory. Please note that capa might take some time to complete the analysis. An example output is below.
Capa example
We can see that Capa has mapped the identified capabilities according to the MITRE ATT&CK framework and Malware Behavior Catalog (MBC). In the last table, we see the capabilities against the matched signatures and the number of signatures that have found a hit against these capabilities. As we might see, it also tells us if there are obfuscated stackstrings in the sample, allowing us to identify if running FLOSS against the sample might be helpful. To find out more information about the sample, we can use the -v or the -vv operator, which will show us the results in verbose or very verbose mode, identifying addresses where we might find the said capability.
Now let's use capa to analyse the file Desktop\mal\4 and answer the following questions.
Answer the questions below

How many matches for anti-VM execution techniques were identified in the sample?
86
Does the sample have to capability to suspend or resume a thread? Answer with Y for yes and N for no.
Y
What MBC behavior is observed against the MBC Objective 'Anti-Static Analysis'?
Disassembler Evasion::Argument Obfuscation [B0012.001]
At what address is the function that has the capability 'Check HTTP Status Code'?
Using Powershell will help avoid cutting off the output. Use the -v or -vv flag to get very verbose output and write it into a file. In the file, navigate to 'check HTTP status code' and find the text 'function @ ...........' where the dotted line represents the address.
0x486921
Leveraging the PE header
So far in this room, we have covered techniques that work regardless of the file type of the malware. However, those techniques are a little hit-and-miss, as they don't always provide us with deterministic information about the malware. The PE headers provide a little more deterministic characteristics of the sample, which tells us much more about the sample.
The PE header:

The programs that we run are generally stored in the executable file format. These files are portable because they can be taken to any system with the same Operating System and dependencies, and they will perform the same task on that system. Therefore, these files are called Portable Executables (PE files). The PE files consist of a sequence of bits stored on the disk. This sequence is in a specific format. The initial bits define the characteristics of the PE file and explain how to read the rest of the data. This initial part of the PE file is called a PE header.
Several tools in the FLARE VM can help us analyze PE headers. PEStudio is one of them. We already familiarized ourselves with PEStudio in a previous task, so we will just use that in this task as well.
The PE header contains rich information useful for malware analysis. We will learn about this data in detail in the Dissecting PE headers room. However, we can get the following information from a PE header as an overview.
Linked Libraries, imports, and functions:
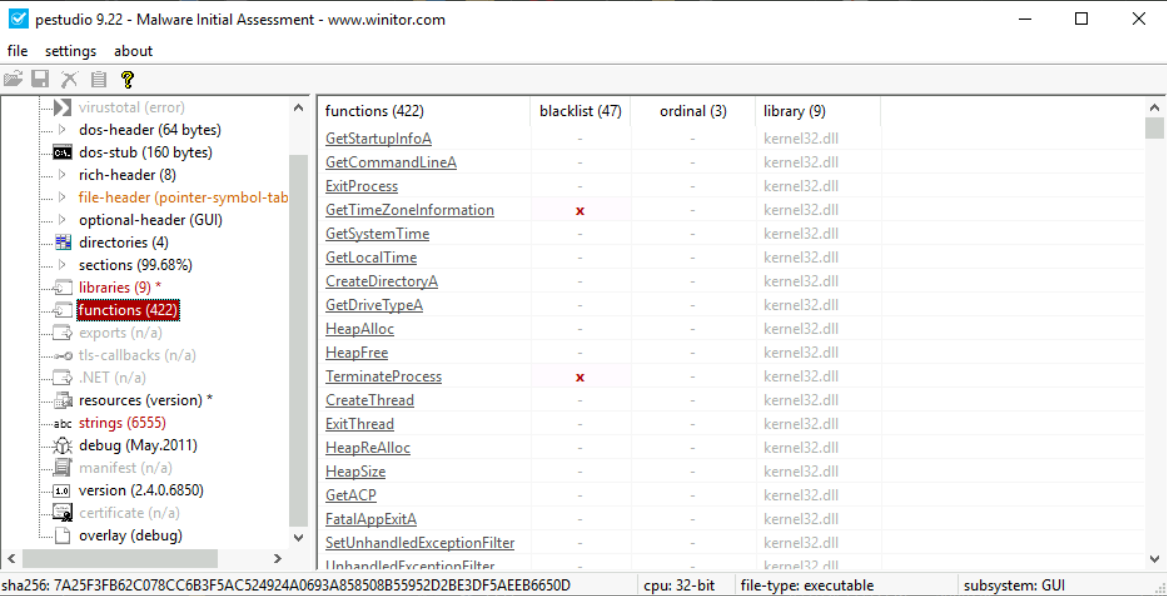
A PE file does not contain all of its code to perform all the tasks. It often reuses code from libraries, often provided by Microsoft as part of the Windows Operating System. Often, certain functions from these libraries are imported by the PE file. The PE header contains information about the libraries that a PE file uses and the functions it imports from those libraries. This information is very useful. A malware analyst can look at the libraries and functions that a PE file imports and get a rough idea of the functionality of a malware sample. For example, if a malware sample imports the CreateProcessA function, we can assume that this sample will create a new process.
Similarly, other functions can provide further information about the sample. However, it must be noticed that we don't know the context in which these functions are called by just looking at the PE headers. We need to dig deeper into that, which we will cover in the upcoming rooms.
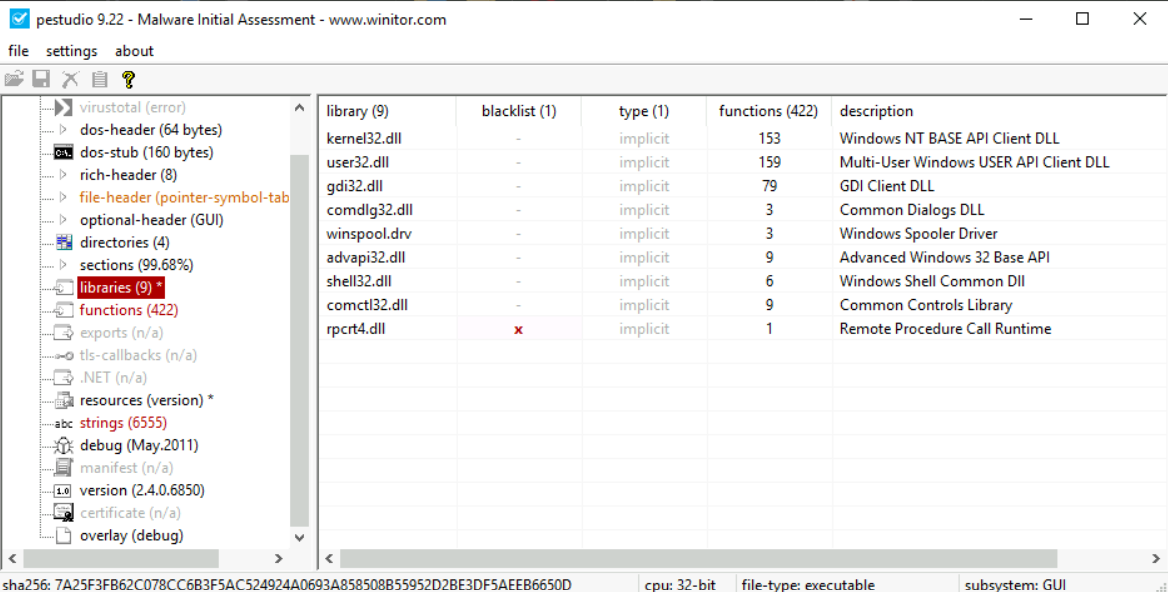
PEStudio has a libraries option in the right pane, which, when selected, shows us the libraries that a PE file will use.
The functions option just below shows the functions imported from these libraries.
Identifying Packed Executables:
As we have seen so far, static analysis bares a lot of information that can be used against the malware. Malware authors understand this as a problem. Therefore, they often go to great lengths to thwart analysis. One of the ways they can do this is by packing the original sample inside a shell-type code that obfuscates the properties of the actual malware sample. This technique is called packing, and the resultant PE file is called a packed PE file. Packing greatly reduces the effectiveness of some of the malware analysis techniques we have learned about so far. For example, if we try to search for strings in a packed executable, we might not find anything useful because of packing. Similarly, searching for similar samples using ssdeep might return more samples packed with the same packer instead of samples behaviorally similar to the sample of interest. Some signatures might also be evaded due to a malware sample being packed.
As we will see in the upcoming Dissecting PE headers room, we can identify packed executables by analyzing the PE header of a malware sample. The PE header contains important information such as the number of sections, permissions of different sections, sizes of the sections, etc. This information can give us pointers to help identify if the malware sample is packed and, if so, which type of packer has packed the executable.
Answer the questions below

Write the name of the dll file which has a cross mark in front of it in the blacklist column
rpcrt4.dll
What does this dll do?
Check the description column of the dll
Remote Procedure Call Runtime
Conclusion
That wraps up our basic static analysis room. So far, we have learned the following:
Lab setup for malware analysis
Searching for strings and obfuscated strings
Fingerprinting malware using hashes and identifying similar samples using imphash and ssdeep
Using signature-based detection like Yara and Capa
Identifying artifacts from the PE header
You can stick around and find what other tools you find interesting in the room. Let us know what you think about this room on our Discord channel or Twitter account. See you around.
Answer the questions below
Join the discussion on our social channels.
Completed
[[Introduction to Cryptography]]
Last updated