Brute Force Heroes

Launch The VM
Start Machine
Start the VM attached to this task . This will launch a modified version of the DVWA at MACHINE_IP . This is what we will be using to practice our brute forcing skills and tools against.
It can take up to 5 minutes for the VM and associated service to launch, so give it a little room to breath. Go ahead and read the introduction below. Don't worry; we'll include a link in there for you too.
Answer the questions below
Start your engines! Sorry... VM!
Introduction
Welcome to Brute Force Hero's. We're going to look at brute force from a zero to hero approach. Covering what brute forcing is, the different tools we can use (despite what you might believe Hydra isn't the only option we have), and the when's and whys behind using these different tools.
If you're already familiar with the concepts behind brute forcing please feel free to skip ahead and get right into it in the next task. The rest of us will take 5 minutes to look at what exactly brute forcing is.
What is brute forcing? Simply put brute forcing is just guesswork - Though we try our best to make it educated:

The difference between doing it in person and trying to login to a service or resource is that we have to try and make sure our guesses are not only correct but that we're also speaking the correct language and we've formatted our guess correctly.
Imagine if in the above scenario the old schoolmate spoke a different language to us (it was a foreign exchange programme) - We could guess all day, but we might never know if we got it right, especially if our pronunciation is off or we build our sentences differently:
Is your name Dave? Dave is your name? You're Dave right?
If you look at popular tools like Hydra there are a whole load of supported formats:
It supports the following formats: Cisco AAA, Cisco auth, Cisco enable, CVS, FTP, HTTP(S)-FORM-GET, HTTP(S)-FORM-POST, HTTP(S)-GET, HTTP(S)-HEAD, HTTP-Proxy, ICQ, IMAP, IRC, LDAP, MS-SQL, MySQL, NNTP, Oracle Listener, Oracle SID, PC-Anywhere, PC-NFS, POP3, PostgreSQL, RDP, Rexec, Rlogin, Rsh, SIP, SMB(NT), SMTP, SMTP Enum, SNMP v1+v2+v3, SOCKS5, SSH (v1 and v2), SSHKEY, Subversion, Teamspeak (TS2), Telnet, VMware-Auth, VNC and XMPP.
This is normally where people have issues - Making sure that their brute force requests match the expected format and are going to be accepted and processed as expected by the receiving service or resource.
Another issue we might face when trying to brute force a login is that it is not stealthy.
Going back to our schoolmate comparison, after a couple of guesses, people nearby will start to notice that you're just saying random names at someone. The same thing is going to happen if you're taking random guesses at a user's login online.
Anyone monitoring the traffic will notice a sudden increase in login attempts, with most of them being wrong. That's going to raise some red flags. Plus, if they have automated lockout or failed attempt protection enabled, it's going to make it difficult for you.
GUI v CLI
There are multiple tools which can be used for brute forcing - One of the most common is the ever-popular Hydra.
But it isn't the only tool or necessarily the best choice, depending on the situation. During this lab, we will look at four tools that can be used for brute forcing. Two will GUI based (Burp Suite and OWASP ZAP) the other two will be CLI base (Hydra and Patator).
There is no need to have prior experience using these tools as we will cover the relevant steps for each one during this room. But we have linked some other THM rooms which people might find useful. Go ahead and have a play!
Patator is not as well known as Hydra - So if this is your first time using it, fear not! We will cover everything you need to know to bring you up to speed. If you are using a Kali or Parrot OS then chances are it is pre-installed. If it isn't, then you can install it using apt:
sudo apt install patator
Or visit the github page
If you're using the attack box that comes with THM, and sudo apt install patator, then to get patator working correctly, you will need to link it to a python2 runtime. One way to do that is to setup a virtual python environment. If you're unsure how to do that, follow these steps (which assume you're using the THM box and running as root):
apt install virtualenv
cd ~
virtualenv -p which python2 venv
source venv/bin/activate
You should then see that your shell prompt has (venv) in front of it and that patator runs with no problems like this: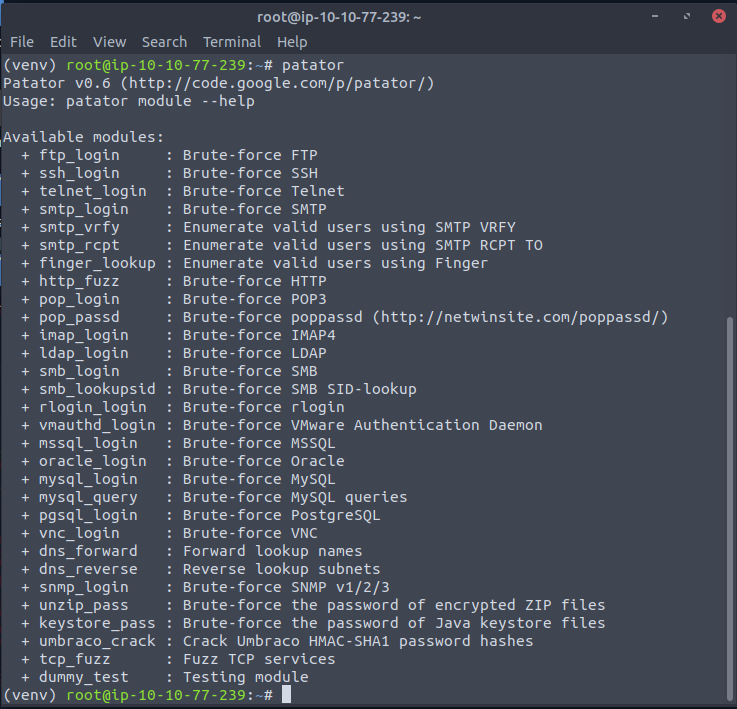
This will make sure that Patator is linked to the version of Python that it needs to run (as it will error otherwise). If you are using the attack box and clone the github repo then you won't need to make this change.
Once you have Patator installed (as well as the other tools), go ahead and move on to the next task, where we'll get started using Burp Suite.
Answer the questions below
Read the above and ensure you are ready to start
Completed
Getting started - Burp Suite
Download Task Files
First thing first, download the attached password file. This is a custom password file built specifically for this room. Make sure you save it somewhere readily accessible as it will be used a lot in this room.
Next fire up Burp Suite. We'll start off by using this to proxy our web traffic to and from the target (the modified DVWA instance at MACHINE_IP ) . Depending on your version of Burp Suite you can either use the inbuilt browser:
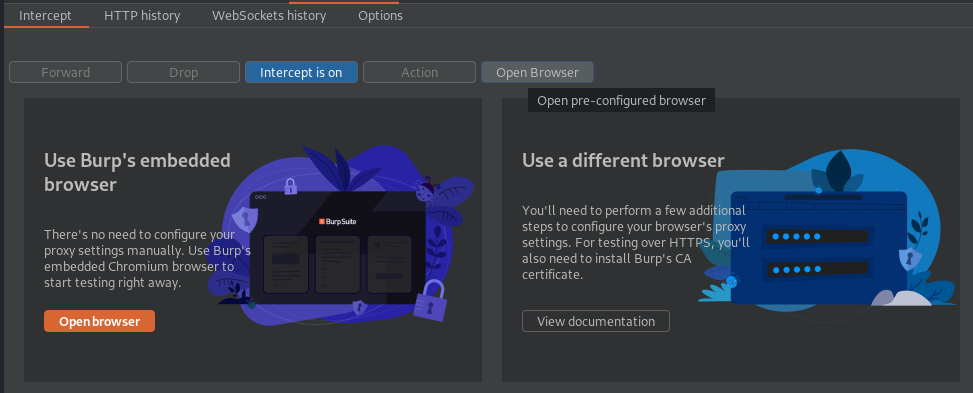
Or set your browser to use Burp Suite as a proxy - Port Swigger (the people behind Burp Suite) have a great guide here, so if you're unsure, follow that. Whichever browser you're using your proxy settings will need to look something like this:
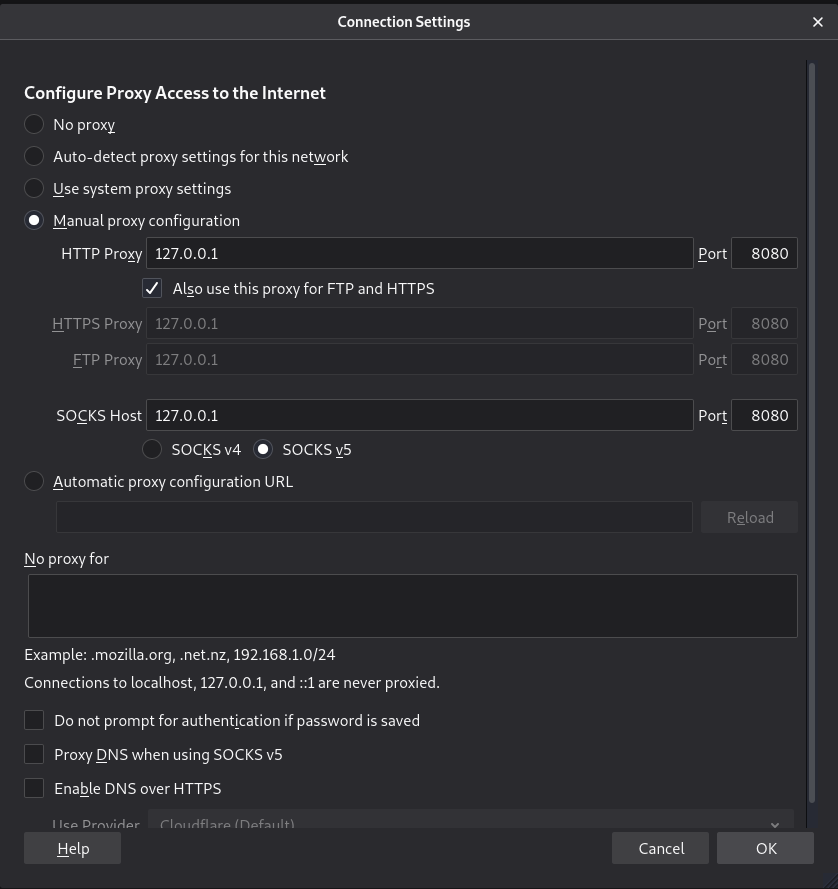
Assuming you haven't made any changes to the Burp Suite defaults.
Once Burp Suite is up and running, go ahead and access the DVWA instance by pointing your web browser at http://MACHINE_IP. You should be met with a login screen. I recommend turning off the intercept (it's under the Proxy->Intercept tab and can be seen in the first screenshot above). We don't really need it for this task, and it is going to get really annoying if you have to manually forward each and every request. Instead, we'll be able to do everything we want from the HTTP history tab. So your screen should look like this:

Now try and login - We'll give you the username admin - The password we're going to try and work out ourselves. For those of you who have played around with DVWA before, the default credentials have been changed. It's vulnerable, but not that vulnerable. Make a couple of login attempts and look at the traffic in your HTTP history tab on Burp Suite. It should look something like this:
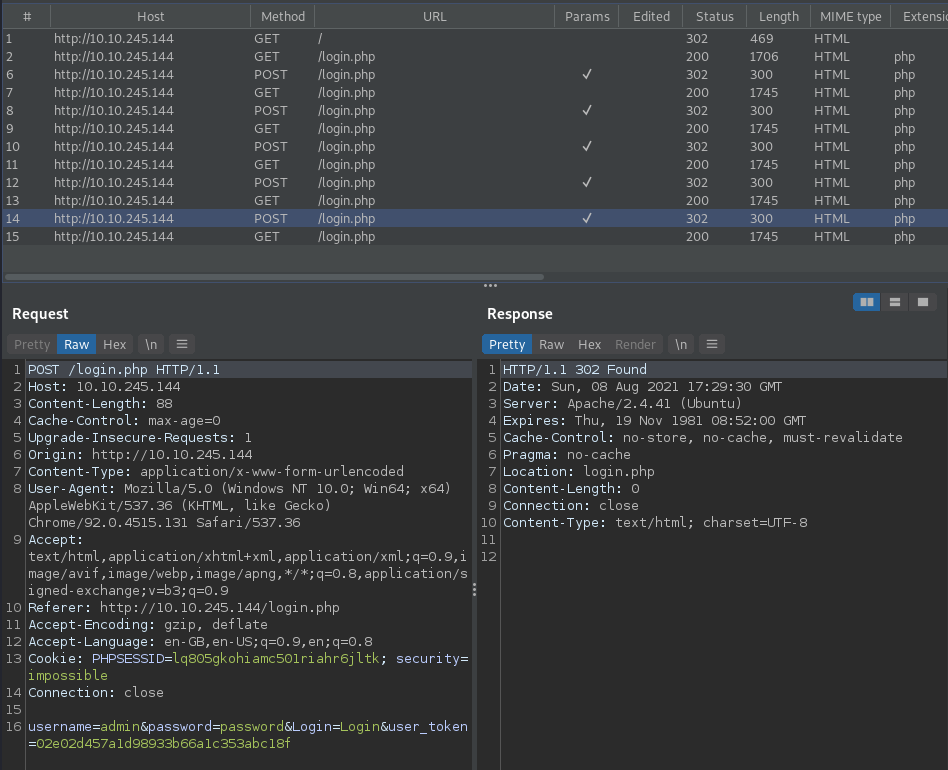
Each login attempt made via a POST request is met with a 302 response code message before we're redirected back to the login page... You'll also notice that each response to our login attempt is essentially blank. But we can see a message on the login page itself which says Login Failed. That message is actually part of the next request, as we can see here:
 This is important, and we'll come back to why in a little bit... But for now. It's Brute Force time!
Answer the questions below
What does HTTP response code 302 mean?
Checkout the MDN webdocs: https://developer.mozilla.org/en-US/docs/Web/HTTP/Status
Found
Brute forcing - Burp Suite
So now we have some real requests we can examine. We can use these to template our brute force requests. In our previous analogy, we've got the language, and how the sentence is formatted, we just need to keep swapping the names out. Right click a login attempt request from our HTTP history and then click Send to Intruder:
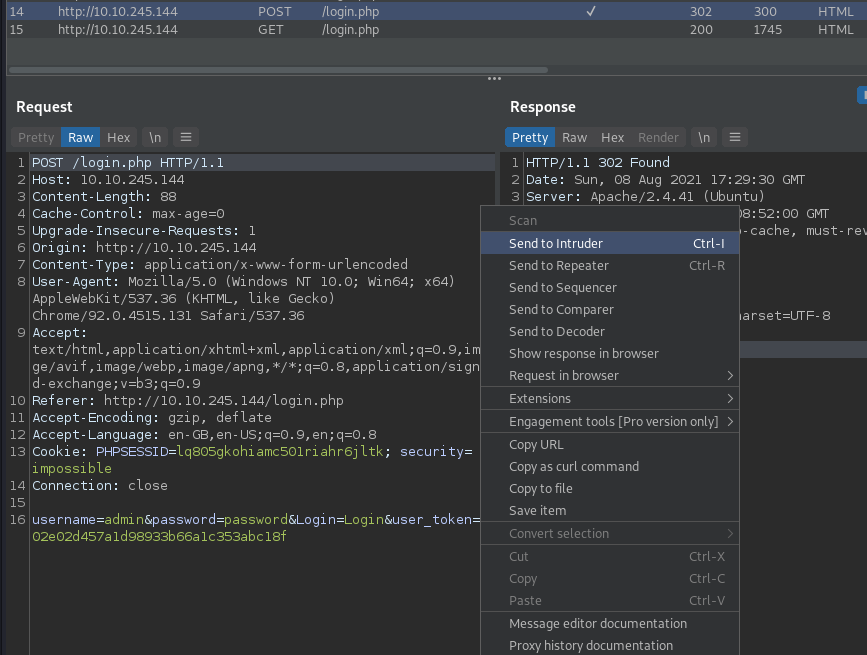
You should then notice that the Intruder tab at the top is flashing. Click on the tab and then click Positions which will be along the top of the Intruder tab:

Next, within the Positions window, hit the Clear button - This will remove all the preset positions which Burp Suite will have pre-populated for us. Burp Suite will automatically select any value on the right side of a '=' . For our case, the only value we want to set as a position that Burp Suite will replace in each attempt is the password value. Click the password value (in this instance, it is password, but depending on what you typed it could be different) and click Add. This will set the payload position, and we'll be ready to move on to the next stage.
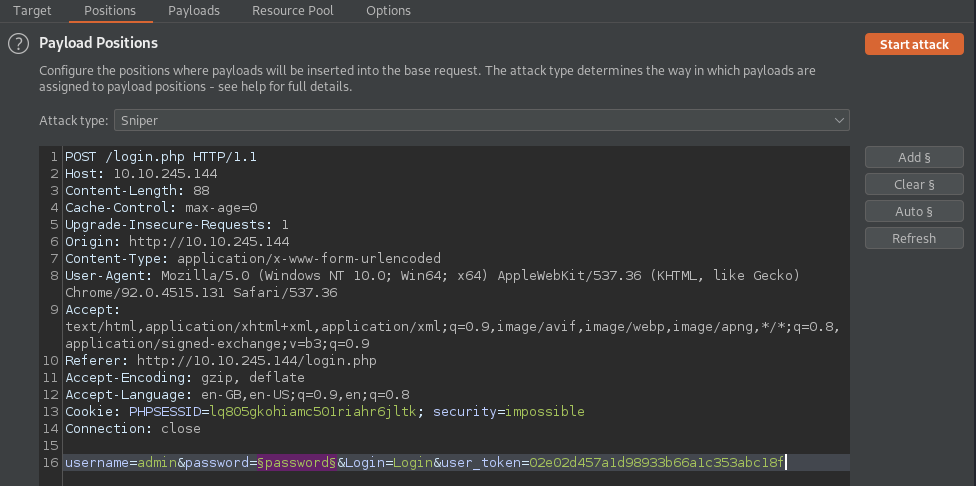
The Intruder->Payloads tab is where we add the payload to be used in the replacement. Burp Suite will take the payload we provide and use its values to replace our marked value. There are a few options here for loading payloads. We are going to load the password file provided in this room by clicking Load ... within the Payload Options [Simple List] section. Select the passwords.txt file you downloaded, and you should see the contents are loaded in, which should look like the below:
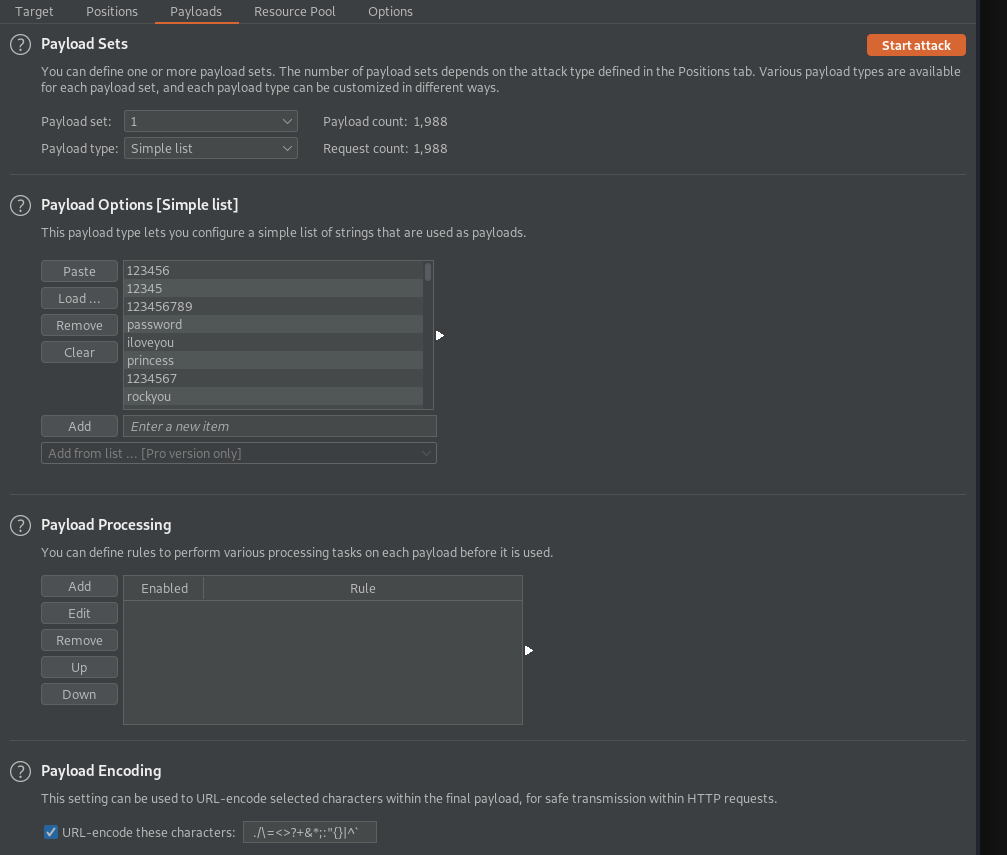
Now at this stage, we're ready to launch our attack. Click Start attack; if (like me) you're using the Community Edition, then a popup will appear. The TL;DR is that because you're using the free version, your attack will be throttled. Click Ok, and then the attack dialogue box itself will appear. It will show the payload value used in each attempt, the response code, and the response length. These are our indicators that our login attempt(s) have or haven't been successful. If we notice a different response code or different response length we should investigate these responses further to confirm whether or not this was a successful attempt, or it was an error of some kind. An example error would be if you used a large password file with some special characters that the end service couldn't process correctly.
Now. This is where I have a confession to make. The screenshot below shows me trying to brute force the login. The value I have covered over is the correct password. Notice anything strange about the successful password?
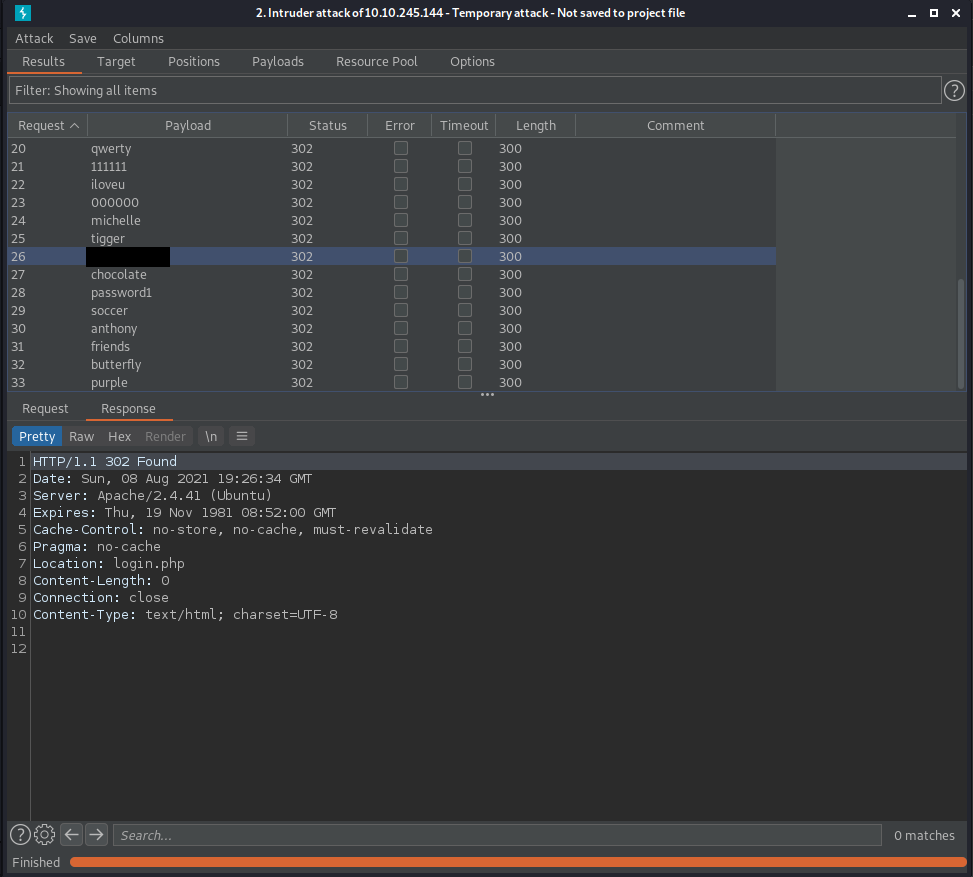
(N.B. For those of you about to try and just look through the password file to work out the correct value - I replaced the value at that location in the file with the correct password. I like your thinking, but it won't be that easy. Try it if you don't believe me. )
The strange thing is that the response codes and response lengths are all the same, even for the successful password. You have no evidence from the attack dialogue box that this is the correct password, but it is, I promise, and I can even prove it (sort of).
The image below shows what a successful login attempt really looks like. The initial response to the login is actually the same as we saw with our incorrect logins, a 302 redirect response. But the next request is different! It doesn't redirect us to login.php (check the earlier screenshots). Instead, we go to the index.php page. We can also see that in the response for a successful login, the Location Response Header is different. So we could look at the redirect destination to tell if our login attempt was successful or not. One problem, Intruder only shows us the initial response (the redirect itself), not the destination...
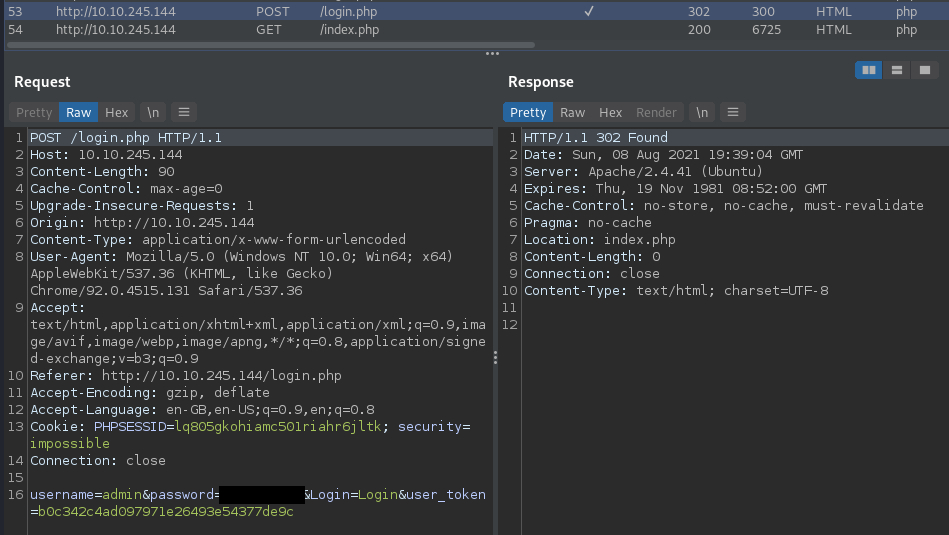
Now those of you who are observant might have noticed that in our screenshot of the successful intruder attack, the response to the correct password attempt had a Response Header called Location, which was set to login.php. Well, one of the other issues with Burp Suite is that it will reuse the same original request. That might work in some instances, but not for all of them. If the server is expecting a unique user_token for each login attempt and it gets the same one reused multiple times, we might not be able to get in even with the correct password. Back to what we said at the start - The format for our request needs to be what the server expects. If it isn't, we're not going to get very far.
But don't lose hope just yet! We know what won't work, and importantly, we know why (or we can make some pretty educated guesses as to why). All we need to do now is change tactics. Remember Try Harder is all well and good, but sometimes we need to couple that with Try Smarter.
Also, if you've got this far and Burp Suite is still running your brute force attempt, I'd turn it off. For now, at least.
N.B - It is possible to use things like Burp Suite Macros to help us get around the use of things like the unique user_token. However that is outside the scope of this room. I would recommend visiting Burp Suite Basics for more info.
Answer the questions below

What's an easy way for us to tell the difference between a failed and a successful login attempt in the above?
Which Response Header?
Location Response Header
Can we use Burp Suite to effectively brute force the login in this instance? (Yay/Nay)
Nay
Brute forcing - Patator
So we tried with Burp Suite - But it turns out this isn't the right tool for this job.
But it was still a great starting point, we were able to work out the request syntax (how the login request is formed), and we can use that information going forward to try a different tool.
Now, this is a brute forcing room - So surely we'll use Hydra now, right?
Nope! (You clearly didn't read the task name, by the way). It's Patator to the rescue!

I've chosen Patator for a couple of reasons - One is that it's not a widely used tool, despite (I think) being fantastic at what it does. The second is that Hydra isn't our best bet here either. You only have to do a quick search to find that people have had plenty of issues trying to brute force DVWA with Hydra (like this issue thread here). We could use a different version of Hydra, such as 8.1 on Ubuntu, but let's see if we can't find a different tool to do the job and hopefully add something new and useful to your CTF arsenal. So let's get started.
So first thing first - Let's look at Patator a bit before we get started. If you run patator -h, you'll get the following output listing the available modules (remember to run the command we gave you in the Introduction section in order to allow Patator to run correctly on the AttackBox):
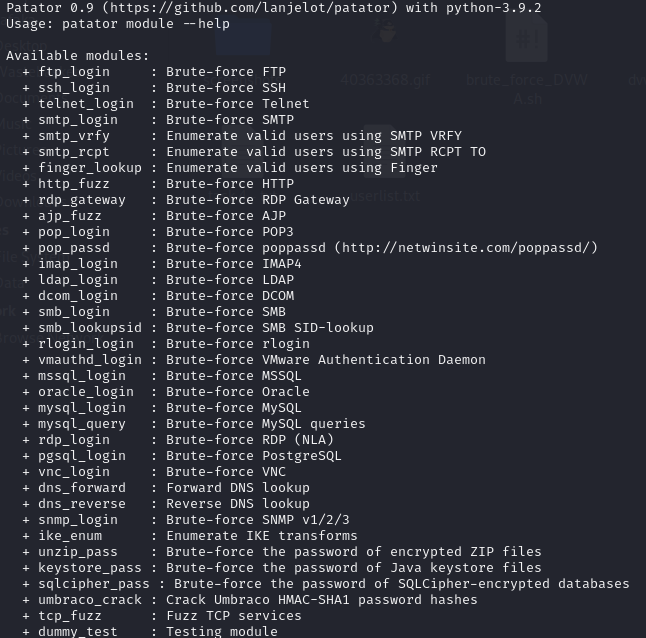
There are a lot of modules. We won't be playing with them all (today), but we can see one that is of immediate interest to us http_fuzz, so let's look at that. Type patator http_fuzz -h and look through the options for this module. Looking at the available options, we can break our command down into the required parts:
Now here is where we look back at our Burp Suite requests (see, there was a reason I made us use Burp Suite first).
 So using what we know we can construct the following command:
The url, body, and header fields can be copied directly from the Burp Suite window. The quit condition is checking that the returned response does not
contain the text login.php.
But we're still missing a couple of steps before we can use this to brute force the page:
We need to add in our payload so we can incrementally swap out the password each time with one from our list.
We don't want to be re-sending the same user_token and Cookie value.
Thankfully, with a bit of bash magic, we can create a script to dynamically generate those values for us - And we don't even have to do all the heavy lifting ourselves, thanks to g0tm1lk . We can take the script they've made and adapt it for our own brute force attempts. Our script should now look like this:
N.B. If you find that when you run the above, you get errors about k,v pairs try changing the script so that the patator command is all on one line. Like this:
patator http_fuzz method=POST --threads=64 timeout=10 url="http://${IP}/login.php" 0=passwords.txt body="username=admin&password=FILE0&Login=Login&user_token=${CSRF}/login.php header="Cookie: PHPSESSID=${SESSIONID}; security=impossible" -x quit:fgrep!=login.php
When you run this script, you might notice something - When it stops, it's not easy to tell which password is actually the correct one. We can filter out all the wrong passwords using the -x ignore: action. The syntax and format are basically the same as the quit action. So all you need to do is test and adjust... I've even made the correct command the answer to Question 1. So if you get that right, you know you're good to go. If you get stuck, think about what text is in the response if the result was incorrect. We can ignore those responses and not print them to the screen.
Add the -x ignore: action to the end of your existing patator command (right after the quit action), and the only result you'll get will be the admin password!
Answer the questions below
What action can we use to show only the correct password (the answer includes ' ')?
If only we could IGNORE the login.php results at a certain LOCATION
-x ignore:fgrep!='Location:login.php'
What is the admin password?
1qaz@WSX
Brute forcing - ZAP
Download Task Files
Congratulations! Not only did you brute force the main login for the admin, but you did it while the security was set to "Impossible" - If this is your first time brute forcing be impressed with yourself, time for tea and medals all round.
But we can't rest on our laurels for long. Remember, we were beaten at the first hurdle with a GUI tool. So let's see if we can't redeem ourselves in that area. Download the userlist.txt we've attached, and let's get started. This task will focus on the use of OWASP ZAP, a great tool for web application pen testing; just remember to take the automated warnings and alerts with a pinch of salt. A good pen tester should manually check listed vulnerabilities reported by automated tools, you'll look silly if it comes to report time, and it turns out the tool (and now, by extension, you) were wrong.
But we're not going to go into the different uses of OWASP ZAP here (though I recommend playing around with the tool and checking out the room linked in the introduction). We're focused on how it can help us brute force.
First things first, start the OWASP ZAP application. Depending on the platform you are using, this may be in a number of different places. If you are using the THM AttackBox, this is found at the Applications->Web->OWASP ZAP menu option. The latest versions of Kali have this tool pre-installed, and it is located at Applications->Web Application Analysis->ZAP. Older Kali or other distributions may not have this pre-installed. If not, you can install it from the ZAP Download page.
Once it is running, click Manual Explore. In the URL to explore, type in 10.10.101.155 and then click Launch Browser (you have a choice between Firefox and Chrome, it doesn't really matter which you pick). This will take you to the main login page. Use the admin credentials we discovered in the previous task and login.
From there, head to the DVWA Security page (10.10.101.155/security.php) - Change the security to Low and click submit:
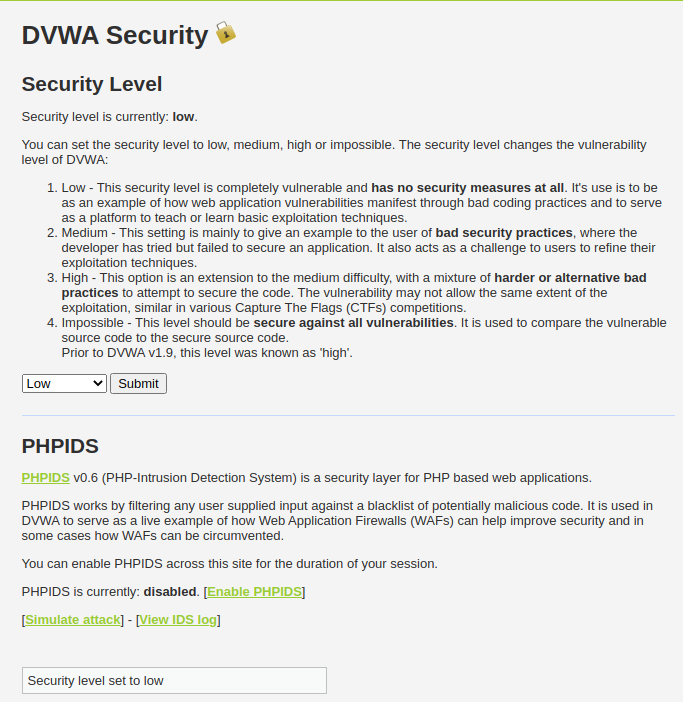
The security level has been set to low (as you can see here)
From there, head to the Brute Force section ( 10.10.101.155/vulnerabilities/brute/ ). Your screen should now look like this:
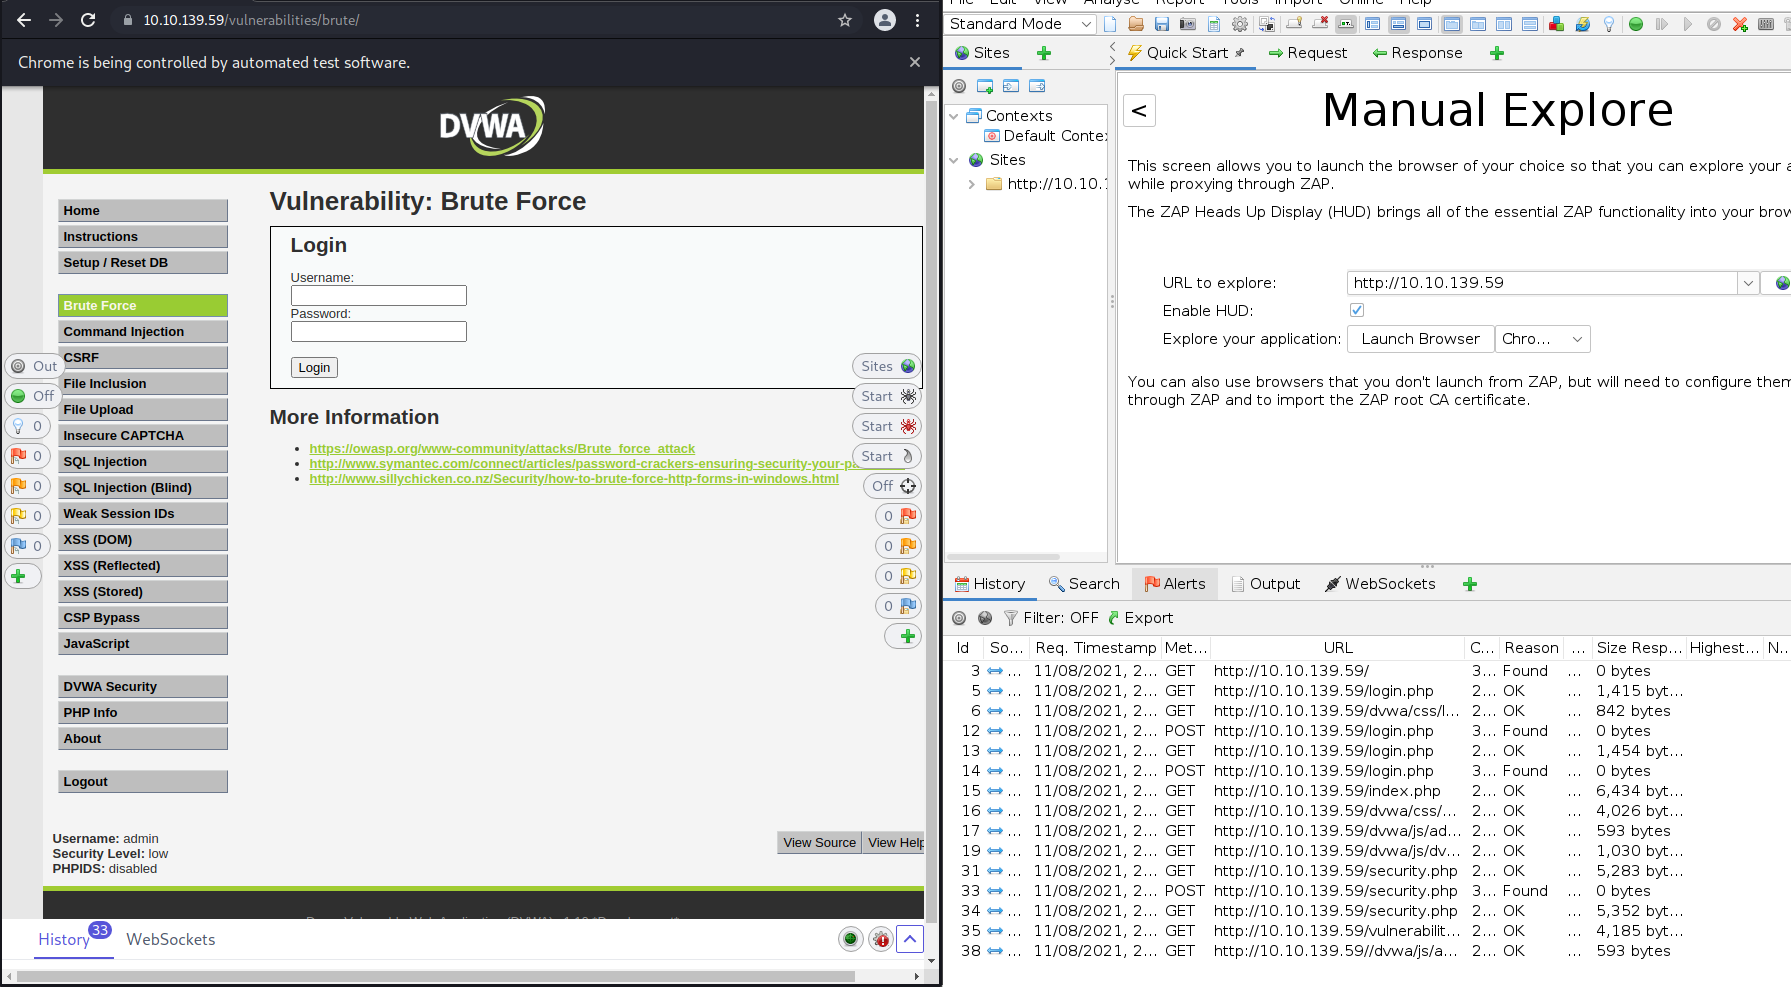
This is where we'll take on brute force round two. Let's try a test login using ZAP, as we did before with Burp Suite. Only this time, we have some valid credentials to use. Login using the username: admin and the password from the last task. You should get a message saying you logged into the admin area. Next, try a test login with some wrong credentials like test/testing:
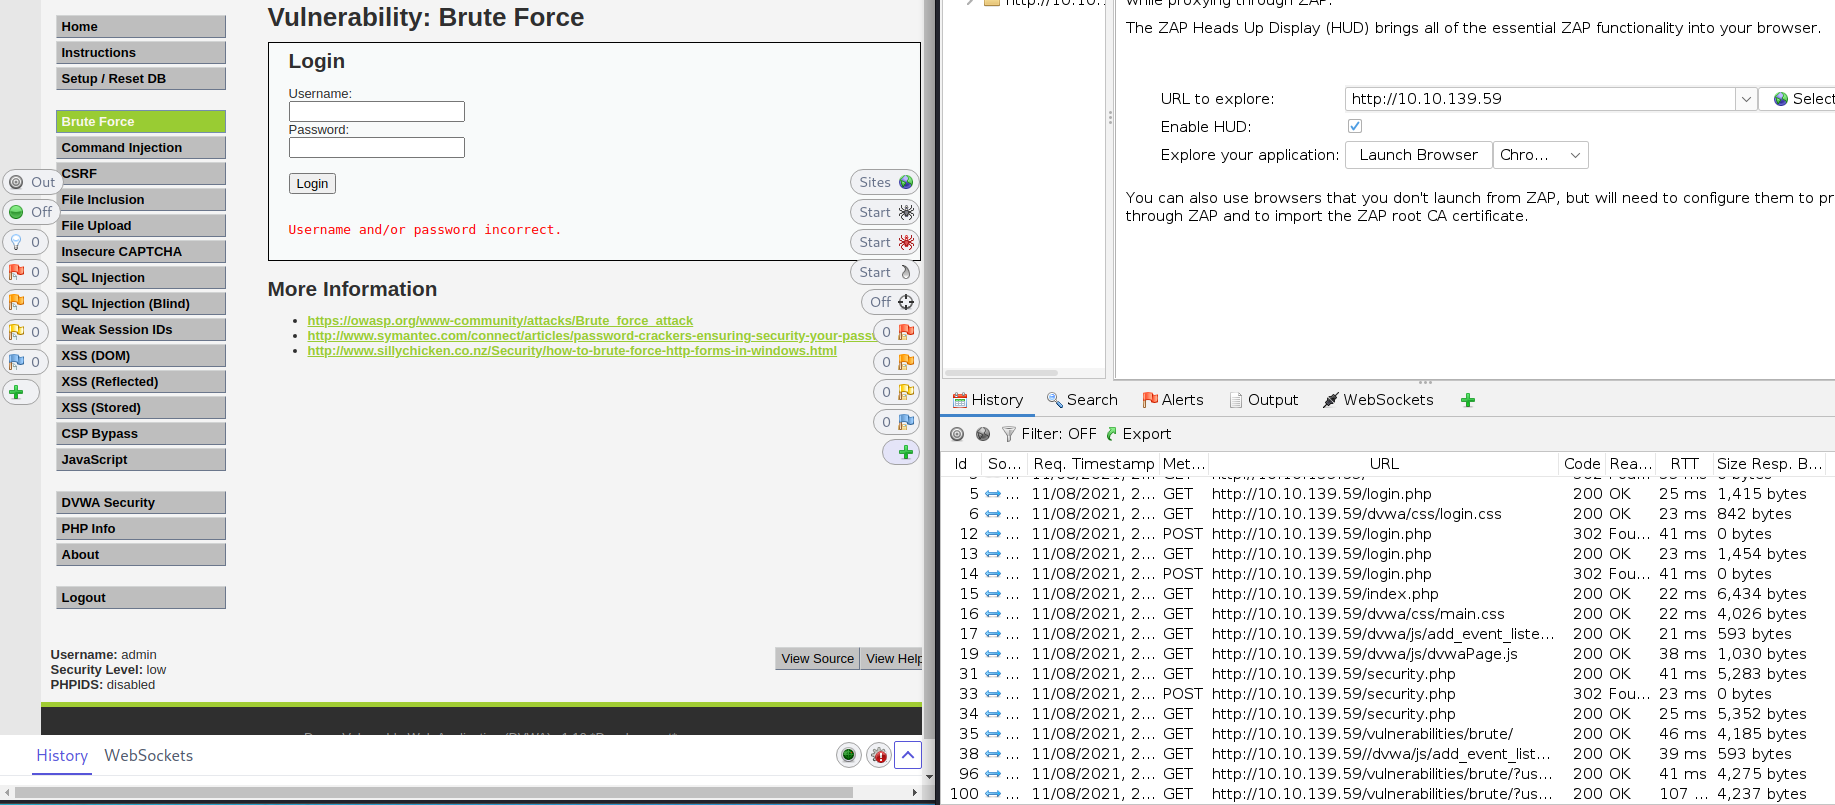
From within ZAP's History tab, we can compare our two login requests. (In our example, this is ID 96 and 100). One was valid (96), and the other wasn't (100) - Both got a 200 response code, but each one was different in size. So we can use that. We know there is a second set of login credentials - But this time we don't even know the username, never mind the password... Fear not though. ZAP can save the day!
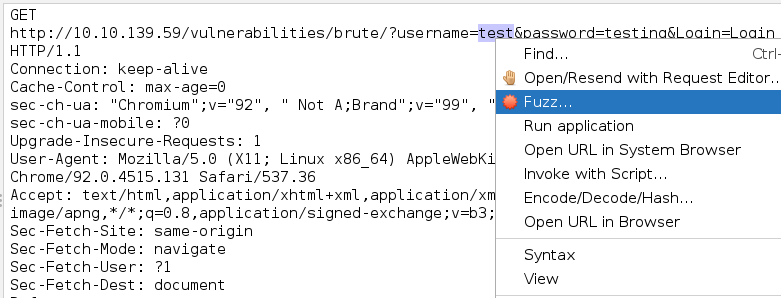
In our most recent login attempt in the request, double click on the username used (in this case test) and then right click and select Fuzz
This will then cause a popup to appear with the username highlighted. Click Payloads... and this will open a second popup. Click Add... . This will... You guessed it another, popup. Here select File from the drop-down at the top and select the userlist.txt file that we provided:
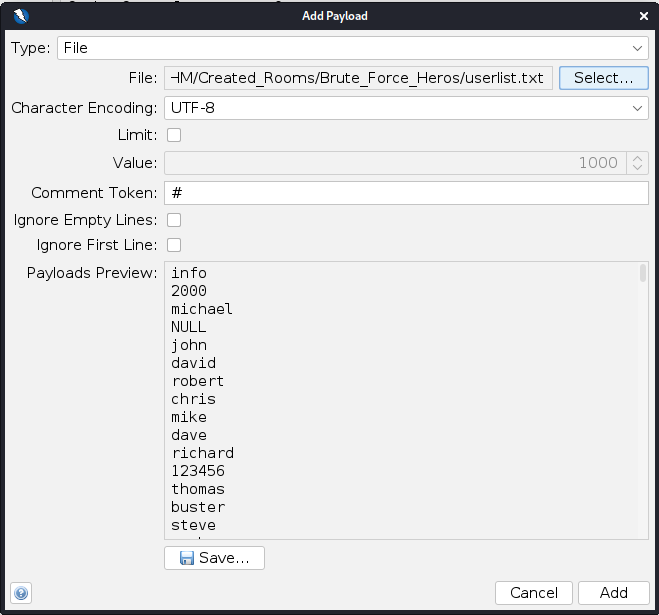
Click Add and then Ok (we'll work our way back to that original popup). Now in the Fuzzer box highlight the password we used and then click **Add...
**
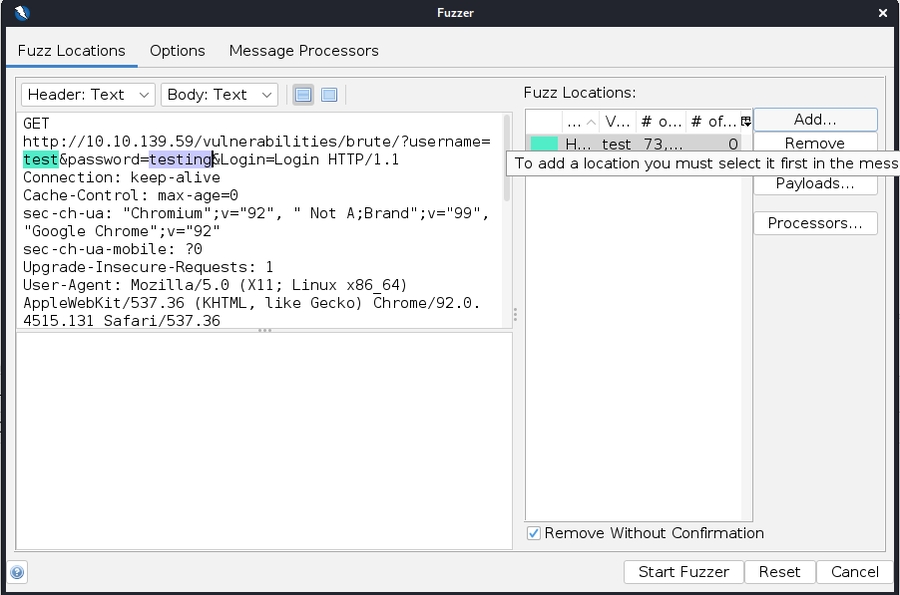
Go back through the various popups, but this time select the passwords.txt we used in the previous task. At the end, you should have two positions highlighted and two payloads. You Fuzzer box should look like this:
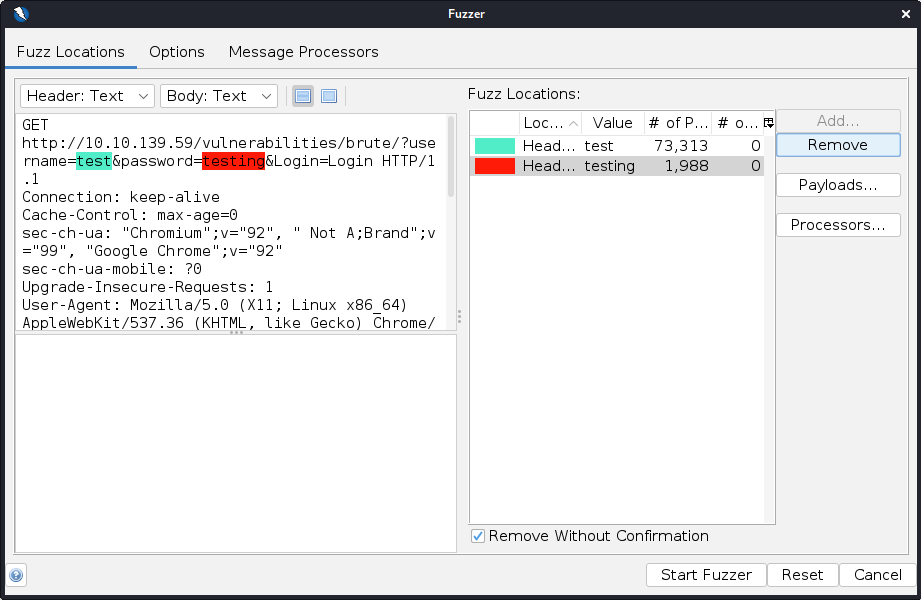
Don't worry if the colours are different. ZAP likes to be decorative, is all. Now click Start Fuzzer. This will create a new tab along the bottom which shows the Fuzzer in progress... You should see a load of 200 responses, all with the same Size Response (4,237 bytes). Click one at random as they whiz by and check out the response. Scroll down, and you'll see these are "**Username and/or password incorrect. "**messages. Click on the Size Resp. Body column and organise the results so that the largest response size is at the top. After a few minutes, you should find that you get a different response size... Like this:

We did it! We got the username and password from scratch (sort of). Now, if you want to, you can play around with the different security settings. Try Burp Suite again (though maybe with a smaller, curated list of passwords and usernames if you're on the free version). You can even try your hand at using the CLI tools. Though keep in mind people have reported issues using Hydra shipped with Kali against DVWA brute force before. So you'll need to make sure you've got a working version (not 9.1).
Answer the questions below


What is the username you found?
Check the ZAP Fuzzer Payload
buster
What is their password?
Check the ZAP Fuzzer Payload
rhymes
Brute forcing - SSH (Hydra + Patator)
You thought we were finished? Oh no! Not just yet. We're having so much fun after all. Right? Right!
The penultimate part of this lab is brute forcing the SSH for the VM itself. We don't know the username, but we do know the password - Sort of.
We have set it to one of the two passwords that we have already recovered, but we have changed it to be in an encoded format. So we have a couple of ways to approach this. We'll start with Hydra, it's the last tool we've yet to use after all.
First things first, we know we have two passwords that it could be, so we need to convert them into the encoded format. Remember that this is going to be encoded, so don't encrypt the passwords. For example, hex, base64, URL are all examples of encoding (and one's I'd recommend you try). A good resource you can use for this is Cyber Chef - To be safe, make sure there are no leading or trailing spaces when encoding your passwords; otherwise you can brute force them all day, and it won't work.
Take the two passwords that we found in Task 5 and Task 6, encode them using the suggested formats above, and create a file called encoded_passwords.txt, which contains all the encoded variations of these passwords, one on each line. Once we have this file, you can use the command below to brute force the SSH login.
hydra -f -L userlist.txt -P encoded_passwords.txt 10.10.101.155 -t 4 ssh -V
People who have used Hydra will be familiar with the syntax here, but for those who aren't, let's break it down:
-f this sets hydra to stop running once it finds a match
-L userlist.txt this is the path to the user name file. If we knew the username and wanted a static value we'd use -l username
-P encoded_passwords.txt this is the path to the password file. Again if we knew the password and wanted a static value we'd use -p password
10.10.101.155 our target
-t 4 ssh the number of threads and the attack mode (Hydra can be used for more than just http_post it seems). You can specify more threads, but it will throw a warning and suggest just 4 - So, lets stick with that.
-V verbose mode - We could leave this off if we didn't want to see the print outs of the attempts
You can also run hydra help to view the various options, but in my opinion, it's not quite as informative as patator.
With the Hydra command running in the background, there isn't much more to do than wait as this may need a few hundred attempts to find the password, and that may take a few minutes... And while we're waiting, we might as well make use of the time. So let's look at how to do the same with Patator:
patator ssh_login host=10.10.101.155 user=FILE0 password=@@FILE1@@ 0=userlist.txt 1=found_passwords.txt -x ignore:mesg='Authentication failed.' -x quit:mesg!='Authentication failed.' -e @@:<encoding_type>
As with our hydra command, let's break this down:
ssh_login the method we'll be using
host=10.10.101.155 our target
user=FILE0 password=@@FILE1@@ the file placeholders for our passwords and usernames. If we wanted a static value, we would just put the username / password, like user=username a key thing to note here is that our password file is bracketed by @@ . That is tied into our encoding.
1=userlist.txt 0=found_passwords.txt the files for our placeholders. Don't get them in the wrong order!
-x ignore:mesg='Authentication failed.' patator is verbose by default, so if we want to ignore the failed attempts, we need to include an ignore condition.
-x quit:mesg!='Authentication failed.' the equivalent of hydras -f, sets the exit condition . In this instance, we will quit when we get a message this isn't Authentication failed.
-e @@:<encoding_type> the encoding type. There are a few to choose from, so check the patator help menu (type patator ssh_login -h )
Patator works slightly differently to Hydra. With Hydra, we had to specify a text file that had our encoded passwords in it already. For Patator we can create a plaintext file called found_passwords.txt and pass an encoding type as a parameter. Patator will then encode the plain text password with this encoding type for us. So before running the above command, you will need to create a file called found_passwords.txt containing the two passwords found in Task 5 and Task 6 without any encoding. When running the command, you will not see any output until we find the password as we are ignoring any response that returns Authentication failed. Remember though, Patator will display the plaintext password without the encoding.
The downside is is that we can only specify one encoding type at a time when we run the command, so you will need to run it multiple times, once with each encoding, or try it after you've worked out what the encoding type should be. But it is always good to know there are multiple ways to brute a login.
Answer the questions below
What is the SSH username?
tommyboy1
What is their password (the encoded version) ?
1qaz%40WSX
What kind of encoding is this?
url
Brute forcing - Hashes
Hash cracking? But I thought this was a brute force lab?
Well, it is - Hash cracking is really a form of brute forcing. This isn't a hash cracking / algorithm room, but the basics you need to know:
Hash functions are one-way functions. This means they are easy to compute and should be hard to reverse ( we won't go into things like SHAttered here, but it is worth looking at if you're interested)
The same input will create the same output (we'll cover the use of salts further down the line)
So as we cannot reverse the hash function, to crack a password hash, if we know what the algorithm used was, we can create a list of hashes using common or known passwords (a wordlist, for example). We can then compare our created hash to the hash we are trying to "crack". If you've got a match, you know the password.
So you see, when you're cracking a hash really, you're engaging in a brute force attack by simply testing your luck creating hashes until you find a match. Not only that but brute force is a type of hash cracking - Brute force-ception. The most common use case for hash cracking is that you provide a wordlist (like the ever popular rockyou) and let the cracker cycle through until it finds a match for the hash. But if you don't have a wordlist, or you've tried that already and got nowhere, you can double down on the brute force and have the cracker create it's own passwords on the fly to hash. This is what we'll be looking at in this task. Now, of course, these aren't the only hash cracking methods. Lookup tables with all the pre-cracked hashes (like crackstation) and rainbow tables are other hash cracking methods but also outside the scope of this room. So back to the room and task at hand - lets begin!
We have now got full SSH access to our VM now as our username and encoded password from Task 7, so we can log in via SSH and look around and see if there is anything interesting. One of the first things we might want is to see what our current user can and can't do. In this instance, let's try running a sudo command as our user:
sudo cat /etc/shadow
The shadow file is a great place to start (especially if we're after some hashes to crack) - But no such luck... Let's check the shadow files permissions though. Maybe there is more than one way to cat a file.
If we check the permissions using the command ls -l /etc/shadow, it looks like anyone can read the shadow file... Their mistake is our gain. Plus, it looks like if we read through the file there is another user on the system. Copy out the whole line starting with the username and add it to a file on your Kali or AttackBox machine. In this case, I've created the file hash.txt. The username is intentionally blanked out in the screenshot so that you can work out the correct user.

Now there are two tools that (I at least think) are synonymous with hash cracking - John the ripper and Hashcat. There are pros and cons to both, and we won't get bogged down here going into that in detail. Safe to say, either one is going to be fine for our purpose here. Let's start with Hashcat.
If we want to use Hashcat the first thing we'll need to do is work out the hash type we've got. Some of the Linux ninjas out there might not need to even bother with that. But it's handy to know how to. So let's start there. If we look at the Hashcat wiki there is a link, for Example hashes. If we go to that page, we can see that it lists the hash mode, hash name and shows us an example. Your first challenge, working out the hash type we're dealing with here and subsequent mode.
Once we have the mode, we can build our Hashcat command. If we look at the Hashcat help command (hashcat -h) at the end, it will show some basic examples. We can use those to build our command. Now a commonly seen use for Hashcat is to use a wordlist, like
But in this case, we don't know if our password is in a wordlist, and use cases like that are covered very widely. So instead we're going to use the hashcat brute force attack.
Now the mask is essentially how we tell Hashcat the key space to brute force. It requires that we know a few details about the password we're cracking in advance, like how many characters and what those characters are (ideally). The more information we have, the more we can make sure our mask is accurate and reduce the key space, making our brute force hash crack attempt quicker. Using this information we can use the hashcat built in charsets to create a mask to match our password and crack it. For example, using the charsets provided by hashcat if we wanted to brute force a 5 character password that is made up of all digit characters, except the middle one, which is an upper case character our mask would be:
?d?d?u?d?d
Making our whole command (if this was say an SHA1 hash):
hashcat -a 3 -m 100 hash.txt ?d?d?u?d?d
This will then cycle through creating passwords that match this mask, for example 11A11, 21A11, 31A11, etc. Hashing them (using the provided hash type, in this case SHA1), and then testing them to see if they match the provided hash. So if our hashed password was 12E45, eventually this would happen:
11A11-> Hashed = 1F4A4922FFFDB189E4D3D479C1376C69CC24026A - Incorrect!
11A12 -> Hashed = 6DCD18DD86B0B6350BF82EEF98A1256B0AEC7026 - Incorrect! ...
...
...
11E45 -> Hashed = 3B88EF20F8305D09681CB6CF0F9EAC9963B8947E - Incorrect!
12E45 -> Hashed = BBB1BD3B59508DBC913D758ECF492F3327F7B634 - Correct!
The way the keyspace is searched will depend on the number of characters provided and is detailed in the provided link above. This is simply to illustrates how the process will work, when using the mask brute force attack.
In our case, we can tell you that the password is 5 characters long and is made up of all lower case characters, except the middle one, which is a digit. If you're wondering how do we know that, we used a tried and tested method to work it out, best illustrated here. Armed with this information, we can create our mask. Check the page linked above to see how to format your mask to check for two lowercase characters, a digit, followed by two more lower case characters. Now we have all the puzzle pieces, it's time to get cracking - Brute force style! This might take a bit of time, but it will work I promise. If you get beyond 10% progress (you can view this by entering s during your Hashcat crack to view the status), something has gone wrong. Make sure you copied the correct line and use the right mode, mask, etc.
Once the password has been cracked, Hashcat will display to the screen the hash that was found, followed by a colon and then the password. Alternatively, Hashcat remembers the found passwords, and you can run the following command to display the cracked hashes:
So that's hashcat covered - What about John the ripper? Well, the command to use John is not very different. The only major difference is that with John we don't need to specify the hash type. However, we can specify the type with the format flag or run it without, and John will do it's best to automatically work out the hash type. For our hash we can just run the following:
Using the same mask as we did with Hashcat (to view the mask options refer to the relevant docs), John will crack the hash just like Hashcat. Due to the way it explores the search-space, it may need to get up to 50% progress to find the password. Likewise, you can pass John the --show option to display cracked passwords again once the password has been found.
BONUS: In the new users home directory is a folder that contains a python script and a .txt file. If you want to play around some more with the use of masks and hashcracking feel free to use the contents of these files.
If you read the python script, you'll see that this makes use of a hash and salt - Remember what we said before about how the same input creates the same output? Well, one way people have worked around this issue is the use of a salt. A salt is a value which is not part of the initial value / password but which can be appended or prepended during the hash process so that the same password creates a different hash.
Be warned if you want to try and brute force this hash using a mask attack, it will take a long time, so we didn't include it here. But it might give you an idea of how long trying to brute force a hash would be in a real user situation. You can also use a wordlist attack for this one (the provided passwords file will work fine as a wordlist here). Just make sure you've got the right mode (refer to the Example hashes).
One final note - If you look at the page for example hashes you'll notice there are a lot of them. The different algorithms being used can again be made different depending on the use of salts and even where the salt sits (before or after the password). You can get an idea of that just looking through the page. There is clearly a lot to the subject, which is beyond the scope of this room, but if you want to learn more a good place to start might be Hashing vs Encryption vs Encoding as well as How hashing works.
Answer the questions below
Which user can we crack the password for?
read the shadow file
crackme
What mode do we need for the user's hash?
Check the example page and run a Find for the first 3 chars of the hash
1800
What is the cracked password
cr4ck
What is the mask value we need to use?
Check the hashcat built in charsets
?l?l?d?l?l
Conclusion
That's it. You've reached the end, and if you've managed all of the above, you can now call yourself a brute force hero and in your utility belt a few more tools.
Most importantly, you hopefully know not only how to use these tools, but what tools can be used when and why they should (or shouldn't) be used. Knowing what command to run or how to run it is great. But if you know why, that is the most important thing because you'll find yourself getting stuck a lot less.
So thank you for completing the room. The material covered within this room was in part taken (with permission) from a Cyber Security masters course.
This room was created by myself (kafaka157) and Heisenberg.
Answer the questions below
Read the above
Completed
[[SQLMAP]]
Last updated